Avec CSS, utilisez " ... " pour bloc débordé de multilignes
avec
overflow: hidden;
text-overflow: ellipsis;
white-space: nowrap;
"..."apparaîtra à la fin de la ligne si débordé. Cependant, ceci sera indiqué dans une seule ligne. Mais je voudrais qu'elle soit présentée en plusieurs lignes.
Il peut ressembler à:
+--------------------+
|abcde feg hij   dkjd|
|dsji jdia js ajid  s|
|jdis ajid dheu d ...|/*Here it's overflowed, so "..." is shown. */
+--------------------+
17 réponses
il y a aussi plusieurs plugins jquery qui traitent de cette question, mais beaucoup ne traitent pas plusieurs lignes de texte. Œuvres suivantes:
- http://pvdspek.github.com/jquery.autoellipsis /
- http://dotdotdot.frebsite.nl /
- http://keith-wood.name/more.html
- http://github.com/tbasse/jquery-truncate
il y a aussi quelques tests de préformance .
j'ai piraté autour jusqu'à ce que j'ai réussi à atteindre quelque chose proche de cela. Il est livré avec quelques mises en garde:
- ce n'est pas du CSS pur; il faut ajouter quelques éléments HTML. Il n'y a cependant pas de JavaScript requis.
- l'ellipse est alignée à droite sur la dernière ligne. Cela signifie que si votre texte n'est pas aligné ou justifié à droite, il peut y avoir un écart perceptible entre le dernier mot visible et l'ellipse (selon la longueur de le premier mot caché).
- l'espace pour l'ellipse est toujours réservé. Cela signifie que si le texte s'inscrit dans la case de façon presque précise, il peut être inutilement tronqué (le dernier mot est caché, bien qu'il ne le soit pas techniquement).
- votre texte doit avoir une couleur de fond fixe, puisque nous utilisons des rectangles de couleur pour cacher l'ellipse dans les cas où il n'est pas nécessaire.
je dois également noter que le le texte sera brisé à une limite de mots, pas à une limite de caractères. C'était délibéré (puisque je considère que c'est mieux pour les textes plus longs), mais parce que c'est différent de ce que text-overflow: ellipsis fait, j'ai pensé que je devrais le mentionner.
si vous pouvez vivre avec ces mises en garde, le HTML ressemble à ceci:
<div class="ellipsify">
<div class="pre-dots"></div>
<div class="dots">…</div>
<!-- your text here -->
<span class="hidedots1"></span>
<div class="hidedots2"></div>
</div>
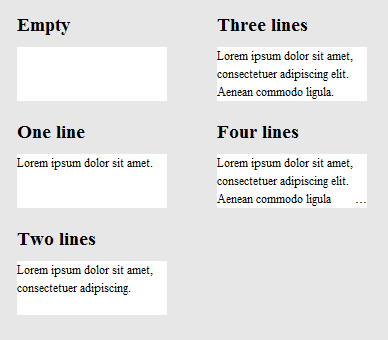
et c'est le CSS correspondant, en utilisant l'exemple d'une boîte de 150 pixels de large avec trois lignes de texte sur un fond blanc. Il suppose que vous avez une réinitialisation CSS ou similaire qui fixe les marges et les capitonnages à zéro si nécessaire.
/* the wrapper */
.ellipsify {
    font-size:12px;
    line-height:18px;
    height: 54px;       /* 3x line height */
    width: 150px;
    overflow: hidden;
    position: relative; /* so we're a positioning parent for the dot hiders */
    background: white;
}

/* Used to push down .dots. Can't use absolute positioning, since that
   would stop the floating. Can't use relative positioning, since that
   would cause floating in the wrong (namely: original) place. Can't
   change height of #dots, since it would have the full width, and
   thus cause early wrapping on all lines. */
.pre-dots {
    float: right;
    height: 36px;  /* 2x line height (one less than visible lines) */
}

.dots {
    float: right; /* to make the text wrap around the dots */
    clear: right; /* to push us below (not next to) .pre-dots */
}

/* hides the dots if the text has *exactly* 3 lines */
.hidedots1 {
    background: white;
    width: 150px;
    height: 18px;       /* line height */
    position: absolute; /* otherwise, because of the width, it'll be wrapped */
}

/* hides the dots if the text has *less than* 3 lines */
.hidedots2 {
    background: white;
    width: 150px;
    height: 54px;       /* 3x line height, to ensure hiding even if empty */
    position: absolute; /* ensures we're above the dots */
}
le résultat ressemble à ceci:
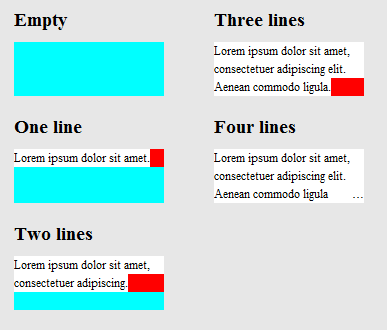
pour clarifier comment cela fonctionne, voici la même image, sauf que .hidedots1 est éclairé en rouge, et .hidedots2 en cyan. Ce sont les rectangles qui cachent les ellipses quand il n'y a pas de texte invisible:
testé en IE9, IE8 (émulé), Chrome, Firefox, Safari, et Opera. Ne fonctionne pas dans IE7.
voici un récent CSS-tricks article qui traite de ceci.
certaines des solutions de l'article ci-dessus (qui ne sont pas mentionnées ici) sont
1) -webkit-line-clamp et 2 )Placer un élément absolument positionné en bas à droite avec fondu
les deux méthodes supposent la majoration suivante:
<div class="module"> /* Add line-clamp/fade class here*/
  <p>Text here</p>
</div>
avec css
.module {
  width: 250px;
  overflow: hidden;
}
1) -webkit-ligne-clamp
Line-clamp FIDDLE (..pour un maximum de 3 lignes)
.line-clamp {
  display: -webkit-box;
  -webkit-line-clamp: 3;
  -webkit-box-orient: vertical;
  max-height: 3.6em; /* I needed this to get it to work */
}
2) fade out
disons que vous positionnez la ligne-hauteur à 1,2 em. Si nous voulons exposer trois lignes de texte, nous pouvons juste faire la hauteur du conteneur 3.6 em (1.2 em × 3). Le débordement caché cachera le reste.
p
{
    margin:0;padding:0;
}
.module {
  width: 250px;
  overflow: hidden;
  border: 1px solid green;
  margin: 10px;
}

.fade {
  position: relative;
  height: 3.6em; /* exactly three lines */
}
.fade:after {
  content: "";
  text-align: right;
  position: absolute;
  bottom: 0;
  right: 0;
  width: 70%;
  height: 1.2em;
  background: linear-gradient(to right, rgba(255, 255, 255, 0), rgba(255, 255, 255, 1) 50%);
}
Solution #3-une combinaison utilisant @supports
nous pouvons utiliser les soutiens @pour appliquer la pince de ligne de webkit sur les navigateurs webkit et appliquer fondu dehors dans d'autres navigateurs.
@prise en charge de la pince avec un violon de repli
<div class="module line-clamp">
  <p>Pellentesque habitant morbi tristique senectus et netus et malesuada fames ac turpis egestas. Vestibulum tortor quam, feugiat vitae, ultricies eget, tempor sit amet, ante. Donec eu libero sit amet quam egestas semper. Aenean ultricies mi vitae est. Mauris placerat eleifend leo.</p>
</div>
CSS
.module {
  width: 250px;
  overflow: hidden;
  border: 1px solid green;
  margin: 10px;
}

.line-clamp {
      position: relative;
      height: 3.6em; /* exactly three lines */
    }
.line-clamp:after {
      content: "";
      text-align: right;
      position: absolute;
      bottom: 0;
      right: 0;
      width: 70%;
      height: 1.2em;
      background: linear-gradient(to right, rgba(255, 255, 255, 0), rgba(255, 255, 255, 1) 50%);
 }

@supports (-webkit-line-clamp: 3) {
    .line-clamp {
        display: -webkit-box;
        -webkit-line-clamp: 3;
        -webkit-box-orient: vertical;
        max-height:3.6em; /* I needed this to get it to work */
        height: auto;
    }
    .line-clamp:after {
        display: none;
    }
}
le lien ci-dessous fournit une solution HTML / CSS pure à ce problème.
prise en charge du Navigateur - comme indiqué dans l'article:
jusqu'à présent nous avons testé sur Safari 5.0, i.e. 9 (doit être en mode standard)), Opera 12 et Firefox 15.
navigateurs plus anciens fonctionneront encore assez bien, comme la viande de la mise en page est dans les propriétés normales de positionnement, de marge et de rembourrage. si votre plate-forme plus ancienne (par exemple Firefox 3.6, IE 8), Vous pouvez utiliser la méthode mais refaire le gradient Comme image PNG autonome ou filtre DirectX.
http://www.mobify.com/dev/multiline-ellipsis-in-pure-css
le css:
p { margin: 0; padding: 0; font-family: sans-serif;}

.ellipsis {
    overflow: hidden;
    height: 200px;
    line-height: 25px;
    margin: 20px;
    border: 5px solid #AAA; }

.ellipsis:before {
    content:"";
    float: left;
    width: 5px; height: 200px; }

.ellipsis > *:first-child {
    float: right;
    width: 100%;
    margin-left: -5px; }

.ellipsis:after {
    content: "026";

    box-sizing: content-box;
    -webkit-box-sizing: content-box;
    -moz-box-sizing: content-box;

    float: right; position: relative;
    top: -25px; left: 100%;
    width: 3em; margin-left: -3em;
    padding-right: 5px;

    text-align: right;

    background: -webkit-gradient(linear, left top, right top,
        from(rgba(255, 255, 255, 0)), to(white), color-stop(50%, white));
    background: -moz-linear-gradient(to right, rgba(255, 255, 255, 0), white 50%, white);
    background: -o-linear-gradient(to right, rgba(255, 255, 255, 0), white 50%, white);
    background: -ms-linear-gradient(to right, rgba(255, 255, 255, 0), white 50%, white);
    background: linear-gradient(to right, rgba(255, 255, 255, 0), white 50%, white); }
le code html:
<div class="ellipsis">
<div>
<p>Call me Ishmael. Some years ago – never mind how long precisely – having little or no money in my purse, and nothing particular to interest me on shore, I thought I would sail about a little and see the watery part of the world. It is a way I have of driving off the spleen, and regulating the circulation. Whenever I find myself growing grim about the mouth; whenever it is a damp, drizzly November in my soul; whenever I find myself involuntarily pausing before coffin warehouses, and bringing up the rear of every funeral I meet; and especially whenever my hypos get such an upper hand of me, that it requires a strong moral principle to prevent me from deliberately stepping into the street, and methodically knocking people's hats off – then, I account it high time to get to sea as soon as I can.</p>
</div>
</div>
le violon
(redimensionnez la fenêtre du navigateur pour tester)
après avoir examiné la spécification W3 pour text-overflow , Je ne pense pas que cela soit possible en utilisant seulement CSS. Ellipsis est une propriété new-ish, donc il n'a probablement pas encore reçu beaucoup d'usage ou de commentaires.
Toutefois, ce mec semble avoir demandé à un semblable (ou identiques) de la question, et que quelqu'un était en mesure de venir avec une belle jQuery solution. Vous pouvez faire une démonstration de la solution ici: http://jsfiddle.net/MPkSF/
si javascript n'est pas une option, je pense que vous n'avez pas de chance...
je veux juste ajouter à cette question par souci d'exhaustivité.
- Opera a un support non standard pour cela appelé -o-ellipsis-lastline .
- dotdotdot est un grand plugin jQuery que je peux recommander.
grande question... J'aimerais qu'il y ait une réponse, mais c'est ce qui se rapproche le plus de la CSS de nos jours. Pas de points de suspension, mais encore assez utilisable.
overflow: hidden;
line-height: 1.2em;
height: 3.6em;      // 3 lines * line-height
j'ai trouvé cette solution css (scss) qui fonctionne assez bien. Sur les navigateurs webkit il montre l'ellipse et sur d'autres navigateurs il tronque juste le texte. Ce qui est parfait pour mon usage prévu.
$font-size: 26px;
$line-height: 1.4;
$lines-to-show: 3;

h2 {
  display: block; /* Fallback for non-webkit */
  display: -webkit-box;
  max-width: 400px;
  height: $font-size*$line-height*$lines-to-show; /* Fallback for non-webkit */
  margin: 0 auto;
  font-size: $font-size;
  line-height: $line-height;
  -webkit-line-clamp: $lines-to-show;
  -webkit-box-orient: vertical;
  overflow: hidden;
  text-overflow: ellipsis;
}
un exemple du créateur: http://codepen.io/martinwolf/pen/qlFdp
Voici la solution la plus proche que j'ai pu obtenir en utilisant juste css.
HTML
<div class="ellipsis"> <span>...</span>
Hello this is Mr_Green from Stackoverflow. I love CSS. I live in CSS and I will never leave working on CSS even my work is on other technologies.</div>
CSS
div {
    height: 3em;
    line-height: 1.5em;
    width: 80%;
    border: 1px solid green;
    overflow: hidden;
    position: relative;
}
div:after {
    content:". . . . . . . . . . . . . . . . . . . . . . . . . . . . . . . . . . . . . . . . . . . .  . . . . . . . . . . . . . . . . . . . . . . . . . . . . . . . . . . . . . . . . . . . . . . . . . . . . . . . . . . . . . . . . . . . . . . . .  . . . . . . . . . . . . . . . . . . . . . . . . . . . . . . . . . . . . . . . . . . . . . . . . . . . . . . . . . . . . . . . . . . . . . . . .  . . . . . . . . . . . . . . . . . . . . . . . . . . . .";
    background-color: white;
    color: white;
    display: inline;
    position: relative;
    box-shadow: 8px 1px 1px white;
    z-index: 1;
}
span {
    position: absolute;
    bottom: 0px;
    right: 0px;
    background-color: white;
}
violon de travail ( redimensionner la fenêtre pour vérifier )
lien vers mon blog pour une explication
Mise À Jour De Violon
j'espère maintenant quelques css expert en aurait eu idée sur la façon de le rendre parfait. :)
Dans votre cas, ce qui suit doit être efficace et suffisant.
  display: -webkit-box;
  -webkit-line-clamp: 3;
  -webkit-box-orient: vertical;
  overflow: hidden;
  text-overflow: ellipsis;
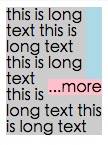
un peu tard pour cette fête, mais j'ai trouvé, ce que je pense, est une solution unique. Plutôt que d'essayer d'insérer votre propre ellipse à travers CSS trickery ou js j'ai pensé que je voudrais essayer et rouler avec la seule restriction de ligne simple. Donc je duplique le texte pour chaque "ligne" et j'utilise juste un tiret de texte négatif pour m'assurer qu'une ligne commence là où la dernière s'arrête. FIDDLE
CSS:
#wrapper{
    font-size: 20pt;
    line-height: 22pt;
    width: 100%;
    overflow: hidden;
    padding: 0;
    margin: 0;
}

.text-block-line{
    height: 22pt;
    display: inline-block;
    max-width: 100%;
    overflow: hidden;
    white-space: nowrap;
    width: auto;
}
.text-block-line:last-child{
    text-overflow: ellipsis;
}

/*the follwing is suboptimal but neccesary I think. I'd probably just make a sass mixin that I can feed a max number of lines to and have them avialable. Number of lines will need to be controlled by server or client template which is no worse than doing a character count clip server side now. */
.line2{
    text-indent: -100%;
}
.line3{
    text-indent: -200%;
}
.line4{
    text-indent: -300%;
}
HTML:
<p id="wrapper" class="redraw">
    <span class="text-block-line line1">This text is repeated for every line that you want to be displayed in your element. This example has a max of 4 lines before the ellipsis occurs. Try scaling the preview window width to see the effect.</span>
    <span class="text-block-line line2">This text is repeated for every line that you want to be displayed in your element. This example has a max of 4 lines before the ellipsis occurs. Try scaling the preview window width to see the effect.</span>
    <span class="text-block-line line3">This text is repeated for every line that you want to be displayed in your element. This example has a max of 4 lines before the ellipsis occurs. Try scaling the preview window width to see the effect.</span>
    <span class="text-block-line line4">This text is repeated for every line that you want to be displayed in your element. This example has a max of 4 lines before the ellipsis occurs. Try scaling the preview window width to see the effect.</span>
</p>
plus de détails dans le violon. Il ya un problème avec le retour du navigateur que j'utilise un js redessiné pour et ainsi de faire vérifier, mais c'est le concept de base. Toutes les pensées/suggestions sont très appréciées.
merci @ balpha et @Kevin, je combine deux méthodes ensemble.
pas de js nécessaires dans cette méthode.
vous pouvez utiliser background-image et aucun gradient nécessaire pour cacher des points.
le innerHTML de .ellipsis-placeholder n'est pas nécessaire, j'utilise .ellipsis-placeholder pour garder la même largeur et la hauteur avec .ellipsis-more .
Vous pouvez utiliser display: inline-block à la place.
.ellipsis {
    overflow: hidden;
    position: relative;
}
.ellipsis-more-top {/*push down .ellipsis-more*/
    content: "";
    float: left;
    width: 5px;
}
.ellipsis-text-container {
    float: right;
    width: 100%;
    margin-left: -5px;
}
.ellipsis-more-container {
    float: right;
    position: relative;
    left: 100%;
    width: 5px;
    margin-left: -5px;
    border-right: solid 5px transparent;
    white-space: nowrap;
}
.ellipsis-placeholder {/*keep text around ,keep it transparent ,keep same width and height as .ellipsis-more*/
    float: right;
    clear: right;
    color: transparent;
}
.ellipsis-placeholder-top {/*push down .ellipsis-placeholder*/
    float: right;
    width: 0;
}
.ellipsis-more {/*ellipsis things here*/
    float: right;
}
.ellipsis-height {/*the total height*/
    height: 3.6em;
}
.ellipsis-line-height {/*the line-height*/
    line-height: 1.2;
}
.ellipsis-margin-top {/*one line height*/
    margin-top: -1.2em;
}
.ellipsis-text {
    word-break: break-all;
}
<div class="ellipsis ellipsis-height ellipsis-line-height">
<div class="ellipsis-more-top ellipsis-height"></div>
<div class="ellipsis-text-container">
<div class="ellipsis-placeholder-top ellipsis-height ellipsis-margin-top"></div>
<div class="ellipsis-placeholder">
<span>...</span><span>more</span>
</div>
<span class="ellipsis-text">text text text text text text text text text text text text text text text text text text text text text text text text text text text text text text text text text text text text text text text text text text text text text text text text text text text text text text text text text text text </span>
</div>
<div class="ellipsis-more-container ellipsis-margin-top">
<div class="ellipsis-more">
<span>...</span><span>more</span>
</div>
</div>
</div>il y a beaucoup de réponses ici mais j'avais besoin d'une qui était:
- CSS Only
- Future-proof (devient de plus en plus compatible avec le temps)
- ne va Pas à briser les mots d'intervalle (seulement sauts sur des espaces)
Le problème, c'est qu'il ne fournit pas des points de suspension pour les navigateurs qui ne supportent pas le "151920920 de la règle" (actuellement, c'est à dire, Edge, Firefox), mais il utilise un gradient fade leur texte hors.
.clampMe {
  position: relative;
  height: 2.4em;
  overflow: hidden;
}

.clampMe:after {
  content: "";
  text-align: right;
  position: absolute;
  bottom: 0;
  right: 0;
  width: 50%;
  height: 1.2em; /* Just use multiples of the line-height */
  background: linear-gradient(to right, rgba(255, 255, 255, 0), rgba(255, 255, 255, 1) 80%);
}

/* Now add in code for the browsers that support -webkit-line-clamp and overwrite the non-supportive stuff */
@supports (-webkit-line-clamp: 2) {
  .clampMe {
      overflow: hidden;
      text-overflow: ellipsis;
      display: -webkit-box;
      -webkit-line-clamp: 2;
      -webkit-box-orient: vertical;
  }

  .clampMe:after {
    display: none;
  }
}
<p class="clampMe">There's a lot more text in here than what you'll ever see. Pellentesque habitant testalotish morbi tristique senectus et netus et malesuada fames ac turpis egestas. Vestibulum tortor quam, feugiat vitae, ultricies eget, tempor sit amet, ante. Donec eu libero sit amet quam egestas semper. Aenean ultricies mi vitae est. Mauris placerat eleifend leo.</p>vous pouvez le voir en action dans ce CodePen et vous pouvez également voir une version Javascript ici (no jQuery).
la solution javascript sera meilleure
- obtenir le nombre de lignes de texte
- bascule
is-ellipsisclasse si la fenêtre redimensionner ou changer
getRowRects
Element.getClientRects() fonctionne comme ce

chaque rect dans la même rangée a le même valeur top , donc trouver les rects avec différente valeur top , comme ce

function getRowRects(element) {
    var rects = [],
        clientRects = element.getClientRects(),
        len = clientRects.length,
        clientRect, top, rectsLen, rect, i;

    for(i=0; i<len; i++) {
        has = false;
        rectsLen = rects.length;
        clientRect = clientRects[i];
        top = clientRect.top;
        while(rectsLen--) {
            rect = rects[rectsLen];
            if (rect.top == top) {
                has = true;
                break;
            }
        }
        if(has) {
            rect.right = rect.right > clientRect.right ? rect.right : clientRect.right;
            rect.width = rect.right - rect.left;
        }
        else {
            rects.push({
                top: clientRect.top,
                right: clientRect.right,
                bottom: clientRect.bottom,
                left: clientRect.left,
                width: clientRect.width,
                height: clientRect.height
            });
        }
    }
    return rects;
}
float ...more
comme ce
détecter la redimensionnement de fenêtre ou le changement d'élément
comme ce


display: -webkit-box;
-webkit-line-clamp: 3;
-webkit-box-orient: vertical;
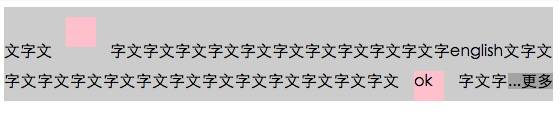
un pur css méthode base sur webkit-ligne-clamp:
@-webkit-keyframes ellipsis {/*for test*/
    0% { width: 622px }
    50% { width: 311px }
    100% { width: 622px }
}
.ellipsis {
    max-height: 40px;/* h*n */
    overflow: hidden;
    background: #eee;

    -webkit-animation: ellipsis ease 5s infinite;/*for test*/
    /**
    overflow: visible;
    /**/
}
.ellipsis .content {
    position: relative;
    display: -webkit-box;
    -webkit-box-orient: vertical;
    -webkit-box-pack: center;
    font-size: 50px;/* w */
    line-height: 20px;/* line-height h */
    color: transparent;
    -webkit-line-clamp: 2;/* max row number n */
    vertical-align: top;
}
.ellipsis .text {
    display: inline;
    vertical-align: top;
    font-size: 14px;
    color: #000;
}
.ellipsis .overlay {
    position: absolute;
    top: 0;
    left: 50%;
    width: 100%;
    height: 100%;
    overflow: hidden;

    /**
    overflow: visible;
    left: 0;
    background: rgba(0,0,0,.5);
    /**/
}
.ellipsis .overlay:before {
    content: "";
    display: block;
    float: left;
    width: 50%;
    height: 100%;

    /**
    background: lightgreen;
    /**/
}
.ellipsis .placeholder {
    float: left;
    width: 50%;
    height: 40px;/* h*n */

    /**
    background: lightblue;
    /**/
}
.ellipsis .more {
    position: relative;
    top: -20px;/* -h */
    left: -50px;/* -w */
    float: left;
    color: #000;
    width: 50px;/* width of the .more w */
    height: 20px;/* h */
    font-size: 14px;

    /**
    top: 0;
    left: 0;
    background: orange;
    /**/
}
<div class='ellipsis'>
<div class='content'>
<div class='text'>text text text text text text text text text text text text text text text text text text text text text </div>
<div class='overlay'>
<div class='placeholder'></div>
<div class='more'>...more</div>
</div>
</div>
</div>j'ai trouvé un script javascript tromper, mais vous devez utiliser la longueur de la chaîne. Disons que vous voulez 3 lignes de largeur 250px, vous pouvez calculer la longueur par ligne i.e.
//get the total character length.
//Haha this might vary if you have a text with lots of "i" vs "w"
var totalLength = (width / yourFontSize) * yourNumberOfLines

//then ellipsify
function shorten(text, totalLength) {
    var ret = text;
    if (ret.length > totalLength) {
        ret = ret.substr(0, totalLength-3) + "...";
    }
    return ret;
}