Uitable viewcell, affiche le bouton Supprimer sur le balayage
Comment puis-je obtenir le bouton Supprimer pour afficher lors d'un balayage sur un UITableViewCell ? L'événement n'est jamais évoquée, et le bouton supprimer n'apparaît jamais.
17 réponses
pendant le démarrage dans (-viewDidLoad or in storyboard) faire:
self.tableView.allowsMultipleSelectionDuringEditing = NO;
outrepasser pour supporter l'édition conditionnelle de la vue de table. Cela ne doit être mis en œuvre que si vous devez retourner NO pour certains articles. Par défaut, tous les éléments sont modifiables.
- (BOOL)tableView:(UITableView *)tableView canEditRowAtIndexPath:(NSIndexPath *)indexPath {
    // Return YES if you want the specified item to be editable.
    return YES;
}

// Override to support editing the table view.
- (void)tableView:(UITableView *)tableView commitEditingStyle:(UITableViewCellEditingStyle)editingStyle forRowAtIndexPath:(NSIndexPath *)indexPath {
    if (editingStyle == UITableViewCellEditingStyleDelete) {
        //add code here for when you hit delete
    }
}
cette réponse a été mise à jour à Swift 3
je pense toujours qu'il est agréable d'avoir un exemple très simple, autonome de sorte que rien n'est supposé quand j'apprends une nouvelle tâche. Cette réponse est celle pour supprimer les lignes UITableView . Le projet fonctionne comme ceci:
ce projet est basé sur le UITableView exemple pour Swift .
ajouter le Code
créer un nouveau projet et remplacer le ViewController.code swift avec ce qui suit.
import UIKit
class ViewController: UIViewController, UITableViewDelegate, UITableViewDataSource {

    // These strings will be the data for the table view cells
    var animals: [String] = ["Horse", "Cow", "Camel", "Pig", "Sheep", "Goat"]

    let cellReuseIdentifier = "cell"

    @IBOutlet var tableView: UITableView!

    override func viewDidLoad() {
        super.viewDidLoad()

        // It is possible to do the following three things in the Interface Builder
        // rather than in code if you prefer.
        self.tableView.register(UITableViewCell.self, forCellReuseIdentifier: cellReuseIdentifier)
        tableView.delegate = self
        tableView.dataSource = self
    }

    // number of rows in table view
    func tableView(_ tableView: UITableView, numberOfRowsInSection section: Int) -> Int {
        return self.animals.count
    }

    // create a cell for each table view row
    func tableView(_ tableView: UITableView, cellForRowAt indexPath: IndexPath) -> UITableViewCell {

        let cell:UITableViewCell = self.tableView.dequeueReusableCell(withIdentifier: cellReuseIdentifier) as UITableViewCell!

        cell.textLabel?.text = self.animals[indexPath.row]

        return cell
    }

    // method to run when table view cell is tapped
    func tableView(_ tableView: UITableView, didSelectRowAt indexPath: IndexPath) {
        print("You tapped cell number \(indexPath.row).")
    }

    // this method handles row deletion
    func tableView(_ tableView: UITableView, commit editingStyle: UITableViewCellEditingStyle, forRowAt indexPath: IndexPath) {

        if editingStyle == .delete {

            // remove the item from the data model
            animals.remove(at: indexPath.row)

            // delete the table view row
            tableView.deleteRows(at: [indexPath], with: .fade)

        } else if editingStyle == .insert {
            // Not used in our example, but if you were adding a new row, this is where you would do it.
        }
    }

}
la méthode de clé simple dans le code ci-dessus qui permet la suppression de ligne est la dernière. C'est encore une fois pour souligner:
// this method handles row deletion
func tableView(_ tableView: UITableView, commit editingStyle: UITableViewCellEditingStyle, forRowAt indexPath: IndexPath) {

    if editingStyle == .delete {

        // remove the item from the data model
        animals.remove(at: indexPath.row)

        // delete the table view row
        tableView.deleteRows(at: [indexPath], with: .fade)

    } else if editingStyle == .insert {
        // Not used in our example, but if you were adding a new row, this is where you would do it.
    }
}
Storyboard
Ajouter un UITableView au contrôleur de vue dans le storyboard. L'utilisation de l'auto disposition pour épingler les quatre côtés de la vue de table aux bords du contrôleur de vue. La traînée de contrôle de la vue de la table dans le storyboard à la ligne @IBOutlet var tableView: UITableView! dans le code.
fini
C'est tout. Vous devriez être en mesure d'exécuter votre application maintenant et supprimer des lignes balayez vers la gauche et en appuyant sur "Supprimer".
Variations
modifier le texte du bouton" Supprimer"
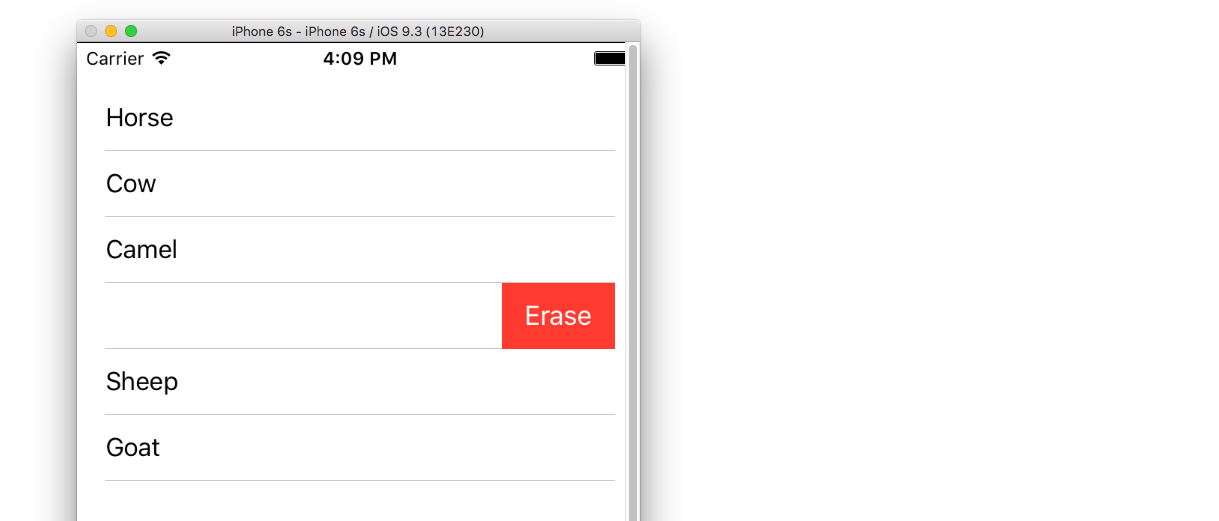
ajouter la méthode suivante:
func tableView(_ tableView: UITableView, titleForDeleteConfirmationButtonForRowAt indexPath: IndexPath) -> String? {
    return "Erase"
}
bouton Personnalisé actions
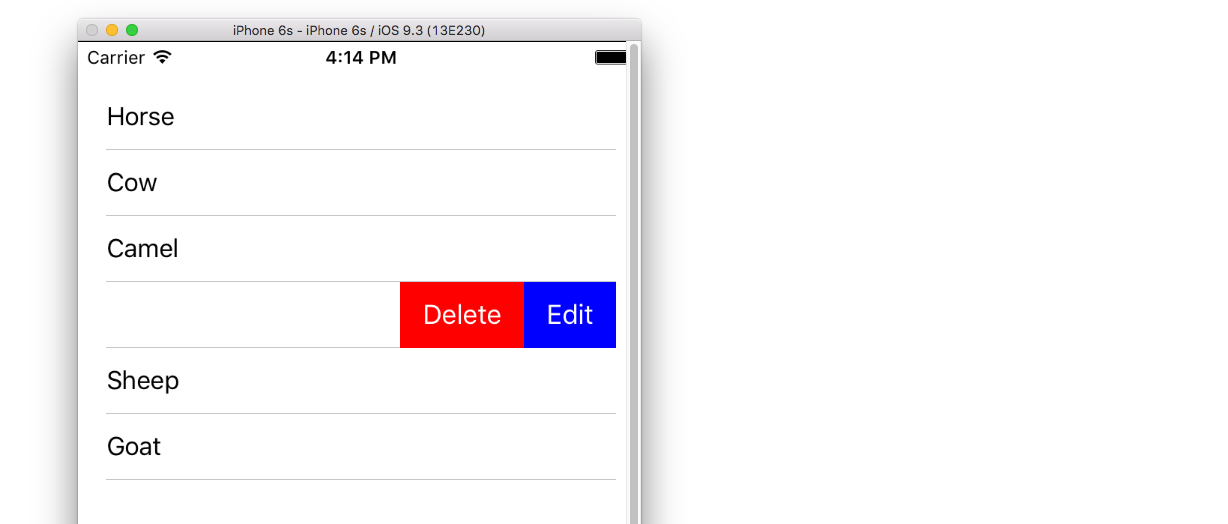
Ajouter la méthode suivante.
func tableView(_ tableView: UITableView, editActionsForRowAt indexPath: IndexPath) -> [UITableViewRowAction]? {

    // action one
    let editAction = UITableViewRowAction(style: .default, title: "Edit", handler: { (action, indexPath) in
        print("Edit tapped")
    })
    editAction.backgroundColor = UIColor.blue

    // action two
    let deleteAction = UITableViewRowAction(style: .default, title: "Delete", handler: { (action, indexPath) in
        print("Delete tapped")
    })
    deleteAction.backgroundColor = UIColor.red

    return [editAction, deleteAction]
}
notez que ce n'est disponible qu'à partir de iOS 8. Voir ce répondez pour plus de détails.
mise à jour pour iOS 11
Les Actionspeuvent être placées en tête ou en queue de la cellule à l'aide de méthodes ajoutées à L'API Uitable Viewdelegate dans iOS 11.
func tableView(_ tableView: UITableView,
                leadingSwipeActionsConfigurationForRowAt indexPath: IndexPath) -> UISwipeActionsConfiguration?
 {
     let editAction = UIContextualAction(style: .normal, title:  "Edit", handler: { (ac:UIContextualAction, view:UIView, success:(Bool) -> Void) in
             success(true)
         })
editAction.backgroundColor = .blue

         return UISwipeActionsConfiguration(actions: [editAction])
 }

 func tableView(_ tableView: UITableView,
                trailingSwipeActionsConfigurationForRowAt indexPath: IndexPath) -> UISwipeActionsConfiguration?
 {
     let deleteAction = UIContextualAction(style: .normal, title:  "Delete", handler: { (ac:UIContextualAction, view:UIView, success:(Bool) -> Void) in
         success(true)
     })
     deleteAction.backgroundColor = .red

     return UISwipeActionsConfiguration(actions: [deleteAction])
 }
Lire la suite
ce code indique comment mettre en œuvre la suppression.
#pragma mark - UITableViewDataSource

// Swipe to delete.
- (void)tableView:(UITableView *)tableView commitEditingStyle:(UITableViewCellEditingStyle)editingStyle forRowAtIndexPath:(NSIndexPath *)indexPath
{
    if (editingStyle == UITableViewCellEditingStyleDelete) {
        [_chats removeObjectAtIndex:indexPath.row];
        [tableView deleteRowsAtIndexPaths:@[indexPath] withRowAnimation:UITableViewRowAnimationAutomatic];
    }
}
optionnellement, dans votre commande d'initialisation, ajoutez la ligne ci-dessous pour afficher le bouton Modifier:
self.navigationItem.leftBarButtonItem = self.editButtonItem;
Note: je n'ai pas assez de réputation pour poster un commentaire dans la réponse de Kurbz.
la réponse de Kurbz est juste. Mais pour moi, il n'a jamais travaillé.
après une enquête, je me suis rendu compte que swipe-to-delete se produit quand ne pas éditer la vue de table. .
Je n'ai jamais vu cela explicitement déclaré comme tel. Sauf erreur de ma part, je n'ai trouvé aucun autre moyen de le faire fonctionner.
lorsque vous éditez, la commande delete et/ou reorder apparaîtra.
j'ai eu un problème que je viens de résoudre donc je le partage car il peut aider quelqu'un.
j'ai UITableView et j'ai ajouté les méthodes indiquées pour permettre à swipe de supprimer:
- (BOOL)tableView:(UITableView *)tableView canEditRowAtIndexPath:(NSIndexPath *)indexPath {
    // Return YES if you want the specified item to be editable.
    return YES;
}

// Override to support editing the table view.
- (void)tableView:(UITableView *)tableView commitEditingStyle:(UITableViewCellEditingStyle)editingStyle forRowAtIndexPath:(NSIndexPath *)indexPath {
    if (editingStyle == UITableViewCellEditingStyleDelete) {
        //add code here for when you hit delete
    }
}
je travaille sur une mise à jour qui me permet de mettre la table en mode édition et d'activer le multi-select. Pour ce faire, J'ai ajouté le code de L'échantillon D'Apple TableMultiSelect . Une fois que j'ai eu ce travail j'ai trouvé que mon glisser le suppression de la fonction avait cessé de fonctionner.
il s'avère que l'ajout de la ligne suivante à viewDidLoad était le problème:
self.tableView.allowsMultipleSelectionDuringEditing = YES;
avec cette ligne in, Le multi-select fonctionnerait mais le swipe à supprimer ne fonctionnerait pas. Sans la ligne, c'était l'inverse.
La correction:
ajouter la méthode suivante à votre viewController:
- (void)setEditing:(BOOL)editing animated:(BOOL)animated
{
    self.tableView.allowsMultipleSelectionDuringEditing = editing;
    [super setEditing:editing animated:animated];
}
puis en votre méthode qui met la table en mode édition (à partir d'un bouton appuyer par exemple), vous devez utiliser:
[self setEditing:YES animated:YES];
au lieu de:
[self.tableView setEditing:YES animated:YES];
cela signifie que le multi-sélect n'est activé que lorsque la table est en mode édition.
ci-dessous, Uitable Viewdatasource vous aidera pour le balayage supprimer
- (BOOL)tableView:(UITableView *)tableView canEditRowAtIndexPath:(NSIndexPath *)indexPath {
    // Return YES if you want the specified item to be editable.
    return YES;
}

- (void)tableView:(UITableView *)tableView commitEditingStyle:(UITableViewCellEditingStyle)editingStyle forRowAtIndexPath:(NSIndexPath *)indexPath {
    if (editingStyle == UITableViewCellEditingStyleDelete) {
        [arrYears removeObjectAtIndex:indexPath.row];
        [tableView reloadData];
    }
}
arr years is a Nsmutable Array and then reload the tableView
Swift
 func tableView(tableView: UITableView, canEditRowAtIndexPath indexPath: NSIndexPath) -> Bool {
            return true
        }

func tableView(tableView: UITableView, commitEditingStyle editingStyle: UITableViewCellEditingStyle, forRowAtIndexPath indexPath: NSIndexPath) {
    if editingStyle == UITableViewCellEditingStyleDelete {
        arrYears.removeObjectAtIndex(indexPath.row)
        tableView.reloadData()
    }
}
Dans iOS 8 et Swift 2.0 s'il vous plaît essayer cette,
override func tableView(tableView: UITableView, canEditRowAtIndexPath indexPath: NSIndexPath) -> Bool {
   // let the controller to know that able to edit tableView's row
   return true
}

override func tableView(tableView: UITableView, commitEdittingStyle editingStyle UITableViewCellEditingStyle, forRowAtIndexPath indexPath: NSIndexPath)  {
   // if you want to apply with iOS 8 or earlier version you must add this function too. (just left in blank code)
}

override func tableView(tableView: UITableView, editActionsForRowAtIndexPath indexPath: NSIndexPath) -> [UITableViewRowAction]?  {
   // add the action button you want to show when swiping on tableView's cell , in this case add the delete button.
   let deleteAction = UITableViewRowAction(style: .Default, title: "Delete", handler: { (action , indexPath) -> Void in

   // Your delete code here.....
   .........
   .........
   })

   // You can set its properties like normal button
   deleteAction.backgroundColor = UIColor.redColor()

   return [deleteAction]
}
la réponse de @Kurbz est géniale, mais je veux laisser cette note et espérer que cette réponse peut sauver des gens un certain temps.
j'avais parfois ces lignes dans mon contrôleur, et ils ont fait que la fonction de balayage ne fonctionnait pas.
- (UITableViewCellEditingStyle)tableView:(UITableView *)tableView editingStyleForRowAtIndexPath:(NSIndexPath *)indexPath{
    return UITableViewCellEditingStyleNone;
}
si vous utilisez UITableViewCellEditingStyleInsert ou UITableViewCellEditingStyleNone comme style d'édition, alors la fonction de balayage ne fonctionne pas. Vous ne pouvez utiliser que UITableViewCellEditingStyleDelete , qui est le style par défaut.
de plus, cela peut être réalisé dans SWIFT en utilisant la méthode suivante
func tableView(tableView: UITableView, commitEditingStyle editingStyle: UITableViewCellEditingStyle, forRowAtIndexPath indexPath: NSIndexPath) {
    if (editingStyle == UITableViewCellEditingStyle.Delete){
        testArray.removeAtIndex(indexPath.row)
        goalsTableView.deleteRowsAtIndexPaths([indexPath], withRowAnimation: UITableViewRowAnimation.Automatic)
    }
}
Swift 3
tout ce que vous avez à faire est d'activer ces deux fonctions:
func tableView(_ tableView: UITableView, canEditRowAt indexPath: IndexPath) -> Bool {

    return true

}

func tableView(_ tableView: UITableView, commit editingStyle: UITableViewCellEditingStyle, forRowAt indexPath: IndexPath) {

    if editingStyle == UITableViewCellEditingStyle.delete {
        tableView.reloadData()
    }

}
Swift 4
func tableView(_ tableView: UITableView, editActionsForRowAt indexPath: IndexPath) -> [UITableViewRowAction]? {
    let delete = UITableViewRowAction(style: .destructive, title: "delete") { (action, indexPath) in
        // delete item at indexPath
    tableView.deleteRows(at: [indexPath], with: .fade)

    }
    return [delete]
}
lorsque vous supprimez une cellule de votre tableview, vous devez également supprimer votre objet array à l'index X.
je pense que vous pouvez l'enlever en utilisant un geste de glissement. La vue de la table va appeler le Délégué:
- (void)tableView:(UITableView *)tableView commitEditingStyle:(UITableViewCellEditingStyle)editingStyle forRowAtIndexPath:(NSIndexPath *)indexPath {
    if (editingStyle == UITableViewCellEditingStyleDelete) {
        //add code here for when you hit delete
        [dataSourceArray removeObjectAtIndex:indexPath.row];
    }
}
après avoir enlevé l'objet. Vous devez recharger l'utilisation de tableview. Ajouter la ligne suivante dans votre code:
[tableView reloadData];
après que vous avez supprimé la ligne avec succès. Et quand vous rechargez la vue ou ajout de données à la source de données, l'objet ne sera plus là.
pour tous les autres est la réponse de Kurbz correct.
je voulais seulement vous rappeler que la fonction delegate ne sera pas suffisante si vous voulez supprimer l'objet du tableau DataSource.
j'espère que je vous ai aidé.
- (void)tableView:(UITableView *)tableView commitEditingStyle:(UITableViewCellEditingStyle)editingStyle forRowAtIndexPath:(NSIndexPath *)indexPath
{
    if (editingStyle == UITableViewCellEditingStyleDelete)
    {
        //add code here for when you hit delete
        [dataSourceArray removeObjectAtIndex:indexPath.row];
        [tableView deleteRowsAtIndexPaths:@[indexPath] withRowAnimation:UITableViewRowAnimationAutomatic];
    }
}
je sais que c'est une vieille question, mais la réponse de @Kurbz juste besoin de cela pour Xcode 6.3.2 et SDK 8.3
j'ai besoin d'ajouter [tableView beginUpdates] et [tableView endUpdates] (merci à @bay.phillips ici )
// Override to support editing the table view.
- (void)tableView:(UITableView *)tableView commitEditingStyle: (UITableViewCellEditingStyle)editingStyle forRowAtIndexPath:(NSIndexPath *)indexPath {
    // Open "Transaction"
    [tableView beginUpdates];

    if (editingStyle == UITableViewCellEditingStyleDelete) {
        // your code goes here
        //add code here for when you hit delete
        [tableView deleteRowsAtIndexPaths:@[indexPath] withRowAnimation:UITableViewRowAnimationFade];
     }

    // Close "Transaction"
    [tableView endUpdates];
}
Swift 2.2:
override func tableView(tableView: UITableView, canEditRowAtIndexPath indexPath: NSIndexPath) -> Bool {
    return true
}

override func tableView(tableView: UITableView,
    editActionsForRowAtIndexPath indexPath: NSIndexPath) -> [UITableViewRowAction]? {
    let delete = UITableViewRowAction(style: UITableViewRowActionStyle.Default, title: "DELETE"){(UITableViewRowAction,NSIndexPath) -> Void in

    print("Your action when user pressed delete")
}
let edit = UITableViewRowAction(style: UITableViewRowActionStyle.Normal, title: "EDIT"){(UITableViewRowAction,NSIndexPath) -> Void in

    print("Your action when user pressed edit")
}
    return [delete, block]
}
pour Swift, il suffit D'écrire ce code
func tableView(tableView: UITableView, commitEditingStyle editingStyle: UITableViewCellEditingStyle, forRowAtIndexPath indexPath: NSIndexPath) {
        if editingStyle == .Delete {
            print("Delete Hit")
        }
}
pour L'Objectif C, il suffit D'écrire ce code
- (void)tableView:(UITableView *)tableView commitEditingStyle:(UITableViewCellEditingStyle)editingStyle forRowAtIndexPath:(NSIndexPath *)indexPath {
       if (editingStyle == UITableViewCellEditingStyleDelete) {
            NSLog(@"index: %@",indexPath.row);
           }
}
pour le code swift4, première édition activée:
func tableView(_ tableView: UITableView, canEditRowAt indexPath: IndexPath) -> Bool {
    return true
}
puis vous ajoutez l'action delete à l'edit delegate:
func tableView(_ tableView: UITableView, editActionsForRowAt indexPath: IndexPath) -> [UITableViewRowAction]? {
    let action = UITableViewRowAction(style: .destructive, title: "Delete") { (_, index) in
        // delete model object at the index
        self.models[index.row]
        // then delete the cell
        tableView.beginUpdates()
        tableView.deleteRows(at: [index], with: .automatic)
        tableView.endUpdates()

    }
    return [action]
}