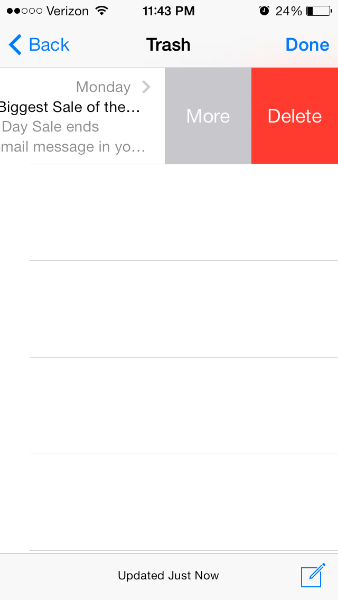
Glisser pour supprimer et le bouton "Plus" (comme dans l'application Mail sur iOS 7)
comment créer un bouton" Plus "lorsque l'utilisateur glisse une cellule dans la vue de table (comme application mail dans ios 7)
j'ai cherché cette information à la fois ici et dans le forum Cocoa Touch, mais je ne semble pas trouver la réponse et j'espère que quelqu'un de plus intelligent que moi peut me donner une solution.
je voudrais que lorsque l'utilisateur glisse une cellule de vue de table, pour afficher plus d'un bouton d'édition (il par défaut est le bouton Supprimer). Dans l'application de Messagerie pour iOS 7 vous pouvez glisser pour supprimer, mais il y a un bouton "Plus" qui apparaît.
20 réponses
comment mettre en œuvre
on dirait que iOS 8 ouvre cette API. Des indices d'une telle fonctionnalité sont présents dans Beta 2.
pour obtenir quelque chose qui fonctionne, implémentez les deux méthodes suivantes sur le délégué de votre vue Uitable pour obtenir l'effet désiré (voir gist pour un exemple).
- tableView:editActionsForRowAtIndexPath:
- tableView:commitEditingStyle:forRowAtIndexPath:
Problèmes Connus
la documentation dit tableView: commitEditingStyle: forRowAtIndexPath is:
" Not called for edit actions using Uitable Viewrowaction - le gestionnaire de l'action sera invoqué à la place."
cependant, le swiping ne fonctionne pas sans elle. Même si la méthode tampon est vide, il doit encore, pour l'instant. C'est évidemment un bug de beta 2.
Sources
https://twitter.com/marksands/status/481642991745265664 https://gist.github.com/marksands/76558707f583dbb8f870
réponse originale: https://stackoverflow.com/a/24540538/870028
mise à jour:
exemple de code avec ce travail (dans Swift): http://dropbox.com/s/0fvxosft2mq2v5m/DeleteRowExampleSwift.zip
l'exemple de code contient cette méthode facile à suivre dans MasterViewController.swift, et avec juste cette méthode vous obtenez le comportement montré dans la capture D'écran OP:
override func tableView(tableView: UITableView, editActionsForRowAtIndexPath indexPath: NSIndexPath) -> [AnyObject]? {

    var moreRowAction = UITableViewRowAction(style: UITableViewRowActionStyle.Default, title: "More", handler:{action, indexpath in
        println("MORE•ACTION");
    });
    moreRowAction.backgroundColor = UIColor(red: 0.298, green: 0.851, blue: 0.3922, alpha: 1.0);

    var deleteRowAction = UITableViewRowAction(style: UITableViewRowActionStyle.Default, title: "Delete", handler:{action, indexpath in
        println("DELETE•ACTION");
    });

    return [deleteRowAction, moreRowAction];
}
j'ai créé une nouvelle bibliothèque pour mettre en œuvre des boutons swippable qui prend en charge une variété de transitions et de boutons extensibles comme iOS 8 mail app.
https://github.com/MortimerGoro/MGSwipeTableCell
cette bibliothèque est compatible avec toutes les différentes façons de créer une Viewcell Uitable et son testé sur iOS 5, iOS 6, iOS 7 et iOS 8.
voici un échantillon de quelques transitions:
transition à la frontière:
Transition Clip
Transition 3D:
la réponse de Johnny est la bonne. Je suis juste en train d'ajouter ceci ci-dessous dans objective-c pour le rendre plus clair pour les débutants (et ceux d'entre nous qui refusent d'apprendre la syntaxe Swift:)
assurez-vous que vous déclarez l'utilitewdelegate et avez les méthodes suivantes:
 -(NSArray *)tableView:(UITableView *)tableView editActionsForRowAtIndexPath:(NSIndexPath *)indexPath {
 UITableViewRowAction *button = [UITableViewRowAction rowActionWithStyle:UITableViewRowActionStyleDefault title:@"Button 1" handler:^(UITableViewRowAction *action, NSIndexPath *indexPath)
    {
        NSLog(@"Action to perform with Button 1");
    }];
    button.backgroundColor = [UIColor greenColor]; //arbitrary color
    UITableViewRowAction *button2 = [UITableViewRowAction rowActionWithStyle:UITableViewRowActionStyleDefault title:@"Button 2" handler:^(UITableViewRowAction *action, NSIndexPath *indexPath)
                                    {
                                        NSLog(@"Action to perform with Button2!");
                                    }];
    button2.backgroundColor = [UIColor blueColor]; //arbitrary color

    return @[button, button2]; //array with all the buttons you want. 1,2,3, etc...
}

- (void)tableView:(UITableView *)tableView commitEditingStyle:(UITableViewCellEditingStyle)editingStyle forRowAtIndexPath:(NSIndexPath *)indexPath {
// you need to implement this method too or nothing will work:

}
 - (BOOL)tableView:(UITableView *)tableView canEditRowAtIndexPath:(NSIndexPath *)indexPath
    {
        return YES; //tableview must be editable or nothing will work...
    }
C'est (assez ridiculement) une API privée.
les deux méthodes suivantes sont privées et envoyées au délégué de UITableView:
-(NSString *)tableView:(UITableView *)tableView titleForSwipeAccessoryButtonForRowAtIndexPath:(NSIndexPath *)indexPath;
-(void)tableView:(UITableView *)tableView swipeAccessoryButtonPushedForRowAtIndexPath:(NSIndexPath *)indexPath;
Ils sont assez explicites.
pour améliorer la réponse de Johnny, ceci peut maintenant être fait en utilisant L'API publique comme suit:
func tableView(tableView: UITableView, editActionsForRowAtIndexPath indexPath: NSIndexPath) -> [UITableViewRowAction]? {

    let moreRowAction = UITableViewRowAction(style: UITableViewRowActionStyle.default, title: "More", handler:{action, indexpath in
        print("MORE•ACTION");
    });
    moreRowAction.backgroundColor = UIColor(red: 0.298, green: 0.851, blue: 0.3922, alpha: 1.0);

    let deleteRowAction = UITableViewRowAction(style: UITableViewRowActionStyle.default, title: "Delete", handler:{action, indexpath in
        print("DELETE•ACTION");
    });

    return [deleteRowAction, moreRowAction];
}
j'espère que vous ne pouvez pas attendre jusqu'à ce qu'apple vous donne ce dont vous avez besoin n'est-ce pas? Donc voici mon option.
créer une cellule personnalisée. Avoir deux vues en elle
1. upper
2. lower
dans lower view, ajoutez les boutons dont vous avez besoin. Traiter ses actions comme toutes les autres IBActions. vous pouvez décider du temps d'animation, du style et de tout.
ajoutez maintenant une uiswipegesture à la vue supérieure et révélez votre vue inférieure sur le geste de glisser. J'ai fait avant et son option la plus simple en ce qui me concerne.
Espérer que l'aide.
ceci n'est pas possible avec le SDK standard. Cependant, il existe diverses solutions tierces qui imitent plus ou moins le comportement dans le courrier.App. Certains d'entre eux (par exemple Mcswipetable Viewcell , Dacontextmenutable ViewController , Rmswipetable Viewcell ) détectent des swipes en utilisant des reconnaisseurs de gestes, certains d'entre eux (par exemple SWTableViewCell ) mettent un second UISScrollView en dessous de la norme UITableViewCellScrollView (private subview of UITableViewCell ) et certains d'entre eux modifient le comportement de UITableViewCellScrollView .
j'aime le plus la dernière approche car la manipulation tactile semble la plus naturelle. Plus précisément, Mscmoreoptiontablewcell est bon. Votre choix peut varier en fonction de vos besoins spécifiques (si vous avez aussi besoin d'un plateau de gauche à droite, si vous avez besoin de la compatibilité iOS 6, etc.).). Sachez également que la plupart de ces approches viennent avec un fardeau: ils peuvent facilement rompez dans une future version iOS si Apple apporte des changements dans la hiérarchie des sous-vues UITableViewCell .
Swift 3 Version code sans utiliser de bibliothèque:
import UIKit

class ViewController: UIViewController, UITableViewDelegate, UITableViewDataSource {

    @IBOutlet weak var tableView: UITableView!

    override func viewDidLoad() {
        super.viewDidLoad()
        // Do any additional setup after loading the view, typically from a nib.

        tableView.tableFooterView = UIView(frame: CGRect.zero) //Hiding blank cells.
        tableView.separatorInset = UIEdgeInsets.zero
        tableView.dataSource = self
        tableView.delegate = self
    }

    override func didReceiveMemoryWarning() {
        super.didReceiveMemoryWarning()
        // Dispose of any resources that can be recreated.
    }

    func tableView(_ tableView: UITableView, numberOfRowsInSection section: Int) -> Int {

        return 4
    }

    func tableView(_ tableView: UITableView, cellForRowAt indexPath: IndexPath) -> UITableViewCell {

        let cell: UITableViewCell = tableView.dequeueReusableCell(withIdentifier: "tableCell", for: indexPath)

        return cell
    }

    //Enable cell editing methods.
    func tableView(_ tableView: UITableView, canEditRowAt indexPath: IndexPath) -> Bool {

        return true
    }

    func tableView(_ tableView: UITableView, commit editingStyle: UITableViewCellEditingStyle, forRowAt indexPath: IndexPath) {

    }

    func tableView(_ tableView: UITableView, editActionsForRowAt indexPath: IndexPath) -> [UITableViewRowAction]? {

        let more = UITableViewRowAction(style: .normal, title: "More") { action, index in
            //self.isEditing = false
            print("more button tapped")
        }
        more.backgroundColor = UIColor.lightGray

        let favorite = UITableViewRowAction(style: .normal, title: "Favorite") { action, index in
            //self.isEditing = false
            print("favorite button tapped")
        }
        favorite.backgroundColor = UIColor.orange

        let share = UITableViewRowAction(style: .normal, title: "Share") { action, index in
            //self.isEditing = false
            print("share button tapped")
        }
        share.backgroundColor = UIColor.blue

        return [share, favorite, more]
    }

}
vous avez besoin de la sous-classe UITableViewCell et de la sous-classe méthode willTransitionToState:(UITableViewCellStateMask)state qui est appelé chaque fois que l'utilisateur glisse la cellule. Les drapeaux state vous indiqueront si le bouton Supprimer s'affiche, et afficher/cacher votre bouton Plus Là.
malheureusement cette méthode ne vous donne ni la largeur du bouton Supprimer ni le temps d'animation. Donc, vous avez besoin d'observer & hard-code votre image de plus de bouton et le temps d'animation dans votre code (je pense personnellement Qu'Apple a besoin faire quelque chose à ce sujet).
pour la programmation swift
func tableView(tableView: UITableView, commitEditingStyle editingStyle: UITableViewCellEditingStyle, forRowAtIndexPath indexPath: NSIndexPath) {
  if editingStyle == UITableViewCellEditingStyle.Delete {
    deleteModelAt(indexPath.row)
    self.tableView.deleteRowsAtIndexPaths([indexPath], withRowAnimation: .Automatic)
  }
  else if editingStyle == UITableViewCellEditingStyle.Insert {
    println("insert editing action")
  }
}

func tableView(tableView: UITableView, editActionsForRowAtIndexPath indexPath: NSIndexPath) -> [AnyObject]? {
  var archiveAction = UITableViewRowAction(style: .Default, title: "Archive",handler: { (action: UITableViewRowAction!, indexPath: NSIndexPath!) in
        // maybe show an action sheet with more options
        self.tableView.setEditing(false, animated: false)
      }
  )
  archiveAction.backgroundColor = UIColor.lightGrayColor()

  var deleteAction = UITableViewRowAction(style: .Normal, title: "Delete",
      handler: { (action: UITableViewRowAction!, indexPath: NSIndexPath!) in
        self.deleteModelAt(indexPath.row)
        self.tableView.deleteRowsAtIndexPaths([indexPath], withRowAnimation: .Automatic);
      }
  );
  deleteAction.backgroundColor = UIColor.redColor()

  return [deleteAction, archiveAction]
}

func deleteModelAt(index: Int) {
  //... delete logic for model
}
CELA POURRAIT VOUS AIDER.
-(NSArray *)tableView:(UITableView *)tableView editActionsForRowAtIndexPath:(NSIndexPath *)indexPath {
 UITableViewRowAction *button = [UITableViewRowAction rowActionWithStyle:UITableViewRowActionStyleDefault title:@"Button 1" handler:^(UITableViewRowAction *action, NSIndexPath *indexPath)
    {
        NSLog(@"Action to perform with Button 1");
    }];
    button.backgroundColor = [UIColor greenColor]; //arbitrary color
    UITableViewRowAction *button2 = [UITableViewRowAction rowActionWithStyle:UITableViewRowActionStyleDefault title:@"Button 2" handler:^(UITableViewRowAction *action, NSIndexPath *indexPath)
                                    {
                                        NSLog(@"Action to perform with Button2!");
                                    }];
    button2.backgroundColor = [UIColor blueColor]; //arbitrary color

    return @[button, button2]; //array with all the buttons you want. 1,2,3, etc...
}

- (void)tableView:(UITableView *)tableView commitEditingStyle:(UITableViewCellEditingStyle)editingStyle forRowAtIndexPath:(NSIndexPath *)indexPath {
// you need to implement this method too or nothing will work:

}
 - (BOOL)tableView:(UITableView *)tableView canEditRowAtIndexPath:(NSIndexPath *)indexPath
    {
        return YES; //tableview must be editable or nothing will work...
    }
je cherchais à ajouter la même fonctionnalité à mon application, et après avoir parcouru tant de tutoriels différents ( raywenderlich étant la meilleure solution de bricolage), J'ai découvert Qu'Apple a sa propre classe UITableViewRowAction , ce qui est très pratique.
vous devez changer la méthode Boilerpoint de Tableview à ceci:
override func tableView(tableView: UITableView, editActionsForRowAtIndexPath indexPath: NSIndexPath) -> [AnyObject]?  {
    // 1
    var shareAction = UITableViewRowAction(style: UITableViewRowActionStyle.Default, title: "Share" , handler: { (action:UITableViewRowAction!, indexPath:NSIndexPath!) -> Void in
    // 2
    let shareMenu = UIAlertController(title: nil, message: "Share using", preferredStyle: .ActionSheet)

    let twitterAction = UIAlertAction(title: "Twitter", style: UIAlertActionStyle.Default, handler: nil)
    let cancelAction = UIAlertAction(title: "Cancel", style: UIAlertActionStyle.Cancel, handler: nil)

    shareMenu.addAction(twitterAction)
    shareMenu.addAction(cancelAction)


    self.presentViewController(shareMenu, animated: true, completion: nil)
    })
    // 3
    var rateAction = UITableViewRowAction(style: UITableViewRowActionStyle.Default, title: "Rate" , handler: { (action:UITableViewRowAction!, indexPath:NSIndexPath!) -> Void in
    // 4
    let rateMenu = UIAlertController(title: nil, message: "Rate this App", preferredStyle: .ActionSheet)

    let appRateAction = UIAlertAction(title: "Rate", style: UIAlertActionStyle.Default, handler: nil)
    let cancelAction = UIAlertAction(title: "Cancel", style: UIAlertActionStyle.Cancel, handler: nil)

    rateMenu.addAction(appRateAction)
    rateMenu.addAction(cancelAction)


    self.presentViewController(rateMenu, animated: true, completion: nil)
    })
    // 5
    return [shareAction,rateAction]
  }
vous pouvez en savoir plus sur ce sur ce Site . Apple propre documentation est vraiment utile pour changer la couleur de fond:
La couleur de fond du bouton d'action.
Declaration OBJECTIVE-C @property (nonatomic, copy) UIColor * backgroundColor Discussion utilisez cette propriété pour spécifier la couleur de fond de votre bouton. Si vous ne spécifiez pas de valeur pour cette propriété, UIKit attribue une couleur par défaut basée sur la valeur propriété de style.
Disponibilitédisponible à partir de iOS 8.0.
Si vous souhaitez modifier la police du bouton, c'est un peu plus délicat. J'ai vu un autre post sur SO. Pour l'amour de vous fournir le code ainsi que le lien, voici le code qu'ils y sont utilisés. Vous devez changer l'apparence du bouton. Vous devez faire une référence spécifique à tableviewcell, sinon vous changeriez l'apparence du bouton tout au long de votre application (I Je ne voulais pas que, mais vous pourriez, Je ne sais pas:))
Objectif C:
+ (void)setupDeleteRowActionStyleForUserCell {

    UIFont *font = [UIFont fontWithName:@"AvenirNext-Regular" size:19];

    NSDictionary *attributes = @{NSFontAttributeName: font,
                      NSForegroundColorAttributeName: [UIColor whiteColor]};

    NSAttributedString *attributedTitle = [[NSAttributedString alloc] initWithString: @"DELETE"
                                                                          attributes: attributes];

    /*
     * We include UIView in the containment hierarchy because there is another button in UserCell that is a direct descendant of UserCell that we don't want this to affect.
     */
    [[UIButton appearanceWhenContainedIn:[UIView class], [UserCell class], nil] setAttributedTitle: attributedTitle
                                                                                          forState: UIControlStateNormal];
}
Swift:
    //create your attributes however you want to
    let attributes = [NSFontAttributeName: UIFont.systemFontOfSize(UIFont.systemFontSize())] as Dictionary!

   //Add more view controller types in the []
    UIButton.appearanceWhenContainedInInstancesOfClasses([ViewController.self])
C'est la version la plus facile, et la plus stream-lined IMHO. Espérons que cela aide.
mise à jour: Voici la version de Swift 3.0:
func tableView(_ tableView: UITableView, editActionsForRowAt indexPath: IndexPath) -> [UITableViewRowAction]? {
    var shareAction:UITableViewRowAction = UITableViewRowAction(style: .default, title: "Share", handler: {(action, cellIndexpath) -> Void in
        let shareMenu = UIAlertController(title: nil, message: "Share using", preferredStyle: .actionSheet)

        let twitterAction = UIAlertAction(title: "Twitter", style: .default, handler: nil)
        let cancelAction = UIAlertAction(title: "Cancel", style: .cancel, handler: nil)

        shareMenu.addAction(twitterAction)
        shareMenu.addAction(cancelAction)


        self.present(shareMenu,animated: true, completion: nil)
    })

    var rateAction:UITableViewRowAction = UITableViewRowAction(style: .default, title: "Rate" , handler: {(action, cellIndexpath) -> Void in
        // 4
        let rateMenu = UIAlertController(title: nil, message: "Rate this App", preferredStyle: .actionSheet)

        let appRateAction = UIAlertAction(title: "Rate", style: .default, handler: nil)
        let cancelAction = UIAlertAction(title: "Cancel", style: .cancel, handler: nil)

        rateMenu.addAction(appRateAction)
        rateMenu.addAction(cancelAction)


        self.present(rateMenu, animated: true, completion: nil)
    })
    // 5
    return [shareAction,rateAction]
}
Réelle Swift 3 Réponse
C'est la seule fonction dont vous avez besoin. Vous n'avez pas besoin des fonctions CanEdit ou CommitEditingStyle pour les actions personnalisées.
func tableView(_ tableView: UITableView, editActionsForRowAt indexPath: IndexPath) -> [UITableViewRowAction]? {
    let action1 = UITableViewRowAction(style: .default, title: "Action1", handler: {
        (action, indexPath) in
        print("Action1")
    })
    action1.backgroundColor = UIColor.lightGray
    let action2 = UITableViewRowAction(style: .default, title: "Action2", handler: {
        (action, indexPath) in
        print("Action2")
    })
    return [action1, action2]
}
à partir de iOS 11 ce document est disponible au public dans UITableViewDelegate . Voici un exemple de code:
- (UISwipeActionsConfiguration *)tableView:(UITableView *)tableView trailingSwipeActionsConfigurationForRowAtIndexPath:(NSIndexPath *)indexPath {
    UIContextualAction *delete = [UIContextualAction contextualActionWithStyle:UIContextualActionStyleDestructive
                                                                         title:@"DELETE"
                                                                       handler:^(UIContextualAction * _Nonnull action, __kindof UIView * _Nonnull sourceView, void (^ _Nonnull completionHandler)(BOOL)) {
                                                                           NSLog(@"index path of delete: %@", indexPath);
                                                                           completionHandler(YES);
                                                                       }];

    UIContextualAction *rename = [UIContextualAction contextualActionWithStyle:UIContextualActionStyleNormal
                                                                         title:@"RENAME"
                                                                       handler:^(UIContextualAction * _Nonnull action, __kindof UIView * _Nonnull sourceView, void (^ _Nonnull completionHandler)(BOOL)) {
                                                                           NSLog(@"index path of rename: %@", indexPath);
                                                                           completionHandler(YES);
                                                                       }];

    UISwipeActionsConfiguration *swipeActionConfig = [UISwipeActionsConfiguration configurationWithActions:@[rename, delete]];
    swipeActionConfig.performsFirstActionWithFullSwipe = NO;

    return swipeActionConfig;
}
également disponible:
- (UISwipeActionsConfiguration *)tableView:(UITableView *)tableView leadingSwipeActionsConfigurationForRowAtIndexPath:(NSIndexPath *)indexPath;
Docs: https://developer.apple.com/documentation/uikit/uitableviewdelegate/2902367-tableview?language=objc
Swift 4 & iOs 11+
@available(iOS 11.0, *)
override func tableView(_ tableView: UITableView, trailingSwipeActionsConfigurationForRowAt indexPath: IndexPath) -> UISwipeActionsConfiguration? {

    let delete = UIContextualAction(style: .destructive, title: "Delete") { _, _, handler in

        handler(true)
        // handle deletion here
    }

    let more = UIContextualAction(style: .normal, title: "More") { _, _, handler in

        handler(true)
        // handle more here
    }

    return UISwipeActionsConfiguration(actions: [delete, more])
}
Voici une façon un peu fragile de le faire qui n'implique pas des API privées ou la construction de votre propre système. Vous êtes en train de couvrir vos paris Qu'Apple ne casse pas cela et que, si tout va bien, ils vont libérer une API que vous pouvez remplacer ces quelques lignes de code avec.
- KVO self.contentView.superview.couche.la sous-couche. Faites ceci en init. C'est la couche D'UIScrollView. Vous ne pouvez pas KVO 'des sous-vues'.
- lorsque les sous-vues changent, trouvez la vue de confirmation Supprimer dans scrollview.les sous-vues. ceci est fait dans le callback observer.
- Double la taille de cette vue et Ajouter un UIButton à la gauche de son seul subview. cela se fait aussi dans le callback observer. Le seul sous-vue de la vue de confirmation de suppression est le bouton Supprimer.
- (optionnel) l'événement UIButton devrait chercher lui-même.superview jusqu'à ce qu'il trouve une Viewuitable et ensuite appeler une source de données ou une méthode de délégation que vous créez, comme tableView: commitCustomEditingStyle: forRowAtIndexPath:. Vous pouvez trouver l'indexPath de la cellule en utilisant [tableView indexPathForCell: self].
cela nécessite également que vous implémentiez les callbacks standard des délégués d'édition de vue de table.
static char kObserveContext = 0;

@implementation KZTableViewCell {
    UIScrollView *_contentScrollView;
    UIView *_confirmationView;
    UIButton *_editButton;
    UIButton *_deleteButton;
}

- (id)initWithStyle:(UITableViewCellStyle)style reuseIdentifier:(NSString *)reuseIdentifier {
    self = [super initWithStyle:style reuseIdentifier:reuseIdentifier];
    if (self) {
        _contentScrollView = (id)self.contentView.superview;

        [_contentScrollView.layer addObserver:self
             forKeyPath:@"sublayers"
                options:0
                context:&kObserveContext];

        _editButton = [UIButton new];
        _editButton.backgroundColor = [UIColor lightGrayColor];
        [_editButton setTitle:@"Edit" forState:UIControlStateNormal];
        [_editButton addTarget:self
                        action:@selector(_editTap)
              forControlEvents:UIControlEventTouchUpInside];

    }
    return self;
}

-(void)dealloc {
    [_contentScrollView.layer removeObserver:self forKeyPath:@"sublayers" context:&kObserveContext];
}

-(void)observeValueForKeyPath:(NSString *)keyPath ofObject:(id)object change:(NSDictionary *)change context:(void *)context {
    if(context != &kObserveContext) {
        [super observeValueForKeyPath:keyPath ofObject:object change:change context:context];
        return;
    }
    if(object == _contentScrollView.layer) {
        for(UIView * view in _contentScrollView.subviews) {
            if([NSStringFromClass(view.class) hasSuffix:@"ConfirmationView"]) {
                _confirmationView = view;
                _deleteButton = [view.subviews objectAtIndex:0];
                CGRect frame = _confirmationView.frame;
                CGRect frame2 = frame;
                frame.origin.x -= frame.size.width;
                frame.size.width *= 2;
                _confirmationView.frame = frame;

                frame2.origin = CGPointZero;
                _editButton.frame = frame2;
                frame2.origin.x += frame2.size.width;
                _deleteButton.frame = frame2;
                [_confirmationView addSubview:_editButton];
                break;
            }
        }
        return;
    }
}

-(void)_editTap {
    UITableView *tv = (id)self.superview;
    while(tv && ![tv isKindOfClass:[UITableView class]]) {
        tv = (id)tv.superview;
    }
    id<UITableViewDelegate> delegate = tv.delegate;
    if([delegate respondsToSelector:@selector(tableView:editTappedForRowWithIndexPath:)]) {
        NSIndexPath *ip = [tv indexPathForCell:self];
        // define this in your own protocol
        [delegate tableView:tv editTappedForRowWithIndexPath:ip];
    }
}
@end
il y a une bibliothèque étonnante appelée SwipeCellKit , elle devrait gagner plus de reconnaissance. À mon avis, il est plus frais que MGSwipeTableCell . Ce dernier ne reproduit pas complètement le comportement des cellules de L'application Mail alors que SwipeCellKit le fait. Ont un look
Swift 4
func tableView(_ tableView: UITableView, trailingSwipeActionsConfigurationForRowAt indexPath: IndexPath) -> UISwipeActionsConfiguration? {
    let delete = UIContextualAction(style: .destructive, title: "Delete") { (action, sourceView, completionHandler) in
        print("index path of delete: \(indexPath)")
        completionHandler(true)
    }
    let rename = UIContextualAction(style: .normal, title: "Edit") { (action, sourceView, completionHandler) in
        print("index path of edit: \(indexPath)")
        completionHandler(true)
    }
    let swipeActionConfig = UISwipeActionsConfiguration(actions: [rename, delete])
    swipeActionConfig.performsFirstActionWithFullSwipe = false
    return swipeActionConfig
}
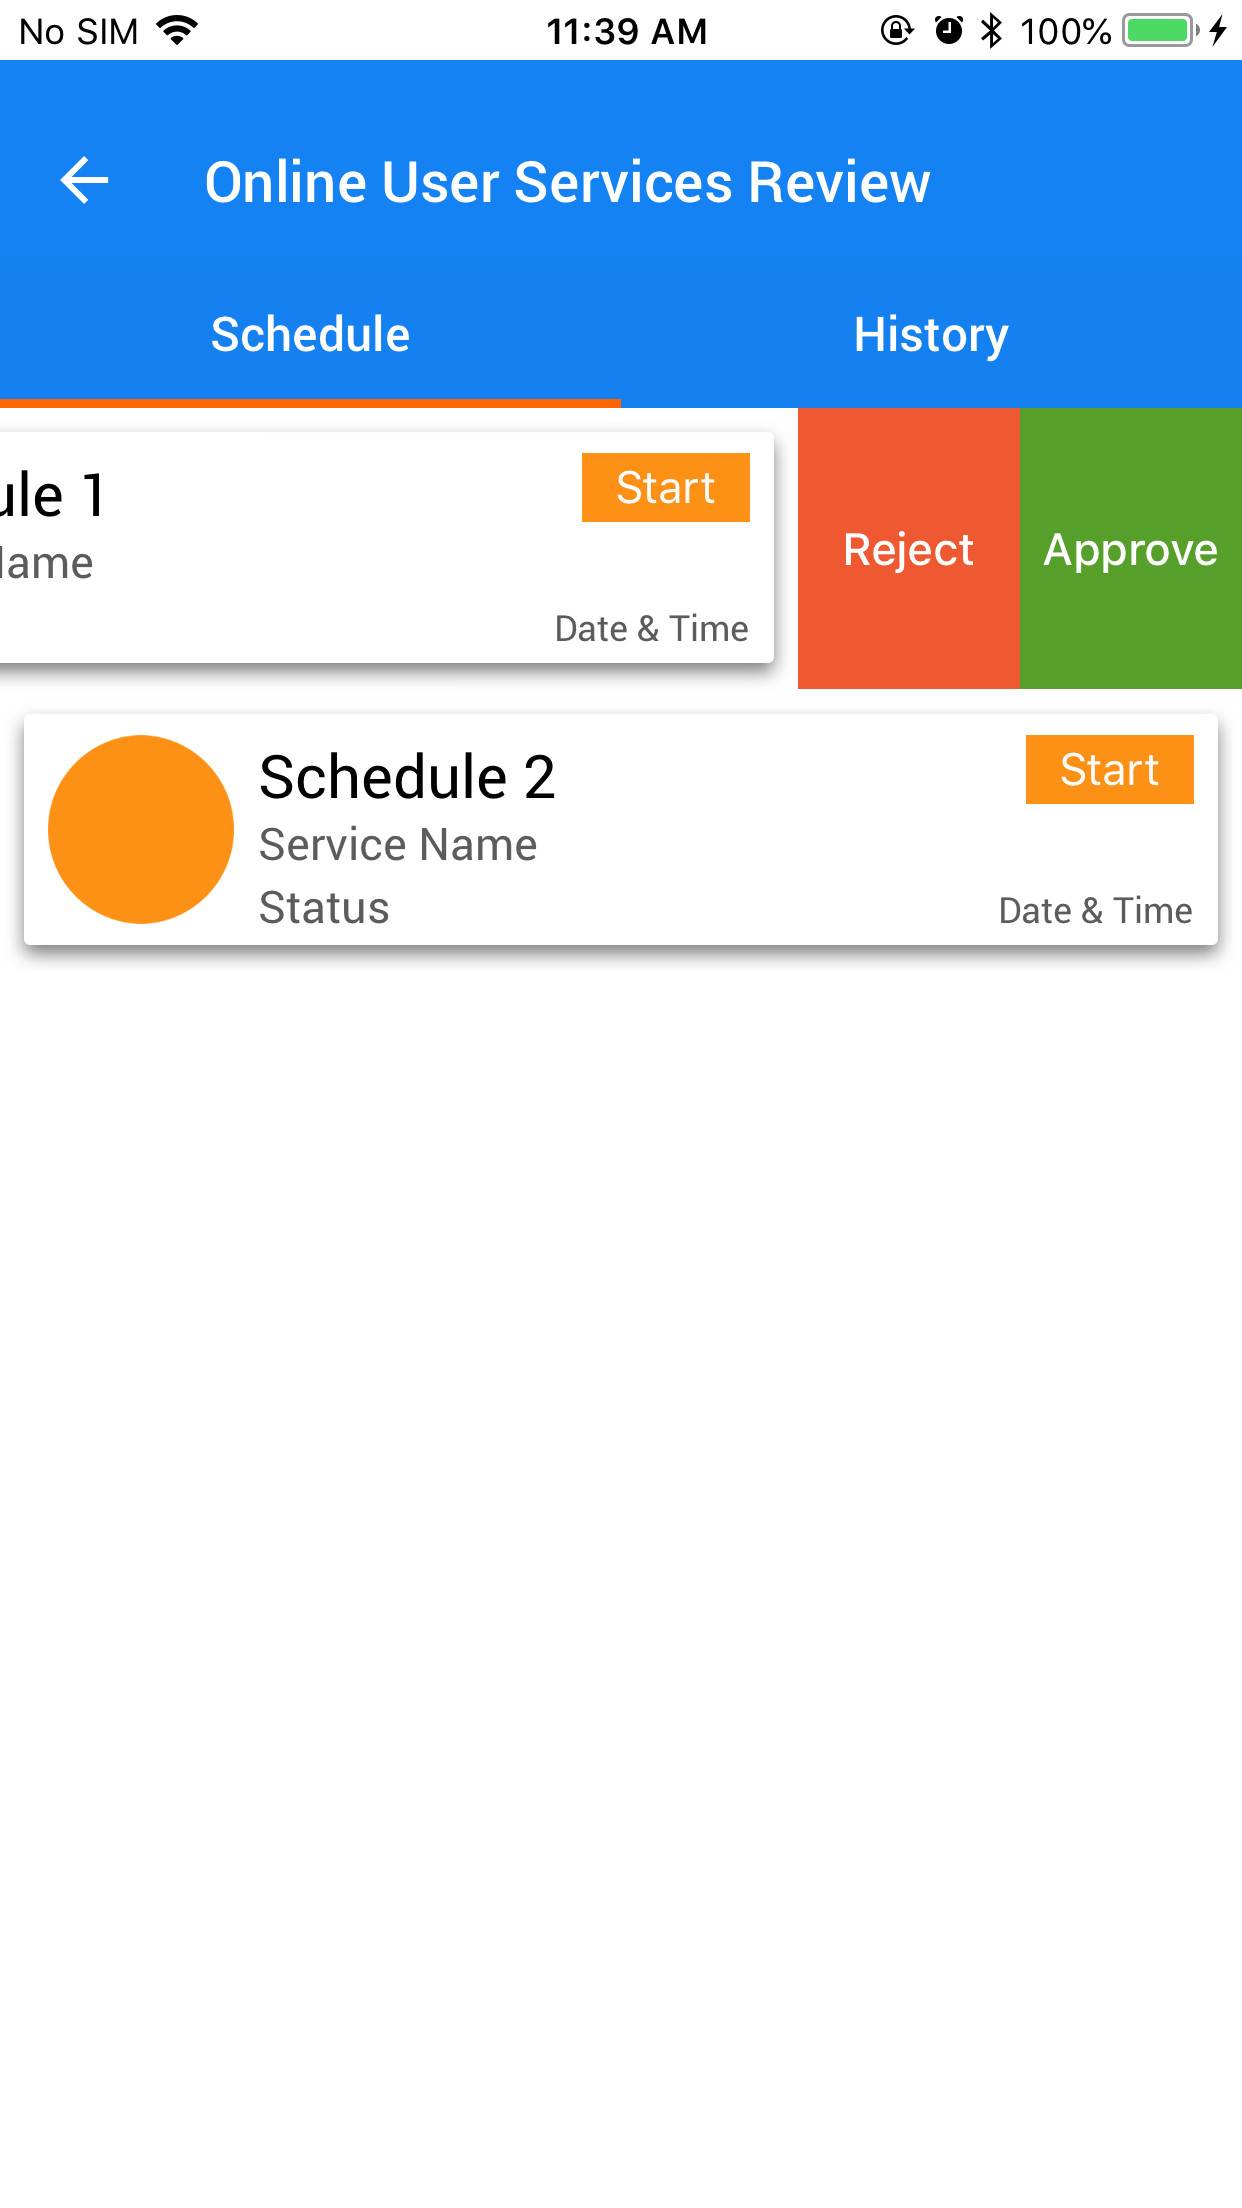
j'ai utilisé tableViewCell pour afficher plusieurs données, après balayage () de droite à gauche sur une cellule, vous trouverez deux boutons d'Approuver Et de rejeter, il y a deux méthodes, la première est ApproveFunc qui prend un argument, et l'autre est RejectFunc qui prend également un argument.
func tableView(_ tableView: UITableView, editActionsForRowAt indexPath: IndexPath) -> [UITableViewRowAction]? {
        let Approve = UITableViewRowAction(style: .normal, title: "Approve") { action, index in

            self.ApproveFunc(indexPath: indexPath)
        }
        Approve.backgroundColor = .green

        let Reject = UITableViewRowAction(style: .normal, title: "Reject") { action, index in

            self.rejectFunc(indexPath: indexPath)
        }
        Reject.backgroundColor = .red


        return [Reject, Approve]
    }

    func tableView(_ tableView: UITableView, canEditRowAt indexPath: IndexPath) -> Bool {
        return true
    }

    func ApproveFunc(indexPath: IndexPath) {
        print(indexPath.row)
    }
    func rejectFunc(indexPath: IndexPath) {
        print(indexPath.row)
    }
Voici une solution simple. Il est capable d'afficher et de cacher UIView custom à L'intérieur de Uitable Viewcell. Displaying logic est contenu dans la classe extended from Uitable Viewcell, Basetable Viewcell.
Basetable Viewcell.h
#import <UIKit/UIKit.h>

@interface BaseTableViewCell : UITableViewCell

@property(nonatomic,strong)UIView* customView;

-(void)showCustomView;

-(void)hideCustomView;

@end
Basetable Viewcell.M
#import "BaseTableViewCell.h"

@interface BaseTableViewCell()
{
    BOOL _isCustomViewVisible;
}

@end

@implementation BaseTableViewCell

- (void)awakeFromNib {
    // Initialization code
}

-(void)prepareForReuse
{
    self.customView = nil;
    _isCustomViewVisible = NO;
}

- (void)setSelected:(BOOL)selected animated:(BOOL)animated {
    [super setSelected:selected animated:animated];

    // Configure the view for the selected state
}

-(void)showCustomView
{
    if(nil != self.customView)
    {
        if(!_isCustomViewVisible)
        {
            _isCustomViewVisible = YES;

            if(!self.customView.superview)
            {
                CGRect frame = self.customView.frame;
                frame.origin.x = self.contentView.frame.size.width;
                self.customView.frame = frame;
                [self.customView willMoveToSuperview:self.contentView];
                [self.contentView addSubview:self.customView];
                [self.customView didMoveToSuperview];
            }

            __weak BaseTableViewCell* blockSelf = self;
            [UIView animateWithDuration:.5 animations:^(){

                for(UIView* view in blockSelf.contentView.subviews)
                {
                    CGRect frame = view.frame;
                    frame.origin.x = frame.origin.x - blockSelf.customView.frame.size.width;
                    view.frame = frame;
                }
            }];
        }
    }
}

-(void)hideCustomView
{
    if(nil != self.customView)
    {
        if(_isCustomViewVisible)
        {
            __weak BaseTableViewCell* blockSelf = self;
            _isCustomViewVisible = NO;
            [UIView animateWithDuration:.5 animations:^(){
                for(UIView* view in blockSelf.contentView.subviews)
                {
                    CGRect frame = view.frame;
                    frame.origin.x = frame.origin.x + blockSelf.customView.frame.size.width;
                    view.frame = frame;
                }
            }];
        }
    }
}

@end
pour obtenir cette fonctionnalité, étendez simplement votre table view cell à partir de Basetable Viewcell.
suivant, À l'intérieur de UIViewController, qui met en œuvre Uitable Viewdelegate, créer deux reconnaisseurs de geste pour manipuler gauche et droite swipes.
- (void)viewDidLoad {
    [super viewDidLoad];
    // Do any additional setup after loading the view, typically from a nib.

    [self.tableView registerNib:[UINib nibWithNibName:CUSTOM_CELL_NIB_NAME bundle:nil] forCellReuseIdentifier:CUSTOM_CELL_ID];

    UISwipeGestureRecognizer* leftSwipeRecognizer = [[UISwipeGestureRecognizer alloc] initWithTarget:self action:@selector(handleLeftSwipe:)];
    leftSwipeRecognizer.direction = UISwipeGestureRecognizerDirectionLeft;
    [self.tableView addGestureRecognizer:leftSwipeRecognizer];

    UISwipeGestureRecognizer* rightSwipeRecognizer = [[UISwipeGestureRecognizer alloc] initWithTarget:self action:@selector(handleRightSwipe:)];
    rightSwipeRecognizer.direction = UISwipeGestureRecognizerDirectionRight;
    [self.tableView addGestureRecognizer:rightSwipeRecognizer];
}
Que d'ajouter deux balayez gestionnaires
- (void)handleLeftSwipe:(UISwipeGestureRecognizer*)recognizer
{
    CGPoint point = [recognizer locationInView:self.tableView];
    NSIndexPath* index = [self.tableView indexPathForRowAtPoint:point];

    UITableViewCell* cell = [self.tableView cellForRowAtIndexPath:index];

    if([cell respondsToSelector:@selector(showCustomView)])
    {
        [cell performSelector:@selector(showCustomView)];
    }
}

- (void)handleRightSwipe:(UISwipeGestureRecognizer*)recognizer
{
    CGPoint point = [recognizer locationInView:self.tableView];
    NSIndexPath* index = [self.tableView indexPathForRowAtPoint:point];

    UITableViewCell* cell = [self.tableView cellForRowAtIndexPath:index];

    if([cell respondsToSelector:@selector(hideCustomView)])
    {
        [cell performSelector:@selector(hideCustomView)];
    }
}
maintenant, à l'intérieur de cellForRowAtIndexPath, de Uitable Viewdelegate, vous pouvez créer UIView personnalisé et l'attacher à la cellule dequeued.
-(UITableViewCell*)tableView:(UITableView *)tableView cellForRowAtIndexPath:(NSIndexPath *)indexPath
{
    CustomCellTableViewCell* cell = (CustomCellTableViewCell*)[tableView dequeueReusableCellWithIdentifier:@"CustomCellTableViewCell" forIndexPath:indexPath];

    NSArray* nibViews = [[NSBundle mainBundle] loadNibNamed:@"CellCustomView"
                                                      owner:nil
                                                    options:nil];

    CellCustomView* customView = (CellCustomView*)[ nibViews objectAtIndex: 0];

    cell.customView = customView;

    return cell;
}
bien sûr, ce mode de chargement de custom UIView est juste pour cet exemple. Le gérer comme vous le souhaitez.