correction simple de l'éclairage dans les images openCV c++
j'ai quelques photos en couleur et l'éclairage n'est pas régulier dans les photos, d'un côté, l'image est plus lumineuse que l'autre côté.
j'aimerais résoudre ce problème en modifiant l'éclairage. Je pense que le contraste local m'aidera mais je ne sais pas comment : (
pourriez-vous s'il vous plaît m'aider avec un morceau de code ou un pipeline ?
5 réponses
Convertissez l'image RVB En Lab couleur-espace (par exemple, n'importe quelle couleur-espace avec un canal de luminance fonctionnera très bien), puis appliquez histogramme adaptatif égalisation à la chaîne L. Finalement, convertissez le laboratoire résultant en RVB.
ce que vous voulez est L'algorithme CLAHE (contraste Limited Adaptive Histogram Equalization) D'OpenCV. Cependant, autant que je sache, il n'est pas documentée. Il n'y a un exemple en python. Vous pouvez lire à propos de CLAHE dans Gemmes Graphiques IV, pp474-485
voici un exemple de CLAHE en action:
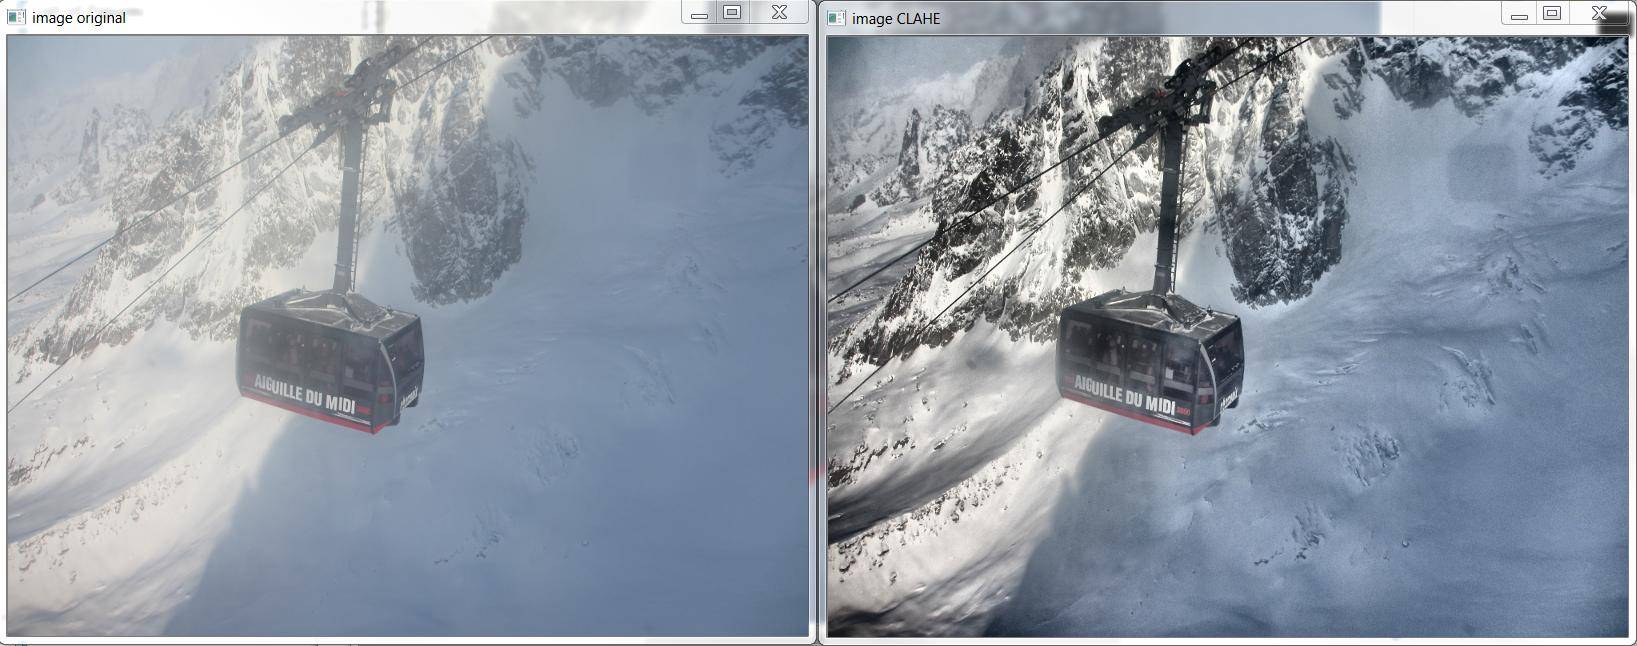
Et voici le C++ qui a produit l'image ci-dessus, basé sur http://answers.opencv.org/question/12024/use-of-clahe/ mais pour la couleur.
#include <opencv2/core.hpp>
#include <vector>       // std::vector
int main(int argc, char** argv)
{
    // READ RGB color image and convert it to Lab
    cv::Mat bgr_image = cv::imread("image.png");
    cv::Mat lab_image;
    cv::cvtColor(bgr_image, lab_image, CV_BGR2Lab);

    // Extract the L channel
    std::vector<cv::Mat> lab_planes(3);
    cv::split(lab_image, lab_planes);  // now we have the L image in lab_planes[0]

    // apply the CLAHE algorithm to the L channel
    cv::Ptr<cv::CLAHE> clahe = cv::createCLAHE();
    clahe->setClipLimit(4);
    cv::Mat dst;
    clahe->apply(lab_planes[0], dst);

    // Merge the the color planes back into an Lab image
    dst.copyTo(lab_planes[0]);
    cv::merge(lab_planes, lab_image);

   // convert back to RGB
   cv::Mat image_clahe;
   cv::cvtColor(lab_image, image_clahe, CV_Lab2BGR);

   // display the results  (you might also want to see lab_planes[0] before and after).
   cv::imshow("image original", bgr_image);
   cv::imshow("image CLAHE", image_clahe);
   cv::waitKey();
}
la réponse fournie par Bull est la meilleure que j'ai rencontrée jusqu'à présent. Je l'ai utilisé pour. Voici le code python pour le même:
import cv2

#-----Reading the image-----------------------------------------------------
img = cv2.imread('Dog.jpg', 1)
cv2.imshow("img",img)

#-----Converting image to LAB Color model-----------------------------------
lab= cv2.cvtColor(img, cv2.COLOR_BGR2LAB)
cv2.imshow("lab",lab)

#-----Splitting the LAB image to different channels-------------------------
l, a, b = cv2.split(lab)
cv2.imshow('l_channel', l)
cv2.imshow('a_channel', a)
cv2.imshow('b_channel', b)

#-----Applying CLAHE to L-channel-------------------------------------------
clahe = cv2.createCLAHE(clipLimit=3.0, tileGridSize=(8,8))
cl = clahe.apply(l)
cv2.imshow('CLAHE output', cl)

#-----Merge the CLAHE enhanced L-channel with the a and b channel-----------
limg = cv2.merge((cl,a,b))
cv2.imshow('limg', limg)

#-----Converting image from LAB Color model to RGB model--------------------
final = cv2.cvtColor(limg, cv2.COLOR_LAB2BGR)
cv2.imshow('final', final)

#_____END_____#
Basé sur le grand C++ exemple écrit par Bull, j'ai pu écrire cette méthode pour Android.
j'ai substitué " Core.extractChannel" pour les "Noyau.Split." Cela évite les problème connu de fuite de mémoire.
public void applyCLAHE(Mat srcArry, Mat dstArry) {
    //Function that applies the CLAHE algorithm to "dstArry".

    if (srcArry.channels() >= 3) {
        // READ RGB color image and convert it to Lab
        Mat channel = new Mat();
        Imgproc.cvtColor(srcArry, dstArry, Imgproc.COLOR_BGR2Lab);

        // Extract the L channel
        Core.extractChannel(dstArry, channel, 0);

        // apply the CLAHE algorithm to the L channel
        CLAHE clahe = Imgproc.createCLAHE();
        clahe.setClipLimit(4);
        clahe.apply(channel, channel);

        // Merge the the color planes back into an Lab image
        Core.insertChannel(channel, dstArry, 0);

        // convert back to RGB
        Imgproc.cvtColor(dstArry, dstArry, Imgproc.COLOR_Lab2BGR);

        // Temporary Mat not reused, so release from memory.
        channel.release();
    }

}
Et de l'appeler comme ceci:
public Mat onCameraFrame(CvCameraViewFrame inputFrame){
    Mat col = inputFrame.rgba();

    applyCLAHE(col, col);//Apply the CLAHE algorithm to input color image.

    return col;
}
Vous pouvez aussi utiliser L'égalisation de L'histogramme adaptatif,
from skimage import exposure

img_adapteq = exposure.equalize_adapthist(img, clip_limit=0.03)
Vous pouvez essayer le code suivant:
#include "opencv2/opencv.hpp"
#include <iostream>

using namespace std;
using namespace cv;

int main(int argc, char** argv)
{

    cout<<"Usage: ./executable input_image output_image \n";

    if(argc!=3)
    {
        return 0;
    }


    int filterFactor = 1;
    Mat my_img = imread(argv[1]);
    Mat orig_img = my_img.clone();
    imshow("original",my_img);

    Mat simg;

    cvtColor(my_img, simg, CV_BGR2GRAY);

    long int N = simg.rows*simg.cols;

    int histo_b[256];
    int histo_g[256];
    int histo_r[256];

    for(int i=0; i<256; i++){
        histo_b[i] = 0;
        histo_g[i] = 0;
        histo_r[i] = 0;
    }
    Vec3b intensity;

    for(int i=0; i<simg.rows; i++){
        for(int j=0; j<simg.cols; j++){
            intensity = my_img.at<Vec3b>(i,j);

            histo_b[intensity.val[0]] = histo_b[intensity.val[0]] + 1;
            histo_g[intensity.val[1]] = histo_g[intensity.val[1]] + 1;
            histo_r[intensity.val[2]] = histo_r[intensity.val[2]] + 1;
        }
    }

    for(int i = 1; i<256; i++){
        histo_b[i] = histo_b[i] + filterFactor * histo_b[i-1];
        histo_g[i] = histo_g[i] + filterFactor * histo_g[i-1];
        histo_r[i] = histo_r[i] + filterFactor * histo_r[i-1];
    }

    int vmin_b=0;
    int vmin_g=0;
    int vmin_r=0;
    int s1 = 3;
    int s2 = 3;

    while(histo_b[vmin_b+1] <= N*s1/100){
        vmin_b = vmin_b +1;
    }
    while(histo_g[vmin_g+1] <= N*s1/100){
        vmin_g = vmin_g +1;
    }
    while(histo_r[vmin_r+1] <= N*s1/100){
        vmin_r = vmin_r +1;
    }

    int vmax_b = 255-1;
    int vmax_g = 255-1;
    int vmax_r = 255-1;

    while(histo_b[vmax_b-1]>(N-((N/100)*s2)))
    {
        vmax_b = vmax_b-1;
    }
    if(vmax_b < 255-1){
        vmax_b = vmax_b+1;
    }
    while(histo_g[vmax_g-1]>(N-((N/100)*s2)))
    {
        vmax_g = vmax_g-1;
    }
    if(vmax_g < 255-1){
        vmax_g = vmax_g+1;
    }
    while(histo_r[vmax_r-1]>(N-((N/100)*s2)))
    {
        vmax_r = vmax_r-1;
    }
    if(vmax_r < 255-1){
        vmax_r = vmax_r+1;
    }

    for(int i=0; i<simg.rows; i++)
    {
        for(int j=0; j<simg.cols; j++)
        {

            intensity = my_img.at<Vec3b>(i,j);

            if(intensity.val[0]<vmin_b){
                intensity.val[0] = vmin_b;
            }
            if(intensity.val[0]>vmax_b){
                intensity.val[0]=vmax_b;
            }


            if(intensity.val[1]<vmin_g){
                intensity.val[1] = vmin_g;
            }
            if(intensity.val[1]>vmax_g){
                intensity.val[1]=vmax_g;
            }


            if(intensity.val[2]<vmin_r){
                intensity.val[2] = vmin_r;
            }
            if(intensity.val[2]>vmax_r){
                intensity.val[2]=vmax_r;
            }

            my_img.at<Vec3b>(i,j) = intensity;
        }
    }

    for(int i=0; i<simg.rows; i++){
        for(int j=0; j<simg.cols; j++){

            intensity = my_img.at<Vec3b>(i,j);
            intensity.val[0] = (intensity.val[0] - vmin_b)*255/(vmax_b-vmin_b);
            intensity.val[1] = (intensity.val[1] - vmin_g)*255/(vmax_g-vmin_g);
            intensity.val[2] = (intensity.val[2] - vmin_r)*255/(vmax_r-vmin_r);
            my_img.at<Vec3b>(i,j) = intensity;
        }
    }


    // sharpen image using "unsharp mask" algorithm
    Mat blurred; double sigma = 1, threshold = 5, amount = 1;
    GaussianBlur(my_img, blurred, Size(), sigma, sigma);
    Mat lowContrastMask = abs(my_img - blurred) < threshold;
    Mat sharpened = my_img*(1+amount) + blurred*(-amount);
    my_img.copyTo(sharpened, lowContrastMask);

    imshow("New Image",sharpened);
    waitKey(0);

    Mat comp_img;
    hconcat(orig_img, sharpened, comp_img);
    imwrite(argv[2], comp_img);
}
Case ici pour plus de détails.