PopupMenu avec des icônes [dupliquer]
cette question a déjà une réponse ici:
bien sûr, il s'agit ici de SDK 11 et au-dessus.
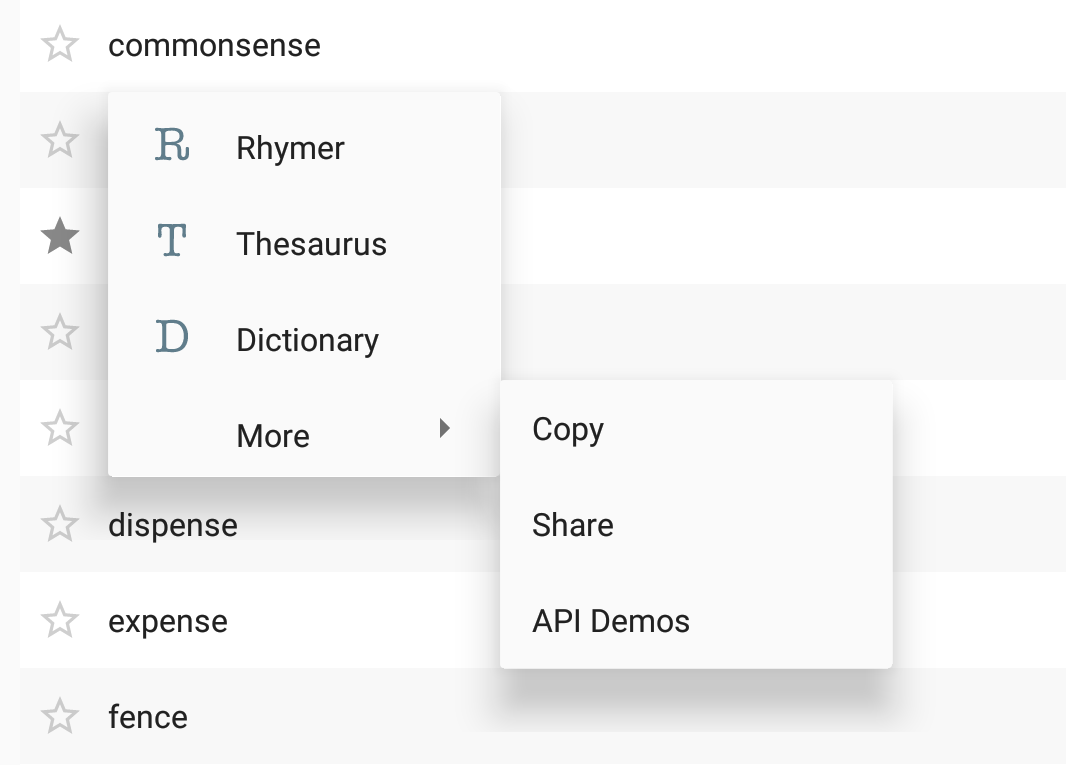
j'ai l'intention de faire quelque chose de similaire à ceci:
à côté de chaque article dans ce PopupMenu , je voudrais placer une icône .
j'ai créé un fichier XML et l'ai placé dans /menu :
<menu xmlns:android="http://schemas.android.com/apk/res/android" >

    <item
        android:id="@+id/action_one"
        android:title="Sync"
        android:icon="@android:drawable/ic_popup_sync"
        />

    <item
        android:id="@+id/action_two"
        android:title="About"
        android:icon="@android:drawable/ic_dialog_info"
        />
</menu>
comme vous l'avez remarqué, dans le fichier xml Je définit les icônes que je veux, cependant, quand le menu popup s'affiche, il les affiche sans les icônes. Que dois-je faire pour que ces 2 icônes apparaissent?
12 réponses
je voudrais mettre en œuvre autrement:
créer un PopUpWindow mise en page:
<?xml version="1.0" encoding="utf-8"?>
<LinearLayout xmlns:android="http://schemas.android.com/apk/res/android"
android:id="@+id/llSortChangePopup"
android:layout_width="wrap_content"
android:layout_height="wrap_content"
android:background="@drawable/sort_popup_background"
android:orientation="vertical" >

<TextView
    android:id="@+id/tvDistance"
    android:layout_width="match_parent"
    android:layout_height="wrap_content"
    android:text="@string/distance"
    android:layout_weight="1.0"
    android:layout_marginLeft="20dp"
    android:paddingTop="5dp"
    android:gravity="center_vertical"
    android:textColor="@color/my_darker_gray" />

<ImageView
    android:layout_marginLeft="11dp"
    android:layout_width="wrap_content"
    android:layout_height="wrap_content"
    android:src="@drawable/sort_popup_devider"
    android:contentDescription="@drawable/sort_popup_devider"/>

<TextView
    android:id="@+id/tvPriority"
    android:layout_width="match_parent"
    android:layout_height="wrap_content"
    android:text="@string/priority"
    android:layout_weight="1.0"
    android:layout_marginLeft="20dp"
    android:gravity="center_vertical"
    android:clickable="true"
    android:onClick="popupSortOnClick"
    android:textColor="@color/my_black" />


<ImageView
    android:layout_marginLeft="11dp"
    android:layout_width="wrap_content"
    android:layout_height="wrap_content"
    android:src="@drawable/sort_popup_devider"
    android:contentDescription="@drawable/sort_popup_devider"/>

<TextView
    android:id="@+id/tvTime"
    android:layout_width="match_parent"
    android:layout_height="wrap_content"
    android:text="@string/time"
    android:layout_weight="1.0"
    android:layout_marginLeft="20dp"
    android:gravity="center_vertical"
    android:clickable="true"
    android:onClick="popupSortOnClick"
    android:textColor="@color/my_black" />

<ImageView
    android:layout_marginLeft="11dp"
    android:layout_width="wrap_content"
    android:layout_height="wrap_content"
    android:src="@drawable/sort_popup_devider"
    android:contentDescription="@drawable/sort_popup_devider"/>

<TextView
    android:id="@+id/tvStatus"
    android:layout_width="match_parent"
    android:layout_height="wrap_content"
    android:text="@string/status"
    android:layout_weight="1.0"
    android:layout_marginLeft="20dp"
    android:gravity="center_vertical"
    android:textColor="@color/my_black"
    android:clickable="true"
    android:onClick="popupSortOnClick"
    android:paddingBottom="10dp"/>

 </LinearLayout>
et ensuite créer le PopUpWindow dans votre Activity :
    // The method that displays the popup.
private void showStatusPopup(final Activity context, Point p) {

   // Inflate the popup_layout.xml
   LinearLayout viewGroup = (LinearLayout) context.findViewById(R.id.llStatusChangePopup);
   LayoutInflater layoutInflater = (LayoutInflater) context.getSystemService(Context.LAYOUT_INFLATER_SERVICE);
   View layout = layoutInflater.inflate(R.layout.status_popup_layout, null);

   // Creating the PopupWindow
   changeStatusPopUp = new PopupWindow(context);
   changeStatusPopUp.setContentView(layout);
   changeStatusPopUp.setWidth(LinearLayout.LayoutParams.WRAP_CONTENT);
   changeStatusPopUp.setHeight(LinearLayout.LayoutParams.WRAP_CONTENT);
   changeStatusPopUp.setFocusable(true);

   // Some offset to align the popup a bit to the left, and a bit down, relative to button's position.
   int OFFSET_X = -20;
   int OFFSET_Y = 50;

   //Clear the default translucent background
   changeStatusPopUp.setBackgroundDrawable(new BitmapDrawable());

   // Displaying the popup at the specified location, + offsets.
   changeStatusPopUp.showAtLocation(layout, Gravity.NO_GRAVITY, p.x + OFFSET_X, p.y + OFFSET_Y);
}
enfin pop it up onClick d'un bouton ou n'importe quoi d'autre:
 imTaskStatusButton.setOnClickListener(new OnClickListener()
        {
            public void onClick(View v)
            {
                 int[] location = new int[2];
                 currentRowId = position;
                 currentRow = v;
                 // Get the x, y location and store it in the location[] array
                 // location[0] = x, location[1] = y.
                 v.getLocationOnScreen(location);

                 //Initialize the Point with x, and y positions
                 point = new Point();
                 point.x = location[0];
                 point.y = location[1];
                 showStatusPopup(TasksListActivity.this, point);
            }
        });
bon exemple pour PopUpWindow :
http://androidresearch.wordpress.com/2012/05/06/how-to-create-popups-in-android /
cela fonctionne si vous utilisez AppCompat v7. C'est un peu hacky mais de manière significative mieux que d'utiliser la réflexion et vous permet toujours d'utiliser le noyau Android PopupMenu:
PopupMenu menu = new PopupMenu(getContext(), overflowImageView);
menu.inflate(R.menu.popup);
menu.setOnMenuItemClickListener(new PopupMenu.OnMenuItemClickListener() { ... });

MenuPopupHelper menuHelper = new MenuPopupHelper(getContext(), (MenuBuilder) menu.getMenu(), overflowImageView);
menuHelper.setForceShowIcon(true);
menuHelper.show();
res/menu/popup.xml
<?xml version="1.0" encoding="utf-8"?>
<menu xmlns:android="http://schemas.android.com/apk/res/android">
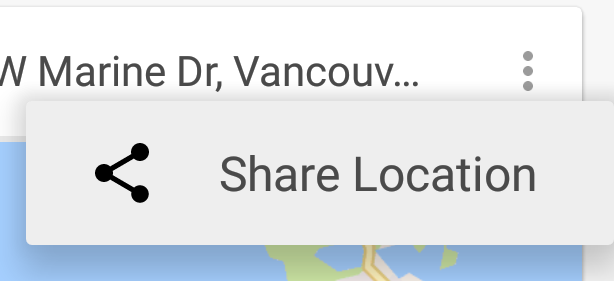
<item android:id="@+id/menu_share_location"
android:title="@string/share_location"
android:icon="@drawable/ic_share_black_24dp"/>
</menu>
Il en résulte dans le menu contextuel en utilisant l'icône qui est définie dans votre menu fichier de ressources:
menu popup Android a une méthode cachée pour afficher l'icône de menu. Utilisez Java reflection pour l'activer comme ci-dessous code snippet.
public static void setForceShowIcon(PopupMenu popupMenu) {
    try {
        Field[] fields = popupMenu.getClass().getDeclaredFields();
        for (Field field : fields) {
            if ("mPopup".equals(field.getName())) {
                field.setAccessible(true);
                Object menuPopupHelper = field.get(popupMenu);
                Class<?> classPopupHelper = Class.forName(menuPopupHelper
                        .getClass().getName());
                Method setForceIcons = classPopupHelper.getMethod(
                        "setForceShowIcon", boolean.class);
                setForceIcons.invoke(menuPopupHelper, true);
                break;
            }
        }
    } catch (Throwable e) {
        e.printStackTrace();
    }
}
menu contextuel avec icône en utilisant MenuBuilder et MenuPopupHelper
    MenuBuilder menuBuilder =new MenuBuilder(this);
    MenuInflater inflater = new MenuInflater(this);
    inflater.inflate(R.menu.menu, menuBuilder);
    MenuPopupHelper optionsMenu = new MenuPopupHelper(this, menuBuilder, view);
    optionsMenu.setForceShowIcon(true);

    // Set Item Click Listener
    menuBuilder.setCallback(new MenuBuilder.Callback() {
        @Override
        public boolean onMenuItemSelected(MenuBuilder menu, MenuItem item) {
            switch (item.getItemId()) {
                case R.id.opt1: // Handle option1 Click
                    return true;
                case R.id.opt2: // Handle option2 Click
                    return true;
                default:
                    return false;
            }
        }

        @Override
        public void onMenuModeChange(MenuBuilder menu) {}
    });


    // Display the menu
    optionsMenu.show();
dans le menu.xml
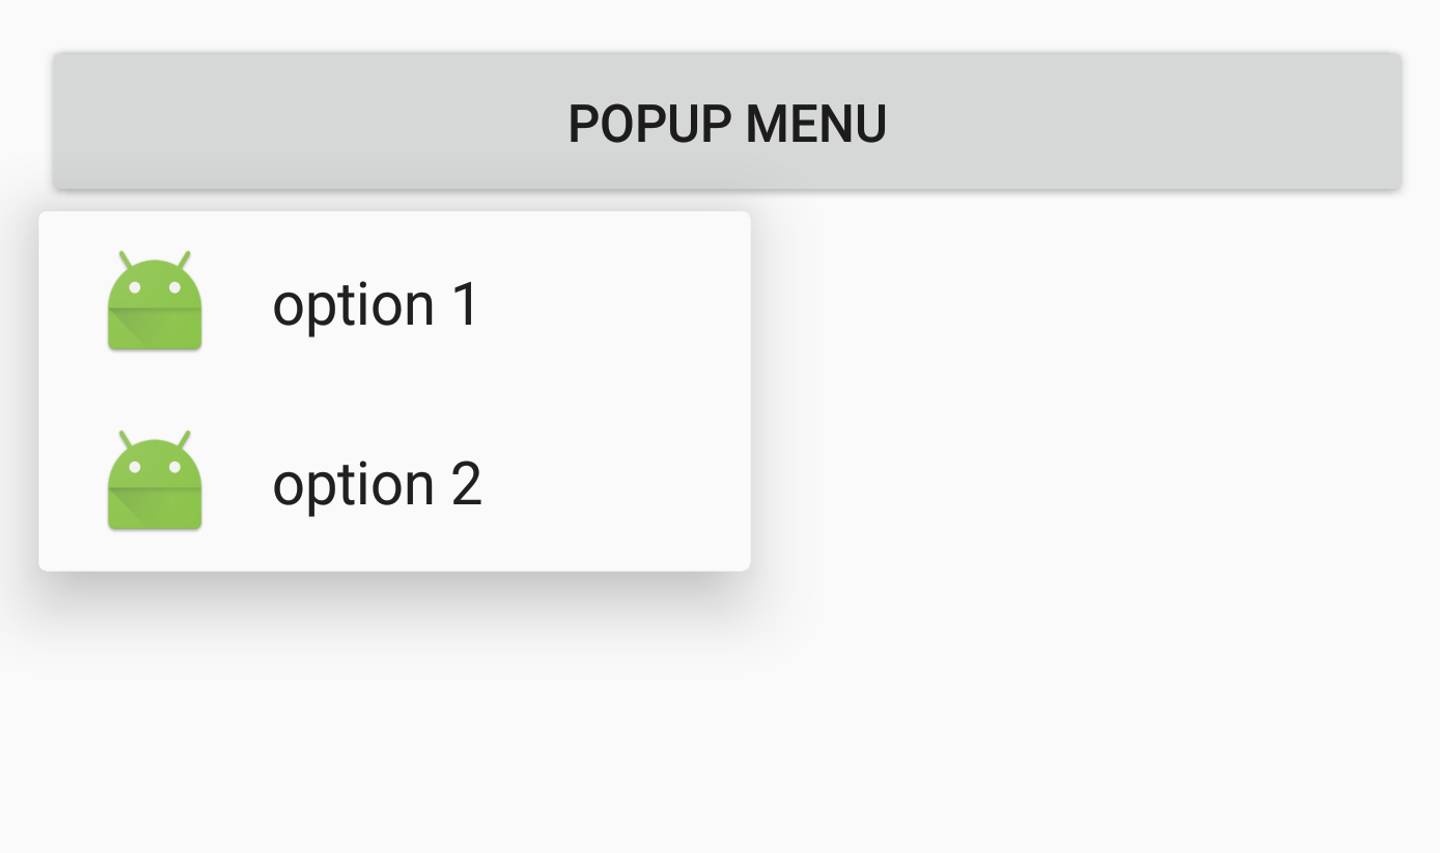
<?xml version="1.0" encoding="utf-8"?>
<menu xmlns:android="http://schemas.android.com/apk/res/android">
    <item
        android:id="@+id/opt1"
        android:icon="@mipmap/ic_launcher"
        android:title="option 1" />
    <item
        android:id="@+id/opt2"
        android:icon="@mipmap/ic_launcher"
        android:title="option 2" />
</menu>
lire le code source PopupMenu. Nous pouvons afficher l'icône par le code ci-dessous:
Field field = popupMenu.getClass().getDeclaredField("mPopup");
field.setAccessible(true);
MenuPopupHelper menuPopupHelper = (MenuPopupHelper) field.get(popupMenu);
menuPopupHelper.setForceShowIcon(true);
Mais MenuPopupHelper.java est dans le paquet interne android. Nous devrions donc utiliser la réflexion:
    PopupMenu popupMenu = new PopupMenu(this, anchor);
    popupMenu.getMenuInflater().inflate(R.menu.process, popupMenu.getMenu());

    try {
        Field field = popupMenu.getClass().getDeclaredField("mPopup");
        field.setAccessible(true);
        Object menuPopupHelper = field.get(popupMenu);
        Class<?> cls = Class.forName("com.android.internal.view.menu.MenuPopupHelper");
        Method method = cls.getDeclaredMethod("setForceShowIcon", new Class[]{boolean.class});
        method.setAccessible(true);
        method.invoke(menuPopupHelper, new Object[]{true});
    } catch (Exception e) {
        e.printStackTrace();
    }

    popupMenu.show();
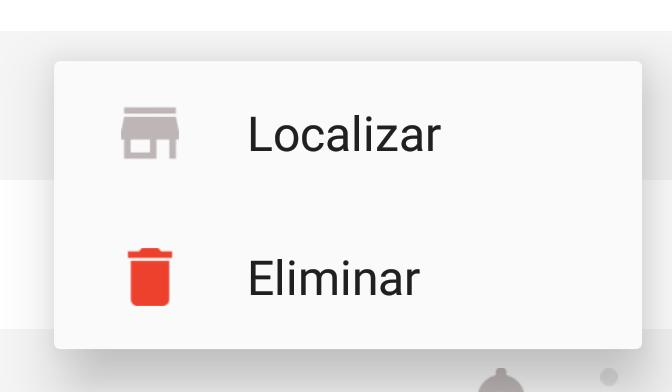
list_item_menu.xml dans /res/menu répertoire
<?xml version="1.0" encoding="utf-8"?>
    <menu xmlns:android="http://schemas.android.com/apk/res/android"
        xmlns:app="http://schemas.android.com/apk/res-auto">

            <item
                android:id="@+id/locale"
                android:title="Localizar"
                android:icon="@mipmap/ic_en_farmacia_ico"
                app:showAsAction="always">
            </item>

            <item android:id="@+id/delete"
                android:title="Eliminar"
                android:icon="@mipmap/ic_eliminar_ico"
                app:showAsAction="always">
            </item>
    </menu>
dans mon activité
private void showPopupOption(View v){
    PopupMenu popup = new PopupMenu(getContext(), v);
    popup.getMenuInflater().inflate(R.menu.list_item_menu, popup.getMenu());

    popup.setOnMenuItemClickListener(new PopupMenu.OnMenuItemClickListener() {
        public boolean onMenuItemClick(MenuItem menu_item) {
            switch (menu_item.getItemId()) {
                case R.id.locale:
                    break;
                case R.id.delete:
                    break;
            }
            return true;
        }
    });

    MenuPopupHelper menuHelper = new MenuPopupHelper(getContext(), (MenuBuilder) popup.getMenu(), v);
    menuHelper.setForceShowIcon(true);
    menuHelper.setGravity(Gravity.END);
    menuHelper.show();
}
résultat
la classe MenuPopupHelper dans AppCompat a l'annotation @hide . Si C'est un problème, ou si vous ne pouvez pas utiliser AppCompat pour quelque raison que ce soit, il y a une autre solution utilisant un Spannable dans le titre MenuItem qui contient à la fois l'icône et le texte du titre.
les principales étapes sont:
- gonflez votre
PopupMenuavec unmenufichier xml - si l'un des articles a une icône, alors le faire pour tous des articles:
- si l'élément n'a pas d'icône, de créer une icône transparente. Cela garantit que les articles sans icônes seront alignés avec des articles avec des icônes
- créer un
SpannableStringBuildercontenant l'icône et le titre - placer le titre de l'article de menu à la
SpannableStringBuilder - placer l'icône de l'élément de menu à null," juste au cas où "
Pros: Pas de réflexion. Ne pas utiliser toute caché api. Peut fonctionner avec le cadre PopupMenu.
contre: plus de code. Si vous avez un sous-menu sans icône, Il aura le rembourrage gauche indésirable sur un petit écran.
détails:
d'abord, définissez une taille pour l'icône dans un fichier dimens.xml :
<dimen name="menu_item_icon_size">24dp</dimen>
Puis, quelques méthodes pour déplacer les icônes définies en xml dans les titres:
/**
 * Moves icons from the PopupMenu's MenuItems' icon fields into the menu title as a Spannable with the icon and title text.
 */
public static void insertMenuItemIcons(Context context, PopupMenu popupMenu) {
    Menu menu = popupMenu.getMenu();
    if (hasIcon(menu)) {
        for (int i = 0; i < menu.size(); i++) {
            insertMenuItemIcon(context, menu.getItem(i));
        }
    }
}

/**
 * @return true if the menu has at least one MenuItem with an icon.
 */
private static boolean hasIcon(Menu menu) {
    for (int i = 0; i < menu.size(); i++) {
        if (menu.getItem(i).getIcon() != null) return true;
    }
    return false;
}

/**
 * Converts the given MenuItem's title into a Spannable containing both its icon and title.
 */
private static void insertMenuItemIcon(Context context, MenuItem menuItem) {
    Drawable icon = menuItem.getIcon();

    // If there's no icon, we insert a transparent one to keep the title aligned with the items
    // which do have icons.
    if (icon == null) icon = new ColorDrawable(Color.TRANSPARENT);

    int iconSize = context.getResources().getDimensionPixelSize(R.dimen.menu_item_icon_size);
    icon.setBounds(0, 0, iconSize, iconSize);
    ImageSpan imageSpan = new ImageSpan(icon);

    // Add a space placeholder for the icon, before the title.
    SpannableStringBuilder ssb = new SpannableStringBuilder("       " + menuItem.getTitle());

    // Replace the space placeholder with the icon.
    ssb.setSpan(imageSpan, 1, 2, 0);
    menuItem.setTitle(ssb);
    // Set the icon to null just in case, on some weird devices, they've customized Android to display
    // the icon in the menu... we don't want two icons to appear.
    menuItem.setIcon(null);
}
enfin, créez votre PopupMenu et utilisez les méthodes ci-dessus avant de le montrer:
PopupMenu popupMenu = new PopupMenu(view.getContext(), view);
popupMenu.inflate(R.menu.popup_menu);
insertMenuItemIcons(textView.getContext(), popupMenu);
popupMenu.show();
Capture d'écran:
j'ai résolu mon problème de la manière la plus simple possible jamais, jamais attendu une telle simplicité:
.xml:
<menu xmlns:android="http://schemas.android.com/apk/res/android" >

<item
    android:id="@+id/action_more"
    android:icon="@android:drawable/ic_menu_more"
    android:orderInCategory="1"
    android:showAsAction="always"
    android:title="More">
    <menu>
        <item
            android:id="@+id/action_one"
            android:icon="@android:drawable/ic_popup_sync"
            android:title="Sync"/>
        <item
            android:id="@+id/action_two"
            android:icon="@android:drawable/ic_dialog_info"
            android:title="About"/>
    </menu>
</item>
dans activité principale.java
@Override
public boolean onCreateOptionsMenu(Menu menu) {
    // Inflate the menu; this adds items to the action bar if it is present.
    getMenuInflater().inflate(R.menu.main, menu);
    return true;
}
C'était un truc en utilisant un sous-menu
si vous voulez afficher l'icône dans le menu contextuel, regardez https://github.com/shehabic/Droppy , c'est assez cool et facile à utiliser
vous pouvez mettre en œuvre cela par L'utilisation de la réflexion si vous ne le connaissez pas avec l'aide de cette impressionnante java fonctionnalité avancée u peut modifier le comportement d'exécution des applications en cours d'exécution dans le JVM, vous pouvez regarder l'objet et effectuer ses méthodes à l'exécution et dans notre cas, nous avons besoin de modifier le comportement popupMenu à l'exécution au lieu d'étendre la classe de base et de le modifier;) espoir que l'aide
private void showPopupMenu(View view) {
    // inflate menu
    PopupMenu popup = new PopupMenu(mcontext, view);
    MenuInflater inflater = popup.getMenuInflater();
    inflater.inflate(R.menu.main, popup.getMenu());

    Object menuHelper;
    Class[] argTypes;
    try {
        Field fMenuHelper = PopupMenu.class.getDeclaredField("mPopup");
        fMenuHelper.setAccessible(true);
        menuHelper = fMenuHelper.get(popup);
        argTypes = new Class[]{boolean.class};
        menuHelper.getClass().getDeclaredMethod("setForceShowIcon", argTypes).invoke(menuHelper, true);
    } catch (Exception e) {

    }
    popup.show();


}
D'après la réponse de @Ajay...voici ce que j'ai fait
 @Override
    public boolean onCreateOptionsMenu(Menu menu) {
        getMenuInflater().inflate(R.menu.add_task, menu);  // for the two icons in action bar
        return true;
    }

    @Override
    public boolean onOptionsItemSelected(MenuItem item) {
        switch (item.getItemId()) {

            case R.id.menu:
                View menuItemView = findViewById(R.id.menu);
                MenuBuilder menuBuilder =new MenuBuilder(this);
                MenuInflater inflater = new MenuInflater(this);
                inflater.inflate(R.menu.popup, menuBuilder);
                MenuPopupHelper optionsMenu = new MenuPopupHelper(this, menuBuilder, menuItemView);
                optionsMenu.setForceShowIcon(true);
                optionsMenu.show();

            default:
                return super.onOptionsItemSelected(item);
        }
    }
popup
<?xml version="1.0" encoding="utf-8"?>
<menu xmlns:android="http://schemas.android.com/apk/res/android">
<item
    android:id="@+id/opt1"
    android:icon="@drawable/change_pic"
    android:title="Change Picture" />
<item
    android:id="@+id/opt2"
    android:icon="@drawable/change_pin"
    android:title="Change Password" />

    <item
        android:id="@+id/opt3"
        android:icon="@drawable/sign_out"
        android:title="Sign Out" />
</menu>
Capture d'écran

j'essayais la réponse de @Stephen Kidson et @david.la suggestion de schereiber, et je me suis rendu compte qu'il n'y a pas une telle méthode setOnMenuItemClickListener dans MenuBuilder . J'ai un peu trafiqué le code source du v7 et j'ai trouvé cette solution:
        MenuBuilder menuBuilder = new MenuBuilder(mContext);
        new SupportMenuInflater(mContext).inflate(R.menu.my_menu, menuBuilder);
        menuBuilder.setCallback(new MenuBuilder.Callback() {
            @Override
            public boolean onMenuItemSelected(MenuBuilder menu, MenuItem menuItem) {
                // your "setOnMenuItemClickListener" code goes here
                switch (menuItem.getItemId()) {
                    case R.id.menu_id1:
                        // do something 1
                        return true;

                    case R.id.menu_id2:
                        // do something 2
                        return true;
                }
                return false;
            }

            @Override
            public void onMenuModeChange(MenuBuilder menu) {
            }
        });
        MenuPopupHelper menuHelper = new MenuPopupHelper(mContext, menuBuilder, v);
        menuHelper.setForceShowIcon(true); // show icons!!!!!!!!
        menuHelper.show();