Y a-t-il un moyen d'ajouter UIPickerView dans UIAlertController (Alert ou ActionSheet) dans Swift?
je suis totalement nouveau pour swift (et la programmation iOS du tout), mais j'ai commencé à m'y frotter (ce n'était pas une bonne idée quand tout est encore en version beta :d). J'ai donc essayé de comprendre par moi-même, mais toujours rien. Même essayé d'ajouter subview contenant picker sans aucun succès. Donc, quelqu'un peut-il m'aider?
11 réponses
Eh bien c'est mon code final qui a fonctionné pour moi. C'est un mélange de quelques idées. Les principales raisons pour lesquelles j'accepte ma réponse est que mon code est dans Swift, mon code utilise UIAlertController, mon code est pour picker. Je tiens à remercier Jageen - ma réponse est basée sur son idée.
    func showPickerInActionSheet(sentBy: String) {
    var title = ""
    var message = "\n\n\n\n\n\n\n\n\n\n";
    var alert = UIAlertController(title: title, message: message, preferredStyle: UIAlertControllerStyle.ActionSheet);
    alert.modalInPopover = true;


    //Create a frame (placeholder/wrapper) for the picker and then create the picker
    var pickerFrame: CGRect = CGRectMake(17, 52, 270, 100); // CGRectMake(left), top, width, height) - left and top are like margins
    var picker: UIPickerView = UIPickerView(frame: pickerFrame);

    /* If there will be 2 or 3 pickers on this view, I am going to use the tag as a way
    to identify them in the delegate and datasource. /* This part with the tags is not required.
    I am doing it this way, because I have a variable, witch knows where the Alert has been invoked from.*/
    if(sentBy == "profile"){
        picker.tag = 1;
    } else if (sentBy == "user"){
        picker.tag = 2;
    } else {
        picker.tag = 0;
    }

    //set the pickers datasource and delegate
    picker.delegate = self;
    picker.dataSource = self;

    //Add the picker to the alert controller
    alert.view.addSubview(picker);

    //Create the toolbar view - the view witch will hold our 2 buttons
    var toolFrame = CGRectMake(17, 5, 270, 45);
    var toolView: UIView = UIView(frame: toolFrame);

    //add buttons to the view
    var buttonCancelFrame: CGRect = CGRectMake(0, 7, 100, 30); //size & position of the button as placed on the toolView

    //Create the cancel button & set its title
    var buttonCancel: UIButton = UIButton(frame: buttonCancelFrame);
    buttonCancel.setTitle("Cancel", forState: UIControlState.Normal);
    buttonCancel.setTitleColor(UIColor.blueColor(), forState: UIControlState.Normal);
    toolView.addSubview(buttonCancel); //add it to the toolView

    //Add the target - target, function to call, the event witch will trigger the function call
    buttonCancel.addTarget(self, action: "cancelSelection:", forControlEvents: UIControlEvents.TouchDown);


    //add buttons to the view
    var buttonOkFrame: CGRect = CGRectMake(170, 7, 100, 30); //size & position of the button as placed on the toolView

    //Create the Select button & set the title
    var buttonOk: UIButton = UIButton(frame: buttonOkFrame);
    buttonOk.setTitle("Select", forState: UIControlState.Normal);
    buttonOk.setTitleColor(UIColor.blueColor(), forState: UIControlState.Normal);
    toolView.addSubview(buttonOk); //add to the subview

    //Add the tartget. In my case I dynamicly set the target of the select button
    if(sentBy == "profile"){
        buttonOk.addTarget(self, action: "saveProfile:", forControlEvents: UIControlEvents.TouchDown);
    } else if (sentBy == "user"){
        buttonOk.addTarget(self, action: "saveUser:", forControlEvents: UIControlEvents.TouchDown);
    }

    //add the toolbar to the alert controller
    alert.view.addSubview(toolView);

    self.presentViewController(alert, animated: true, completion: nil);
}

func saveProfile(sender: UIButton){
    // Your code when select button is tapped

}

func saveUser(sender: UIButton){
    // Your code when select button is tapped
}

func cancelSelection(sender: UIButton){
    println("Cancel");
    self.dismissViewControllerAnimated(true, completion: nil);
    // We dismiss the alert. Here you can add your additional code to execute when cancel is pressed
}

// returns number of rows in each component..
func pickerView(pickerView: UIPickerView, numberOfRowsInComponent component: Int) -> Int{
    if(pickerView.tag == 1){
        return self.profilesList.count;
    } else if(pickerView.tag == 2){
        return self.usersList.count;
    } else  {
        return 0;
    }
}

// Return the title of each row in your picker ... In my case that will be the profile name or the username string
func pickerView(pickerView: UIPickerView, titleForRow row: Int, forComponent component: Int) -> String! {
    if(pickerView.tag == 1){

            var selectedProfile: Profiles = self.profilesList[row] as Profiles;
            return selectedProfile.profileName;

    } else if(pickerView.tag == 2){

            var selectedUser: Users = self.usersList[row] as Users;
            return selectedUser.username;

    } else  {

        return "";

    }

}

func pickerView(pickerView: UIPickerView, didSelectRow row: Int, inComponent component: Int) {
    if(pickerView.tag == 1){
            var choosenProfile: Profiles = profilesList[row] as Profiles;
            self.selectedProfile = choosenProfile.profileName;
    } else if (pickerView.tag == 2){
            var choosenUser: Profiles = usersList[row] as Users;
            self.selectedUsername = choosenUser.username;
    }

}
essayez ceci j'ai fait quelque tour...
ci-dessous le code fonctionne pour moi dans iPod iOS8beta5 + XCode6
- Je ajouter UIActivityIndicatorView de contrôle dans UIAlertController en objective-c.
UIAlertController *alert = [UIAlertController alertControllerWithTitle:nil
                                        message:@"Please wait\n\n\n"
                                 preferredStyle:UIAlertControllerStyleAlert];

    UIActivityIndicatorView *spinner = [[UIActivityIndicatorView alloc] initWithActivityIndicatorStyle:UIActivityIndicatorViewStyleWhiteLarge];
    spinner.center = CGPointMake(130.5, 65.5);
    spinner.color = [UIColor blackColor];
    [spinner startAnimating];
    [alert.view addSubview:spinner];
    [self presentViewController:alert animated:NO completion:nil];
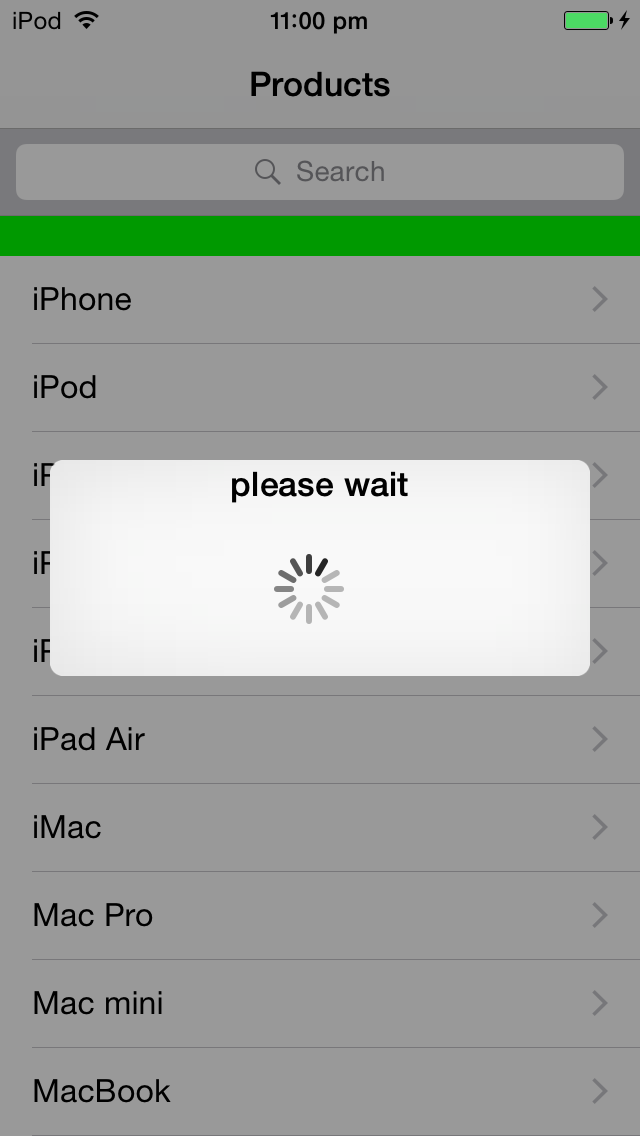
Remarque :
c'est dans l'objectif-c mais par ceci il est prouvé que nous pouvons aussi faire cela en utilisant swift.
Vous pouvez utiliser un code similaire dans iOS8 / Swift pour ajouter vos propres contrôles dans une alerte (au lieu d'une feuille d'action) qui apparaît au milieu de l'écran.
le seul problème que j'ai eu avec faire ça avec alert.addSubView était que la vue alert ne se dimensionne que selon les contrôles que vous avez ajoutés par les méthodes de classe. Vous devez ensuite ajouter vos propres contraintes pour s'assurer que l'alerte regroupe toutes vos commandes.
j'ai ajouté un exemple ici comme la question originale a demandé L'alerte ou ActionSheet
func addAlert(){

    // create the alert
    let title = "This is the title"
    let message = "This is the message"
    var alert = UIAlertController(title: title, message: message, preferredStyle: UIAlertControllerStyle.Alert);
    alert.modalInPopover = true;

    // add an action button
    let nextAction: UIAlertAction = UIAlertAction(title: "Action", style: .Default){action->Void in
        // do something
    }
    alert.addAction(nextAction)

    // now create our custom view - we are using a container view which can contain other views
    let containerViewWidth = 250
    let containerViewHeight = 120
    var containerFrame = CGRectMake(10, 70, CGFloat(containerViewWidth), CGFloat(containerViewHeight));
    var containerView: UIView = UIView(frame: containerFrame);

    alert.view.addSubview(containerView)

    // now add some constraints to make sure that the alert resizes itself
    var cons:NSLayoutConstraint = NSLayoutConstraint(item: alert.view, attribute: NSLayoutAttribute.Height, relatedBy: NSLayoutRelation.GreaterThanOrEqual, toItem: containerView, attribute: NSLayoutAttribute.Height, multiplier: 1.00, constant: 130)

    alert.view.addConstraint(cons)

    var cons2:NSLayoutConstraint = NSLayoutConstraint(item: alert.view, attribute: NSLayoutAttribute.Width, relatedBy: NSLayoutRelation.GreaterThanOrEqual, toItem: containerView, attribute: NSLayoutAttribute.Width, multiplier: 1.00, constant: 20)

    alert.view.addConstraint(cons2)

    // present with our view controller
    presentViewController(alert, animated: true, completion: nil)

}
j'ai besoin de faire la même chose et c'est comment je l'ai résolu. J'ai fait quelque chose de similaire à Jageen. Mon code est en dessous. Notez que j'ai mis des valeurs dans UIPickerView dans une partie différente du code.
//Need to use an UIAlertController for iOS 8 instead of an action view
UIAlertController *alert = [UIAlertController alertControllerWithTitle:nil
                              message:@"\n\n\n\n\n\n\n\n"
                              preferredStyle:UIAlertControllerStyleAlert];

//Make a frame for the picker & then create the picker
CGRect pickerFrame = CGRectMake(0, 0, 270, 100);
UIPickerView *regionsPicker = [[UIPickerView alloc] initWithFrame:pickerFrame];

//There will be 3 pickers on this view so I am going to use the tag as a way
//to identify them in the delegate and datasource
regionsPicker.tag = 1;

//set the pickers datasource and delegate
regionsPicker.dataSource = self;
regionsPicker.delegate = self;

//set the pickers selection indicator to true so that the user will now which one that they are chosing
[regionsPicker setShowsSelectionIndicator:YES];

//Add the picker to the alert controller
[alert.view addSubview:regionsPicker];

//make the toolbar view
UIView *toolView = [[UIView alloc] initWithFrame:CGRectMake(0, 0, 270.0f, 44.f)];
toolView.backgroundColor = [UIColor blackColor]; //set it's background


//add buttons to the view
CGRect buttonFrame = CGRectMake(0, 5, 100, 30); //size & position of the button as placed on the toolView
//make the cancel button & set the title
UIButton *button = [[UIButton alloc] initWithFrame: buttonFrame];
[button setTitle: @"Cancel" forState: UIControlStateNormal];
[button setTitleColor: [UIColor blueColor] forState: UIControlStateNormal]; //make the color blue to keep the same look as prev version
[toolView addSubview:button]; //add to the subview

//Add the tartget
[button addTarget: self
           action: @selector(cancelRegionSet)
 forControlEvents: UIControlEventTouchDown];

//do the same for the select button
buttonFrame = CGRectMake(90, 5, 100, 30);
UIButton *selButton = [[UIButton alloc] initWithFrame:buttonFrame];
[selButton setTitle:@"Select" forState:UIControlStateNormal];
[selButton setTitleColor:[UIColor blueColor] forState:UIControlStateNormal];
[toolView addSubview:selButton];

[selButton addTarget: self
              action: @selector(dismissRegionSet:)
 forControlEvents: UIControlEventTouchDown];

//add the toolbar to the alert controller
[alert.view addSubview:toolView];

[self presentViewController:alert animated:NO completion:nil];
je pense que ce n'est pas une mauvaise idée de commencer par la bêta.
Vous avez besoin de custom UIAlertView. Attention à UIAlertControllerdisponible uniquement dans iOS 8.0.
alertController = [UIAlertController alertControllerWithTitle:@" \n\n\n\n\n\n\n\n\n\n"
                                                      message:@""
                                               preferredStyle:UIAlertControllerStyleActionSheet];

closePicker = [[UISegmentedControl alloc] initWithItems:[NSArray arrayWithObject:@"Cancel"]];
closePicker.momentary = YES;
closePicker.frame = CGRectMake(25, 0.0f, 50.0f, 30.0f);
closePicker.segmentedControlStyle = UISegmentedControlStyleBar;
closePicker.tintColor = [UIColor blackColor];
[closePicker addTarget:self action:@selector(dismissActionSheet:) forControlEvents:UIControlEventValueChanged];
[alertController.view addSubview:closePicker];


UIPickerView *pickerFiliter=[[UIPickerView alloc]init];
pickerFiliter = [[UIPickerView alloc] initWithFrame:CGRectMake(0.0, 40.0, 320.0, 120.0)];
pickerFiliter.showsSelectionIndicator = YES;
pickerFiliter.dataSource = self;
pickerFiliter.delegate = self;

[alertController.view addSubview:pickerFiliter];


[self presentViewController:alertController animated:YES completion:nil];


- (IBAction)dismissActionSheet:(id)sender
 {

    [alertController dismissViewControllerAnimated:YES completion:nil];

 }
vous pouvez ajouter Picker comme UIActionSheet dans iOS 8 en utilisant L'Objectif-C par: -
 colorArray = [[NSMutableArray alloc ]initWithObjects:@"One", @"Two", @"Three", @"Four", @"Five", nil];
picker = [[UIPickerView alloc]init];
picker.frame = CGRectMake(0.0, 44.0,self.view.frame.size.width, 216.0);
picker.dataSource = self;
picker.delegate = self;
picker.showsSelectionIndicator = true;
picker.backgroundColor = [UIColor whiteColor];

UIToolbar* pickerDateToolbar = [[UIToolbar alloc] initWithFrame: CGRectMake(0, 0, 320, 44)];  //(frame: CGRectMake(0, 0, 320, 44))
pickerDateToolbar.barStyle =  UIBarStyleBlackTranslucent;//UIBarStyle.Black
pickerDateToolbar.barTintColor = [UIColor whiteColor];
pickerDateToolbar.translucent = true;
actionView.backgroundColor = [UIColor whiteColor];


UILabel* label = [[UILabel alloc] initWithFrame:CGRectMake(150, 5, 150, 20)];
label.backgroundColor = [UIColor clearColor];
label.textColor = [UIColor blackColor];
label.shadowColor = [UIColor blackColor];
label.shadowOffset = CGSizeMake(0, 1);
label.font = [UIFont systemFontOfSize:15];//[UIFont boldSystemFontOfSize:15];
label.text = @"Select a Status";
UIBarButtonItem *labeltext= [[UIBarButtonItem alloc] initWithCustomView:label];


UIBarButtonItem *cancelBtn = [[UIBarButtonItem alloc] initWithTitle:@"Cancel" style:UIBarButtonItemStylePlain target:self action:@selector(cancel_clicked:)];

UIBarButtonItem *flexSpace = [[UIBarButtonItem alloc] initWithBarButtonSystemItem:UIBarButtonSystemItemFlexibleSpace target:nil action:nil];

UIBarButtonItem *doneBtn = [[UIBarButtonItem alloc] initWithTitle:@"Done" style:UIBarButtonItemStylePlain target:self action:@selector(done_clicked:)];

pickerDateToolbar.items = [[NSArray alloc] initWithObjects:cancelBtn,flexSpace,labeltext,doneBtn,nil];

cancelBtn.tintColor = [UIColor blueColor];
doneBtn.tintColor = [UIColor blueColor];

[actionView addSubview:pickerDateToolbar];
[actionView addSubview:picker];

if (window != nil) {
[window addSubview:actionView];
}
else
{
[self.view addSubview:actionView];
}

[UIView animateWithDuration:(0.2) animations:^{
actionView.frame = CGRectMake(0, self.view.frame.size.height - 260.0, self.view.frame.size.width, 260.0);
self.view.alpha = 0.5;
actionView.alpha = 1;
}];
Dans le ViewDidLoad ajouter cet,
UIApplication * delegate = [UIApplication sharedApplication];
UIWindow *myWindow = delegate.keyWindow;
NSArray *myWindow2 = delegate.windows;

if(myWindow == [UIApplication sharedApplication].keyWindow)
window = myWindow;
else
window = myWindow2[0];

actionView = [[UIView alloc]initWithFrame:CGRectMake(0, UIScreen.mainScreen.bounds.size.height, UIScreen.mainScreen.bounds.size.width, 240.0)];
/ / Ceci est pour créer ActionView et pour le fond fané quand picker est affiché dans popup.
-(void)cancel_clicked:(id)sender{
NSLog(@"cancel clicked");
[UIView animateWithDuration:0.2 animations:^{
actionView.frame = CGRectMake(0, UIScreen.mainScreen.bounds.size.height - 260.0, UIScreen.mainScreen.bounds.size.width, 260.0);
} completion:^(BOOL finished) {
self.view.alpha = 1;
[actionView removeFromSuperview];
}];
}
// Méthode Du Clic Sur Le Bouton D'Annulation.
-(void)done_clicked:(id)sender{
NSLog(@"done clicked");
self.view.userInteractionEnabled = TRUE;

[UIView animateWithDuration:0.2 animations:^{
actionView.frame = CGRectMake(0, UIScreen.mainScreen.bounds.size.height - 260.0, UIScreen.mainScreen.bounds.size.width, 260.0);
} completion:^(BOOL finished) {
_permitStatus.text = [colorArray objectAtIndex:[picker selectedRowInComponent:0]];
self.view.alpha = 1;
[actionView removeFromSuperview];
}];
}
// Pour Faire Cliquez Sur Bouton.
Voici un projet github Cela fait apparaître un UIDatePicker au centre de l'écran. Il n'utilise pas UIAlertController ou UIAlertView. Je ne pense pas que ce soit le but des cours d'alerte.
Swift 2.0:
faire un exemple de vue de pickerview ou de segment et l'ajouter comme sous-vue de uialercontroller. Mettre en œuvre UIPickerView délégués et présenter le uialertcontroller. Voici comment j'ai réalisé la même.
class ViewController:

    UIViewController,UIPickerViewDataSource,UIPickerViewDelegate {

     var samplePicker: UIPickerView = UIPickerView()
     var sampleSegment:UISegmentedControl = UISegmentedControl ()
     var alertController:UIAlertController = UIAlertController()
     var buildings:[String] = ["BankBuilding", "Cinema" , "CornerShop", "Greg's House","14th Street"]

     override func viewDidLoad() {
      super.viewDidLoad()

      samplePicker = UIPickerView(frame: CGRectMake(10.0, 40.0, 250, 150))
      samplePicker.delegate =  self;
      samplePicker.dataSource = self;
      samplePicker.showsSelectionIndicator = true
      samplePicker.tintColor =  UIColor.redColor()
      samplePicker.reloadAllComponents()


      sampleSegment = UISegmentedControl(items: NSArray(object: "  Dismiss ") as [AnyObject])
      sampleSegment.momentary = true
      sampleSegment.frame = CGRectMake(25, 10.0, 100.0, 30.0)
      sampleSegment.tintColor = UIColor.blackColor()
      sampleSegment.backgroundColor = UIColor.orangeColor()
      sampleSegment.addTarget(self, action: "dismissAlert", forControlEvents: UIControlEvents.ValueChanged)

     }
     func numberOfComponentsInPickerView(pickerView: UIPickerView) -> Int {

      return 1
     }

     func pickerView(pickerView: UIPickerView, numberOfRowsInComponent component: Int) -> Int {
      return 3
     }

     func pickerView(pickerView: UIPickerView, titleForRow row: Int, forComponent component: Int) -> String? {

      return buildings[row] as String
     }

     func pickerView(pickerView: UIPickerView, didSelectRow row: Int, inComponent component: Int) {
      print(buildings[0])

     }
     func pickerView(pickerView: UIPickerView, rowHeightForComponent component: Int) -> CGFloat {
      return 36.0
     }
     override func viewDidAppear(animated: Bool)
     {
      alertController = UIAlertController(title: " \n\n\n\n\n\n\n\n\n\n", message: "", preferredStyle: UIAlertControllerStyle.Alert)

      alertController.view.addSubview(sampleSegment)
      alertController.view.addSubview(samplePicker)

      self.presentViewController(alertController, animated: true, completion: nil)

     }
     func dismissAlert()
     {
      alertController.dismissViewControllerAnimated(true, completion: nil)
     }
     override func didReceiveMemoryWarning() {
      super.didReceiveMemoryWarning()

     }
    }
Swift 3.0:
func showPickerInActionSheet() {

    let title = ""
    let message = "\n\n\n\n\n\n\n\n\n\n";
    let alert = UIAlertController(title: title, message: message, preferredStyle: UIAlertControllerStyle.actionSheet);
    alert.isModalInPopover = true;


    //Create a frame (placeholder/wrapper) for the picker and then create the picker
    let pickerFrame = CGRect(x: 17, y: 52, width: 270, height: 100)
    let picker: UIPickerView = UIPickerView(frame: pickerFrame)


    //set the pickers datasource and delegate
    picker.delegate   = self
    picker.dataSource = self

    //Add the picker to the alert controller
    alert.view.addSubview(picker)

    //Create the toolbar view - the view witch will hold our 2 buttons
    let toolFrame = CGRect(x: 17, y: 5, width: 270, height: 45)
    let toolView: UIView = UIView(frame: toolFrame)


    //add buttons to the view
    let buttonCancelFrame = CGRect(x: 0, y: 7, width: 100, height: 30) //size & position of the button as placed on the toolView

    //Create the cancel button & set its title
    let buttonCancel: UIButton = UIButton(frame: buttonCancelFrame);
    buttonCancel.setTitle("Cancel", for: .normal)
    buttonCancel.setTitleColor(UIColor.blue, for: .normal)
    toolView.addSubview(buttonCancel); //add it to the toolView

    //Add the target - target, function to call, the event witch will trigger the function call
    buttonCancel.addTarget(self, action: Selector("cancelSelection:"), for: UIControlEvents.touchDown);


    //add buttons to the view

    let buttonOkFrame = CGRect(x: 170, y: 7, width: 100, height: 30)//size & position of the button as placed on the toolView

    //Create the Select button & set the title
    let buttonOk: UIButton = UIButton(frame: buttonOkFrame);
    buttonOk.setTitle("Select", for: UIControlState.normal);
    buttonOk.setTitleColor(UIColor.blue, for: UIControlState.normal);
    toolView.addSubview(buttonOk); //add to the subview

    buttonOk.addTarget(self, action: #selector(HomeViewController.saveDelayTime), for: UIControlEvents.touchDown);

    //add the toolbar to the alert controller
    alert.view.addSubview(toolView);

    self.present(alert, animated: true, completion: nil);
}

func saveProfile(sender: UIButton){
    // Your code when select button is tapped

}

func saveUser(sender: UIButton){
    // Your code when select button is tapped
}

func cancelSelection(sender: UIButton){
    self.dismiss(animated: true, completion: nil)

    // We dismiss the alert. Here you can add your additional code to execute when cancel is pressed
}

// returns number of rows in each component..
func numberOfComponents(in pickerView: UIPickerView) -> Int{
    return 1
}

func pickerView(_ pickerView: UIPickerView, numberOfRowsInComponent component: Int) -> Int {
    return 60
}

// Return the title of each row in your picker ... In my case that will be the profile name or the username string
func pickerView(_ pickerView: UIPickerView, titleForRow row: Int, forComponent component: Int) -> String? {
    return "\(row)"

}

func pickerView(_ pickerView: UIPickerView, didSelectRow row: Int, inComponent component: Int) {
    selectedTime = row
}

func saveDelayTime() {
    self.dismiss(animated: true, completion: nil)
    UserDefaults.standard.set(selectedTime, forKey: "DelayTimeKey")
    let _ = UserDefaults.standard.synchronize()
}
Swift 4.1 / Xcode 9.4.1 / iOS 11.4
func addAlert(){

    // create the alert
    let title = "This is the title"
    let message = "This is the message"
    let alert = UIAlertController(title: title, message: message, preferredStyle: UIAlertControllerStyle.alert);
    alert.isModalInPopover = true;

    // add an action button
    let nextAction: UIAlertAction = UIAlertAction(title: "Action", style: .default){action->Void in
        // do something
    }
    alert.addAction(nextAction)

    // now create our custom view - we are using a container view which can contain other views
    let containerViewWidth = 250
    let containerViewHeight = 120
    let containerFrame = CGRect(x:10, y: 70, width: CGFloat(containerViewWidth), height: CGFloat(containerViewHeight));
    let containerView: UIView = UIView(frame: containerFrame);

    alert.view.addSubview(containerView)

    // now add some constraints to make sure that the alert resizes itself
    let cons:NSLayoutConstraint = NSLayoutConstraint(item: alert.view, attribute: NSLayoutAttribute.height, relatedBy: NSLayoutRelation.greaterThanOrEqual, toItem: containerView, attribute: NSLayoutAttribute.height, multiplier: 1.00, constant: 130)

    alert.view.addConstraint(cons)

    let cons2:NSLayoutConstraint = NSLayoutConstraint(item: alert.view, attribute: NSLayoutAttribute.width, relatedBy: NSLayoutRelation.greaterThanOrEqual, toItem: containerView, attribute: NSLayoutAttribute.width, multiplier: 1.00, constant: 20)

    alert.view.addConstraint(cons2)

    // present with our view controller
    present(alert, animated: true, completion: nil)

}