HTML5 canvas ctx.fillText ne fait pas de saut de ligne?
Je ne peux pas ajouter de texte à une toile si le texte inclut"n". Je veux dire, les sauts de ligne ne montrent pas/travail.
ctxPaint.fillText("s ome n n <br/> thing", x, y);
le code ci-dessus dessinera "s ome n <br/> thing" , sur une ligne.
est-ce une limitation de fillText ou est-ce que je le fais mal? le "n"; s sont là, et ne sont pas imprimés, mais ils ne fonctionnent pas non plus.
15 réponses
je crains que ce soit une limitation du fillText de Canvas. Il n'y a pas de support multi-ligne. Le pire, c'est qu'il n'y a pas de méthode intégrée pour mesurer la hauteur de la ligne, seulement la largeur, ce qui rend le faire vous-même encore plus difficile!
beaucoup de gens ont écrit leur propre support multi-ligne, peut-être le projet le plus notable qui a est Mozilla Skywriter .
l'essentiel de ce que vous aurez besoin de faire est de multiples appels de fillText tout en ajoutant la hauteur de le texte à la valeur y à chaque fois. (la mesure de la largeur de M est ce que les gens de skywriter font pour approximer le texte, je crois.)
si vous voulez simplement prendre soin des barres de nouvelle ligne dans le texte, vous pouvez le simuler en séparant le texte aux nouvelles lignes et en appelant plusieurs fois le fillText()
quelque chose comme http://jsfiddle.net/BaG4J/1 /
var c = document.getElementById('c').getContext('2d');
c.font = '11px Courier';
    console.log(c);
var txt = 'line 1\nline 2\nthird line..';
var x = 30;
var y = 30;
var lineheight = 15;
var lines = txt.split('\n');

for (var i = 0; i<lines.length; i++)
c.fillText(lines[i], x, y + (i*lineheight) );canvas{background-color:#ccc;}<canvas id="c" width="150" height="150"></canvas> je viens de faire une preuve de concept d'emballage ( Absolute wrap at specified largeur. Pas de mots de manipulation cassant, encore )
exemple à http://jsfiddle.net/BaG4J/2 /
var c = document.getElementById('c').getContext('2d');
c.font = '11px Courier';

var txt = 'this is a very long text to print';

printAt(c, txt, 10, 20, 15, 90 );


function printAt( context , text, x, y, lineHeight, fitWidth)
{
    fitWidth = fitWidth || 0;

    if (fitWidth <= 0)
    {
         context.fillText( text, x, y );
        return;
    }

    for (var idx = 1; idx <= text.length; idx++)
    {
        var str = text.substr(0, idx);
        console.log(str, context.measureText(str).width, fitWidth);
        if (context.measureText(str).width > fitWidth)
        {
            context.fillText( text.substr(0, idx-1), x, y );
            printAt(context, text.substr(idx-1), x, y + lineHeight, lineHeight,  fitWidth);
            return;
        }
    }
    context.fillText( text, x, y );
}canvas{background-color:#ccc;}<canvas id="c" width="150" height="150"></canvas> Et un retour de ligne ( casser à des espaces ) de la preuve de concept.
exemple à http://jsfiddle.net/BaG4J/5 /
var c = document.getElementById('c').getContext('2d');
c.font = '11px Courier';

var txt = 'this is a very long text. Some more to print!';

printAtWordWrap(c, txt, 10, 20, 15, 90 );


function printAtWordWrap( context , text, x, y, lineHeight, fitWidth)
{
    fitWidth = fitWidth || 0;

    if (fitWidth <= 0)
    {
        context.fillText( text, x, y );
        return;
    }
    var words = text.split(' ');
    var currentLine = 0;
    var idx = 1;
    while (words.length > 0 && idx <= words.length)
    {
        var str = words.slice(0,idx).join(' ');
        var w = context.measureText(str).width;
        if ( w > fitWidth )
        {
            if (idx==1)
            {
                idx=2;
            }
            context.fillText( words.slice(0,idx-1).join(' '), x, y + (lineHeight*currentLine) );
            currentLine++;
            words = words.splice(idx-1);
            idx = 1;
        }
        else
        {idx++;}
    }
    if  (idx > 0)
        context.fillText( words.join(' '), x, y + (lineHeight*currentLine) );
}canvas{background-color:#ccc;}<canvas id="c" width="150" height="150"></canvas> dans les deuxième et troisième exemples, j'utilise la méthode measureText() qui montre combien de temps ( en pixels ) une chaîne sera imprimée.
peut-être venir à cette fête un peu en retard, mais j'ai trouvé le tutoriel suivant pour envelopper le texte sur une toile parfaite.
http://www.html5canvastutorials.com/tutorials/html5-canvas-wrap-text-tutorial /
de ce que j'ai pu penser obtenir multi lignes de travail (Désolé Ramirez, le vôtre n'a pas fonctionné pour moi!). Mon code complet pour envelopper le texte dans une toile est le suivant:
<script type="text/javascript">

     // http: //www.html5canvastutorials.com/tutorials/html5-canvas-wrap-text-tutorial/
     function wrapText(context, text, x, y, maxWidth, lineHeight) {
        var cars = text.split("\n");

        for (var ii = 0; ii < cars.length; ii++) {

            var line = "";
            var words = cars[ii].split(" ");

            for (var n = 0; n < words.length; n++) {
                var testLine = line + words[n] + " ";
                var metrics = context.measureText(testLine);
                var testWidth = metrics.width;

                if (testWidth > maxWidth) {
                    context.fillText(line, x, y);
                    line = words[n] + " ";
                    y += lineHeight;
                }
                else {
                    line = testLine;
                }
            }

            context.fillText(line, x, y);
            y += lineHeight;
        }
     }

     function DrawText() {

         var canvas = document.getElementById("c");
         var context = canvas.getContext("2d");

         context.clearRect(0, 0, 500, 600);

         var maxWidth = 400;
         var lineHeight = 60;
         var x = 20; // (canvas.width - maxWidth) / 2;
         var y = 58;


         var text = document.getElementById("text").value.toUpperCase();

         context.fillStyle = "rgba(255, 0, 0, 1)";
         context.fillRect(0, 0, 600, 500);

         context.font = "51px 'LeagueGothicRegular'";
         context.fillStyle = "#333";

         wrapText(context, text, x, y, maxWidth, lineHeight);
     }

     $(document).ready(function () {

         $("#text").keyup(function () {
             DrawText();
         });

     });

    </script>
où c est l'ID de ma toile et text est l'ID de ma boîte de texte.
comme vous pouvez probablement voir am en utilisant une police non standard. Vous pouvez utiliser @font-face tant que vous avez utilisé la police sur un texte avant de manipuler le canvas - sinon le canvas ne récupérera pas la police.
J'espère que ça aidera quelqu'un.
diviser le texte en lignes, et dessiner chacun séparément:
function fillTextMultiLine(ctx, text, x, y) {
  var lineHeight = ctx.measureText("M").width * 1.2;
  var lines = text.split("\n");
  for (var i = 0; i < lines.length; ++i) {
    ctx.fillText(lines[i], x, y);
    y += lineHeight;
  }
}
voici ma solution, modifiant la populaire fonction wrapText() qui est déjà présentée ici. J'utilise la fonction de prototypage de JavaScript pour que vous puissiez appeler la fonction à partir du contexte canvas.
CanvasRenderingContext2D.prototype.wrapText = function (text, x, y, maxWidth, lineHeight) {

    var lines = text.split("\n");

    for (var i = 0; i < lines.length; i++) {

        var words = lines[i].split(' ');
        var line = '';

        for (var n = 0; n < words.length; n++) {
            var testLine = line + words[n] + ' ';
            var metrics = this.measureText(testLine);
            var testWidth = metrics.width;
            if (testWidth > maxWidth && n > 0) {
                this.fillText(line, x, y);
                line = words[n] + ' ';
                y += lineHeight;
            }
            else {
                line = testLine;
            }
        }

        this.fillText(line, x, y);
        y += lineHeight;
    }
}
usage de base:
var myCanvas = document.getElementById("myCanvas");
var ctx = myCanvas.getContext("2d");
ctx.fillStyle = "black";
ctx.font = "12px sans-serif";
ctx.textBaseline = "top";
ctx.wrapText("Hello\nWorld!",20,20,160,16);
Voici une démonstration que j'ai faite: http://jsfiddle.net/7RdbL/
le code pour l'emballage de mots (briser les espaces) fourni par @Gaby Petrioli est très utile.
J'ai étendu son code pour fournir un support pour les caractères newline \n . Aussi, souvent, il est utile d'avoir les dimensions de la boîte englobante, de sorte que multiMeasureText() renvoie à la fois la largeur et la hauteur.
vous pouvez voir le code ici: http://jsfiddle.net/jeffchan/WHgaY/76 /
avec javascript, j'ai développé une solution. Ce n'est pas beau, mais ça a marché pour moi:
function drawMultilineText(){

    // set context and formatting
    var context = document.getElementById("canvas").getContext('2d');
    context.font = fontStyleStr;
    context.textAlign = "center";
    context.textBaseline = "top";
    context.fillStyle = "#000000";

    // prepare textarea value to be drawn as multiline text.
    var textval = document.getElementByID("textarea").value;
    var textvalArr = toMultiLine(textval);
    var linespacing = 25;
    var startX = 0;
    var startY = 0;

    // draw each line on canvas.
    for(var i = 0; i < textvalArr.length; i++){
        context.fillText(textvalArr[i], x, y);
        y += linespacing;
    }
}

// Creates an array where the <br/> tag splits the values.
function toMultiLine(text){
   var textArr = new Array();
   text = text.replace(/\n\r?/g, '<br/>');
   textArr = text.split("<br/>");
   return textArr;
}
Espère que ça aide!
je viens d'étendre le CanvasRenderingContext2D ajoutant deux fonctions: mlFillText et mlStrokeText.
vous pouvez trouver la dernière version dans GitHub :
avec ces fonctions, vous pouvez remplir / trait le texte miltiline dans une boîte. Vous pouvez aligner le texte verticaly et horizontaly. (Il prend en compte les \N et peut aussi justifier le texte).
les prototypes sont:
FonctionmlFillText (text, x, y, w,h, vAlign, hAlign, lineheight); fonction mlStrokeText (text,x,y,w,h,vAlign,hAlign,lineheight);
où vAlign peut être: bouton" top"," center "ou"" Et hAlign peut être: "gauche", "centre", "droite" ou de "justifier"
vous pouvez tester la lib ici: http://jsfiddle.net/4WRZj/1 /
voici le code de la bibliothèque:
// Library: mltext.js
// Desciption: Extends the CanvasRenderingContext2D that adds two functions: mlFillText and mlStrokeText.
//
// The prototypes are:
//
// function mlFillText(text,x,y,w,h,vAlign,hAlign,lineheight);
// function mlStrokeText(text,x,y,w,h,vAlign,hAlign,lineheight);
//
// Where vAlign can be: "top", "center" or "button"
// And hAlign can be: "left", "center", "right" or "justify"
// Author: Jordi Baylina. (baylina at uniclau.com)
// License: GPL
// Date: 2013-02-21

function mlFunction(text, x, y, w, h, hAlign, vAlign, lineheight, fn) {
    text = text.replace(/[\n]/g, " \n ");
    text = text.replace(/\r/g, "");
    var words = text.split(/[ ]+/);
    var sp = this.measureText(' ').width;
    var lines = [];
    var actualline = 0;
    var actualsize = 0;
    var wo;
    lines[actualline] = {};
    lines[actualline].Words = [];
    i = 0;
    while (i < words.length) {
        var word = words[i];
        if (word == "\n") {
            lines[actualline].EndParagraph = true;
            actualline++;
            actualsize = 0;
            lines[actualline] = {};
            lines[actualline].Words = [];
            i++;
        } else {
            wo = {};
            wo.l = this.measureText(word).width;
            if (actualsize === 0) {
                while (wo.l > w) {
                    word = word.slice(0, word.length - 1);
                    wo.l = this.measureText(word).width;
                }
                if (word === "") return; // I can't fill a single character
                wo.word = word;
                lines[actualline].Words.push(wo);
                actualsize = wo.l;
                if (word != words[i]) {
                    words[i] = words[i].slice(word.length, words[i].length);
                } else {
                    i++;
                }
            } else {
                if (actualsize + sp + wo.l > w) {
                    lines[actualline].EndParagraph = false;
                    actualline++;
                    actualsize = 0;
                    lines[actualline] = {};
                    lines[actualline].Words = [];
                } else {
                    wo.word = word;
                    lines[actualline].Words.push(wo);
                    actualsize += sp + wo.l;
                    i++;
                }
            }
        }
    }
    if (actualsize === 0) lines[actualline].pop();
    lines[actualline].EndParagraph = true;

    var totalH = lineheight * lines.length;
    while (totalH > h) {
        lines.pop();
        totalH = lineheight * lines.length;
    }

    var yy;
    if (vAlign == "bottom") {
        yy = y + h - totalH + lineheight;
    } else if (vAlign == "center") {
        yy = y + h / 2 - totalH / 2 + lineheight;
    } else {
        yy = y + lineheight;
    }

    var oldTextAlign = this.textAlign;
    this.textAlign = "left";

    for (var li in lines) {
        var totallen = 0;
        var xx, usp;
        for (wo in lines[li].Words) totallen += lines[li].Words[wo].l;
        if (hAlign == "center") {
            usp = sp;
            xx = x + w / 2 - (totallen + sp * (lines[li].Words.length - 1)) / 2;
        } else if ((hAlign == "justify") && (!lines[li].EndParagraph)) {
            xx = x;
            usp = (w - totallen) / (lines[li].Words.length - 1);
        } else if (hAlign == "right") {
            xx = x + w - (totallen + sp * (lines[li].Words.length - 1));
            usp = sp;
        } else { // left
            xx = x;
            usp = sp;
        }
        for (wo in lines[li].Words) {
            if (fn == "fillText") {
                this.fillText(lines[li].Words[wo].word, xx, yy);
            } else if (fn == "strokeText") {
                this.strokeText(lines[li].Words[wo].word, xx, yy);
            }
            xx += lines[li].Words[wo].l + usp;
        }
        yy += lineheight;
    }
    this.textAlign = oldTextAlign;
}

(function mlInit() {
    CanvasRenderingContext2D.prototype.mlFunction = mlFunction;

    CanvasRenderingContext2D.prototype.mlFillText = function (text, x, y, w, h, vAlign, hAlign, lineheight) {
        this.mlFunction(text, x, y, w, h, hAlign, vAlign, lineheight, "fillText");
    };

    CanvasRenderingContext2D.prototype.mlStrokeText = function (text, x, y, w, h, vAlign, hAlign, lineheight) {
        this.mlFunction(text, x, y, w, h, hAlign, vAlign, lineheight, "strokeText");
    };
})();
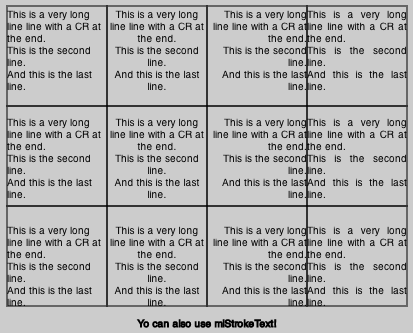
Et voici l'exemple d'utilisation:
var c = document.getElementById("myCanvas");
var ctx = c.getContext("2d");

var T = "This is a very long line line with a CR at the end.\n This is the second line.\nAnd this is the last line.";
var lh = 12;

ctx.lineWidth = 1;

ctx.mlFillText(T, 10, 10, 100, 100, 'top', 'left', lh);
ctx.strokeRect(10, 10, 100, 100);

ctx.mlFillText(T, 110, 10, 100, 100, 'top', 'center', lh);
ctx.strokeRect(110, 10, 100, 100);

ctx.mlFillText(T, 210, 10, 100, 100, 'top', 'right', lh);
ctx.strokeRect(210, 10, 100, 100);

ctx.mlFillText(T, 310, 10, 100, 100, 'top', 'justify', lh);
ctx.strokeRect(310, 10, 100, 100);

ctx.mlFillText(T, 10, 110, 100, 100, 'center', 'left', lh);
ctx.strokeRect(10, 110, 100, 100);

ctx.mlFillText(T, 110, 110, 100, 100, 'center', 'center', lh);
ctx.strokeRect(110, 110, 100, 100);

ctx.mlFillText(T, 210, 110, 100, 100, 'center', 'right', lh);
ctx.strokeRect(210, 110, 100, 100);

ctx.mlFillText(T, 310, 110, 100, 100, 'center', 'justify', lh);
ctx.strokeRect(310, 110, 100, 100);

ctx.mlFillText(T, 10, 210, 100, 100, 'bottom', 'left', lh);
ctx.strokeRect(10, 210, 100, 100);

ctx.mlFillText(T, 110, 210, 100, 100, 'bottom', 'center', lh);
ctx.strokeRect(110, 210, 100, 100);

ctx.mlFillText(T, 210, 210, 100, 100, 'bottom', 'right', lh);
ctx.strokeRect(210, 210, 100, 100);

ctx.mlFillText(T, 310, 210, 100, 100, 'bottom', 'justify', lh);
ctx.strokeRect(310, 210, 100, 100);

ctx.mlStrokeText("Yo can also use mlStrokeText!", 0 , 310 , 420, 30, 'center', 'center', lh);
Voici une version de wrapText() de Colin qui supporte aussi texte centré verticalement avec context.textBaseline = 'middle' :
var wrapText = function (context, text, x, y, maxWidth, lineHeight) {
    var paragraphs = text.split("\n");
    var textLines = [];

    // Loop through paragraphs
    for (var p = 0; p < paragraphs.length; p++) {
        var line = "";
        var words = paragraphs[p].split(" ");
        // Loop through words
        for (var w = 0; w < words.length; w++) {
            var testLine = line + words[w] + " ";
            var metrics = context.measureText(testLine);
            var testWidth = metrics.width;
            // Make a line break if line is too long
            if (testWidth > maxWidth) {
                textLines.push(line.trim());
                line = words[w] + " ";
            }
            else {
                line = testLine;
            }
        }
        textLines.push(line.trim());
    }

    // Move text up if centered vertically
    if (context.textBaseline === 'middle')
        y = y - ((textLines.length-1) * lineHeight) / 2;

    // Render text on canvas
    for (var tl = 0; tl < textLines.length; tl++) {
        context.fillText(textLines[tl], x, y);
        y += lineHeight;
    }
};
je pense que vous pouvez toujours compter sur CSS
ctx.measureText().height doesn’t exist.
heureusement, grâce à css hack-ardry (seeTypographic Metrics for more ways to fix older implementations of using CSS measurements), nous pouvons trouver la hauteur du texte en mesurant les décalages de la lumière de a avec la même police-propriétés:
var d = document.createElement(”span”);
d.font = “20px arial”
d.textContent = “Hello world!”
var emHeight = d.offsetHeight;
de l': http://www.html5rocks.com/en/tutorials/canvas/texteffects/
si vous n'avez besoin que de deux lignes de texte, vous pouvez les diviser en deux appels de fillText différents et donner à chacun une ligne de base différente.
ctx.textBaseline="bottom";
ctx.fillText("First line", x-position, y-position);
ctx.textBaseline="top";
ctx.fillText("Second line", x-position, y-position);
Je ne pense pas que ce soit possible non plus, mais une solution est de créer un élément <p> et de le positionner avec Javascript.
je suis arrivé à travers ceci en raison d'avoir le même problème. Je travaille avec une taille de police variable, donc cela prend en compte:
var texts=($(this).find('.noteContent').html()).split("<br>");
for (var k in texts) {
    ctx.fillText(texts[k], left, (top+((parseInt(ctx.font)+2)*k)));
}
où .noteContent est la div contenteditable éditée par l'utilisateur (qui est imbriquée dans un jQuery chaque fonction), et ctx.font est " 14px Arial "(notez que la taille du pixel vient en premier)
ne supporte pas les caractères comme les balises newline '\n', tab '\t' ou < br/>.
l'Essayer:
var newrow = mheight + 30;
ctx.fillStyle = "rgb(0, 0, 0)";
ctx.font = "bold 24px 'Verdana'";
ctx.textAlign = "center";
ctx.fillText("Game Over", mwidth, mheight); //first line
ctx.fillText("play again", mwidth, newrow); //second line
ou peut-être plusieurs lignes:
var textArray = new Array('line2', 'line3', 'line4', 'line5');
var rows = 98;
ctx.fillStyle = "rgb(0, 0, 0)";
ctx.font = "bold 24px 'Verdana'";
ctx.textAlign = "center";
ctx.fillText("Game Over", mwidth, mheight); //first line

for(var i=0; i < textArray.length; ++i) {
rows += 30;
ctx.fillText(textArray[i], mwidth, rows);
}
Mon ES5 solution pour le problème:
var wrap_text = (ctx, text, x, y, lineHeight, maxWidth, textAlign) => {
  if(!textAlign) textAlign = 'center'
  ctx.textAlign = textAlign
  var words = text.split(' ')
  var lines = []
  var sliceFrom = 0
  for(var i = 0; i < words.length; i++) {
    var chunk = words.slice(sliceFrom, i).join(' ')
    var last = i === words.length - 1
    var bigger = ctx.measureText(chunk).width > maxWidth
    if(bigger) {
      lines.push(words.slice(sliceFrom, i).join(' '))
      sliceFrom = i
    }
    if(last) {
      lines.push(words.slice(sliceFrom, words.length).join(' '))
      sliceFrom = i
    }
  }
  var offsetY = 0
  var offsetX = 0
  if(textAlign === 'center') offsetX = maxWidth / 2
  for(var i = 0; i < lines.length; i++) {
    ctx.fillText(lines[i], x + offsetX, y + offsetY)
    offsetY = offsetY + lineHeight
  }
}
plus d'informations sur la question Est sur mon blog .