Comment définir une police de caractères personnalisée aux éléments dans NavigationView?
Avec le Nouveau NavigationView, Nous sommes en mesure de définir les éléments d'un tiroir à travers une ressource de menu en XML.
Avec cela, nous pouvons définir chaque élément avec quelque chose comme
<item
  android:id="@+id/drawer_my_account"
  android:icon="@drawable/ic_my_account"
  android:title="@string/drawer_my_account" />
Mais maintenant, je veux définir une police de caractères personnalisée pour chacun de ces éléments dans mon tiroir, et je n'ai pas pu trouver un moyen de le faire, que ce soit par XML ou par code Java. Est-il un moyen de le faire?
14 réponses
Ajoutez simplement le fichier de classe suivant à votre projet.
import android.graphics.Paint;
import android.graphics.Typeface;
import android.text.TextPaint;
import android.text.style.TypefaceSpan;

public class CustomTypefaceSpan extends TypefaceSpan {

    private final Typeface newType;

    public CustomTypefaceSpan(String family, Typeface type) {
        super(family);
        newType = type;
    }

    @Override
    public void updateDrawState(TextPaint ds) {
        applyCustomTypeFace(ds, newType);
    }

    @Override
    public void updateMeasureState(TextPaint paint) {
        applyCustomTypeFace(paint, newType);
    }

    private static void applyCustomTypeFace(Paint paint, Typeface tf) {
        int oldStyle;
        Typeface old = paint.getTypeface();
        if (old == null) {
            oldStyle = 0;
        } else {
            oldStyle = old.getStyle();
        }

        int fake = oldStyle & ~tf.getStyle();
        if ((fake & Typeface.BOLD) != 0) {
            paint.setFakeBoldText(true);
        }

        if ((fake & Typeface.ITALIC) != 0) {
            paint.setTextSkewX(-0.25f);
        }

        paint.setTypeface(tf);
    }
}
Ensuite, créez la méthode suivante à votre activité
private void applyFontToMenuItem(MenuItem mi) {
        Typeface font = Typeface.createFromAsset(getAssets(), "ds_digi_b.TTF");
        SpannableString mNewTitle = new SpannableString(mi.getTitle());
        mNewTitle.setSpan(new CustomTypefaceSpan("" , font), 0 , mNewTitle.length(),  Spannable.SPAN_INCLUSIVE_INCLUSIVE);
        mi.setTitle(mNewTitle);
}
Et appelez-le depuis activity.
navView = (NavigationView) findViewById(R.id.navView);
        Menu m = navView.getMenu();
        for (int i=0;i<m.size();i++) {
            MenuItem mi = m.getItem(i);

            //for aapplying a font to subMenu ...
            SubMenu subMenu = mi.getSubMenu();
            if (subMenu!=null && subMenu.size() >0 ) {
                for (int j=0; j <subMenu.size();j++) {
                    MenuItem subMenuItem = subMenu.getItem(j);
                    applyFontToMenuItem(subMenuItem);
                }
            }

            //the method we have create in activity
            applyFontToMenuItem(mi);
        }
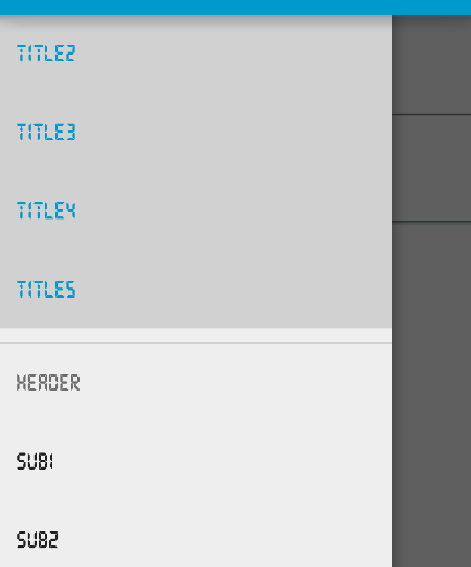
Et voici ma sortie
Celui-ci travaille pour moi
<android.support.design.widget.NavigationView
       android:id="@+id/navigation_view"
       android:layout_width="wrap_content"
       android:layout_height="match_parent"
       android:layout_gravity="start"
       android:background="#4A4444"
       android:clipToPadding="false"
       android:paddingBottom="50dp"
       app:itemIconTint="@color/white"
       app:menu="@menu/drawer_home"
       app1:itemTextAppearance="@style/NavigationDrawerStyle" >
</android.support.design.widget.NavigationView>
Res->valeurs>styles
 <style name="NavigationDrawerStyle">
    <item name="android:textSize">18sp</item>
    <item name="android:typeface">monospace</item>
</style>
/ / pour définir une application principale de police de caractères personnalisée.java
public class MainApplication extends Application {
    @Override
    public void onCreate() {
        super.onCreate();

//set Custom Typeface

        FontsOverride.setDefaultFont(this, "MONOSPACE", "OpenSans-Semibold.ttf");
    }
}
/ / FontsOverride.java
public final class FontsOverride {

     public static void setDefaultFont(Context context,
                String staticTypefaceFieldName, String fontAssetName) {
            final Typeface regular = Typeface.createFromAsset(context.getAssets(),
                    fontAssetName);
            replaceFont(staticTypefaceFieldName, regular);
        }

        protected static void replaceFont(String staticTypefaceFieldName,
                final Typeface newTypeface) {
            try {
                final Field staticField = Typeface.class
                        .getDeclaredField(staticTypefaceFieldName);
                staticField.setAccessible(true);

                staticField.set(null, newTypeface);
            } catch (NoSuchFieldException e) {
                e.printStackTrace();
            } catch (IllegalAccessException e) {
                e.printStackTrace();
            }
        }


}
Est-il un moyen de le faire?
Oui. Le NavigationView ne fournit pas un moyen direct de gérer cela, mais il peut facilement être réalisé en utilisant View.findViewsWithText.
Il y a deux choses qui nous aideront à gérer cela.
- chaque vue
MenuItemest unTextView. Donc, cela rend l'application de votreTypefacebeaucoup plus facile. Pour plus d'informations sur leTextViewréellement utilisé parNavigationView, voirNavigationMenuItemView. -
NavigationViewfournit un rappel lorsqu'unMenuItemest sélectionné. Nous allons devoir fournir à chaqueMenuItemun identifiant unique et ce rappel aidera à généraliser ces identifiants autant que possible, ce qui signifie un peu moins de code plus tard. Bien que, cela est plus lié à si oui ou non vous avez unSubMenu.
La mise en Œuvre
Notez que chaque identifiant MenuItem est simplement menuItem+Position. Cela sera utile plus tard lorsque nous trouverons le View pour chaque MenuItem.
<group android:checkableBehavior="single">
    <item
        android:id="@+id/menuItem1"
        android:icon="@drawable/ic_dashboard"
        android:title="MenuItem 1" />
    <item
        android:id="@+id/menuItem2"
        android:icon="@drawable/ic_event"
        android:title="MenuItem 2" />
    <item
        android:id="@+id/menuItem3"
        android:icon="@drawable/ic_headset"
        android:title="MenuItem 3" />
    <item
        android:id="@+id/menuItem4"
        android:icon="@drawable/ic_forum"
        android:title="MenuItem 4" />
</group>

<item android:title="Sub items" >
    <menu>
        <item
            android:id="@+id/menuItem5"
            android:icon="@drawable/ic_dashboard"
            android:title="Sub item 5" />
        <item
            android:id="@+id/menuItem6"
            android:icon="@drawable/ic_forum"
            android:title="Sub item 6" />
    </menu>
</item>
/** The total number of menu items in the {@link NavigationView} */
private static final int MENU_ITEMS = 6;
/** Contains the {@link MenuItem} views in the {@link NavigationView} */
private final ArrayList<View> mMenuItems = new ArrayList<>(MENU_ITEMS);

@Override
protected void onCreate(Bundle savedInstanceState) {
    super.onCreate(savedInstanceState);
    ...
    final NavigationView navView = ...
    // Grab the NavigationView Menu
    final Menu navMenu = navView.getMenu();
    // Install an OnGlobalLayoutListener and wait for the NavigationMenu to fully initialize
    navView.getViewTreeObserver().addOnGlobalLayoutListener(new ViewTreeObserver.OnGlobalLayoutListener() {
        @Override
        public void onGlobalLayout() {
            // Remember to remove the installed OnGlobalLayoutListener
            navView.getViewTreeObserver().removeOnGlobalLayoutListener(this);
            // Loop through and find each MenuItem View
            for (int i = 0, length = MENU_ITEMS; i < length; i++) {
                final String id = "menuItem" + (i + 1);
                final MenuItem item = navMenu.findItem(getResources().getIdentifier(id, "id", getPackageName()));
                navView.findViewsWithText(mMenuItems, item.getTitle(), View.FIND_VIEWS_WITH_TEXT);
            }
            // Loop through each MenuItem View and apply your custom Typeface
            for (final View menuItem : mMenuItems) {
                ((TextView) menuItem).setTypeface(yourTypeface, Typeface.BOLD);
            }
        }
    });
}
Vous pouvez voir comment à l'aide d'un générique MenuItem id vous permet d'utiliser Resources.getIdentifier et économiser quelques lignes de code.
SubMenu mise en garde
, quelque Chose à garder à l'esprit. Vous devez effectuer une boucle explicite sur vos éléments de menu N plutôt que d'utiliser Menu.size. Sinon, vos éléments SubMenu ne seront pas reconnus. En d'autres termes, si vous n'avez pas de SubMenu, une autre manière de faire serait:
for (int i = 0, length = navMenu.size(); i < length; i++) {
    final MenuItem item = navMenu.getItem(i);
    navigationView.findViewsWithText(mMenuItems, item.getTitle(), View.FIND_VIEWS_WITH_TEXT);
}
Et vous n'avez pas à vous soucier d'appliquer un identifiant unique à chacun MenuItem.
Les Résultats
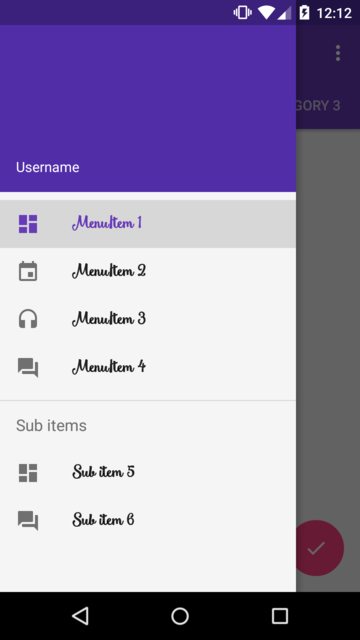
La police que j'utilise dans l'exemple: Smoothie Shoppe
Utiliser le app:itemTextAppearance="" de la propriété. Espérons que cette aide.
 <android.support.design.widget.NavigationView
        android:id="@+id/nav_view"
        android:layout_width="wrap_content"
        android:layout_height="match_parent"
        android:layout_gravity="start"
        android:fitsSystemWindows="true"
        app:headerLayout="@layout/nav_header_main"
        android:background="@drawable/nav_bg_gradient"
        android:theme="@style/NavigationView"
        app:itemIconTint="@color/colorWhite"
        app:itemTextColor="@color/colorWhite"
        app:itemTextAppearance="@style/NavigationText"
        app:menu="@menu/main_drawer">
Dans les styles.XML écrire
<style name="NavigationText" parent="@android:style/TextAppearance.Medium">
        <item name="android:textColor">@color/colorWhite</item>
        <item name="android:textSize">12sp</item>
        <item name="android:fontFamily">sans-serif-thin</item>
    </style>
J'ai utilisé l'application:thème
<android.support.design.widget.NavigationView
    android:id="@+id/nav_view"
    android:layout_width="wrap_content"
    android:layout_height="match_parent"
    android:layout_gravity="start"
    android:background="@color/colorMenuBackground"
    android:fitsSystemWindows="true"
    app:headerLayout="@layout/nav_header_main"
    app:menu="@menu/activity_main_drawer"
    app:theme="@style/NavigationViewTextAppearance"
   />
Styles.xml:
<style name="NavigationViewTextAppearance">
    <item name="android:ellipsize">end</item>
    <item name="android:fontFamily">@font/badscript_regular</item>
</style>
Pas une police personnalisée, mais une autre façon de changer la police des éléments de navigation. Créez une mise en page nommée design_navigation_item.xml.
<android.support.design.internal.NavigationMenuItemView
    xmlns:android="http://schemas.android.com/apk/res/android"
    android:layout_width="match_parent"
    android:layout_height="?attr/listPreferredItemHeightSmall"
    android:paddingLeft="?attr/listPreferredItemPaddingLeft"
    android:paddingRight="?attr/listPreferredItemPaddingRight"
    android:drawablePadding="@dimen/navigation_icon_padding"
    android:gravity="center_vertical|start"
    android:maxLines="1"
    android:fontFamily="sans-serif-thin"
    android:textSize="22sp"
    android:textAppearance="?attr/textAppearanceListItem" />
Ensuite, changez la fontFamily à la police désirée.
Il est un peu tard pour répondre mais j'ai trouvé une façon plus propre de le faire, donc je voudrais partager.
-
Créer une vue personnalisée
NavFontTextView.java:import android.content.Context; import android.support.design.internal.NavigationMenuItemView; import android.util.AttributeSet; import utils.CustomFontHelper; public class NavFontTextView extends NavigationMenuItemView { Context mContext; public NavFontTextView(Context context) { super(context); mContext = context; setDefaultFont(); } public NavFontTextView(Context context, AttributeSet attrs) { super(context, attrs); mContext = context; setDefaultFont(); CustomFontHelper.setCustomFont(this, context, attrs); } public NavFontTextView(Context context, AttributeSet attrs, int defStyleAttr) { super(context, attrs, defStyleAttr); mContext = context; setDefaultFont(); CustomFontHelper.setCustomFont(this, context, attrs); } public void setDefaultFont() { CustomFontHelper.setCustomFont(this, "fonts/SourceSansPro-Regular.ttf", mContext); } } -
Faire un fichier appelé
CustomFontHelper.java:import android.content.Context; import android.content.res.TypedArray; import android.graphics.Typeface; import android.util.AttributeSet; import android.widget.TextView; /** * Taken from: http://stackoverflow.com/a/16648457/75579 */ public class CustomFontHelper { /** * Sets a font on a textview based on the custom com.my.package:font attribute * If the custom font attribute isn't found in the attributes nothing happens * @param textview * @param context * @param attrs */ public static void setCustomFont(TextView textview, Context context, AttributeSet attrs) { TypedArray a = context.obtainStyledAttributes(attrs, R.styleable.CustomFont); String font = a.getString(R.styleable.CustomFont_font); setCustomFont(textview, font, context); a.recycle(); } /** * Sets a font on a textview * @param textview * @param font * @param context */ public static void setCustomFont(TextView textview, String font, Context context) { if(font == null) { return; } Typeface tf = FontCache.get(font, context); if(tf != null) { textview.setTypeface(tf); } } } -
Faire une mise en page
layout/design_navigation_item.xml(le nom doit être le même):<?xml version="1.0" encoding="utf-8"?> <custom_view.NavFontTextView xmlns:android="http://schemas.android.com/apk/res/android" xmlns:app="http://schemas.android.com/apk/res-auto" android:layout_width="match_parent" android:layout_height="?attr/listPreferredItemHeightSmall" android:drawablePadding="10dp" android:gravity="center_vertical|start" android:maxLines="1" android:paddingLeft="?attr/listPreferredItemPaddingLeft" android:paddingRight="?attr/listPreferredItemPaddingRight" app:font="fonts/SourceSansPro-Bold.ttf" /> Placez votre fichier de police
SourceSansPro-Bold.ttfdans cette voie:app/src/main/assets/fonts/SourceSansPro-Bold.ttf
Vous êtes prêt à partir! De cette façon, vous pouvez garder votre activité principale plus propre.
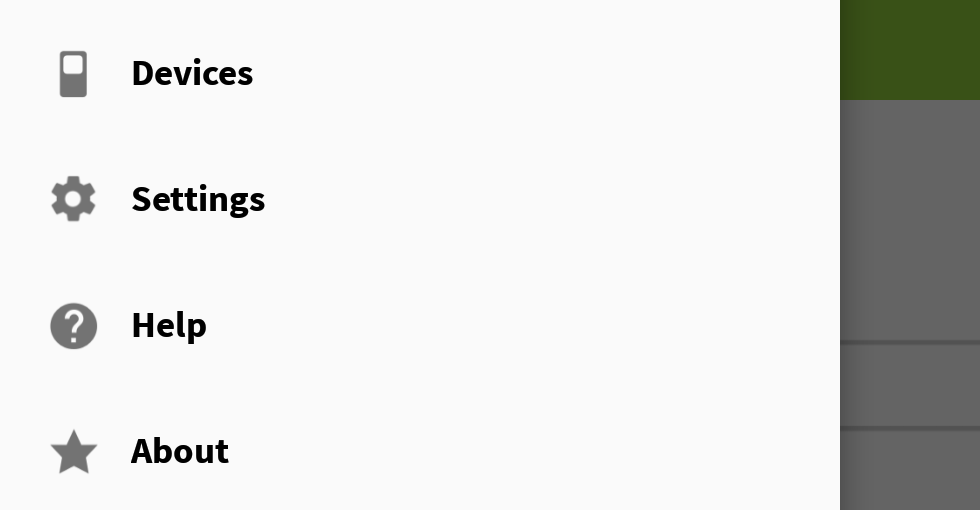
Voici un capture:
Pour ceux qui utilisent la réponse @ Moinkhan, pour appliquer la police à chaque partie de vos menus, Utilisez cette solution et pour chaque section d'en-tête, utilisez id. votre menu comme ceci..
<item android:title="@string/others" android:id="@+id/nav_others">
    <menu>
        <item
            android:id="@+id/contact"
            android:title="@string/contact"/>
    </menu>
</item>
Et une solution comme celle-ci..
navMenu = navView.getMenu();
    MenuItem item= navView.getMenu().findItem(R.id.nav_others);
    applyFontToMenuItem(item);
Peut-être que ça aide quelqu'un.
J'ai vraiment aimé la solution de "Dragon qui crache le feu" mais je n'ai pas eu le textview. Cela pourrait être fait en faisant ce qui suit:
TextView textView = (CheckedTextView) findViewById(android.support.design.R.id.design_menu_item_text);

public class StyledMenuItem extends NavigationMenuItemView {
public StyledMenuItem(Context context) {
    super(context);
}

public StyledMenuItem(Context context, AttributeSet attrs) {
    super(context, attrs);
    if (!isInEditMode()) {
        setCustomFont(context, attrs);
        setFilterTouchesWhenObscured(true);
    }
}

public StyledMenuItem(Context context, AttributeSet attrs, int defStyleAttr) {
    super(context, attrs, defStyleAttr);
    if (!isInEditMode()) {
        setCustomFont(context, attrs);
        setFilterTouchesWhenObscured(true);
    }
}

private void setCustomFont(Context ctx, AttributeSet attrs) {
    TypedArray a = ctx.obtainStyledAttributes(attrs, R.styleable.ProjectView);
    String customFont = a.getString(R.styleable.ProjectView_projectFont);
    setCustomFont(ctx, customFont);
    a.recycle();
}

private void setCustomFont(Context ctx, String asset) {
    Typeface typeFace = TypeFaceProvider.getTypeFace(ctx, asset);
    TextView textView = (CheckedTextView) findViewById(android.support.design.R.id.design_menu_item_text);
    if (typeFace != null && textView != null) {
        textView.setTypeface(typeFace);
    }
}
Design_navigation_item.xml:
<?xml version="1.0" encoding="utf-8"?>
Style.xml:
<style name="Body1" parent="Base.TextAppearance.AppCompat.Body1">
    <item name="projectFont">Quicksand-Regular.otf</item>
</style>
Attrs.xml:
<?xml version="1.0" encoding="utf-8"?>
<resources>

<declare-styleable name="ProjectView">
    <attr name="projectFont" format="string" />
</declare-styleable>
</resources>
J'ai refactorisé la réponse de@adneal à ceci. Il boucle sur les éléments de menu (sans entrer dans les sous-éléments, seulement les éléments de niveau supérieur) en fonction de l'index au lieu de l'id et définit la police de caractères.
Remplacer rightNavigationView avec votre la fenêtre des éléments et {POLICE de caractères} avec votre choix de Police
final Menu navMenu = rightNavigationView.getMenu();
        rightNavigationView.getViewTreeObserver().addOnGlobalLayoutListener(new ViewTreeObserver.OnGlobalLayoutListener() {
            @Override
            public void onGlobalLayout() {
                ArrayList<View> menuItems = new ArrayList<>(); // save Views in this array
                rightNavigationView.getViewTreeObserver().removeOnGlobalLayoutListener(this); // remove the global layout listener
                for (int i = 0; i < navMenu.size(); i++) {// loops over menu items  to get the text view from each menu item
                    final MenuItem item = navMenu.getItem(i);
                    rightNavigationView.findViewsWithText(menuItems, item.getTitle(), View.FIND_VIEWS_WITH_TEXT);
                }
                for (final View menuItem : menuItems) {// loops over the saved views and sets the font
                    ((TextView) menuItem).setTypeface({TYPE}, Typeface.BOLD);
                }
            }
        });
Une autre façon de définir votre police personnalisée:
1. Vous pouvez ajouter vos polices dans un dossier" font", puis vous pouvez les utiliser dans N'importe quel TextView (ou partout où vous en avez besoin)
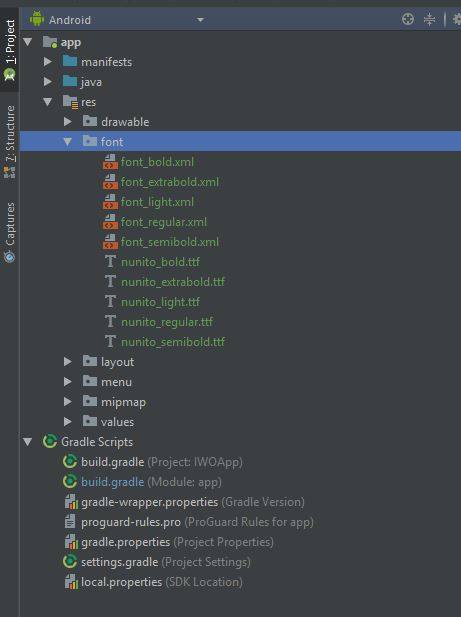
Un exemple de police.xml:
<?xml version="1.0" encoding="utf-8"?>
<font-family xmlns:android="http://schemas.android.com/apk/res/android">
    <font
        android:font="@font/nunito_bold"
        android:fontStyle="normal"
        android:fontWeight="400" />
</font-family>
2. dans vos styles.fichier xml, vous pouvez personnaliser votre style de texte de l'élément avec cette police, et la couleur, partout où vous avez besoin (de @Moonis Abidi réponse)
 <style name="NavigationText" parent="@android:style/TextAppearance.Medium">
        <item name="android:textColor">@android:color/white</item>
        <item name="android:textSize">12sp</item>
        <item name="android:fontFamily">@font/nunito_semibold</item>
    </style>
3. maintenant, il vous suffit de le spécifier dans votre vue de navigation avec app: itemTextAppearance :
<android.support.design.widget.NavigationView
        android:id="@+id/nav_view"
        android:layout_width="wrap_content"
        android:layout_height="match_parent"
        android:layout_gravity="start"
        android:fitsSystemWindows="true"
        app:headerLayout="@layout/nav_header"
        app:menu="@menu/main_menu"
        app:itemTextAppearance="@style/NavigationText"/>
// ------------- En outre, si vous devez utiliser cette police à partir D'autres TextViews, vous pouvez l'utiliser comme
 <TextView
        android:layout_width="wrap_content"
        android:layout_height="wrap_content"
        android:fontFamily="@font/nunito_bold"/>
C'est une autre approche:
Un la fenêtre des éléments a des enfants appelé NavigationMenuItemView. Un NavigationMenuItemView a deux enfants. L'un est AppCompatCheckedTextView.
Remplacer onlayout méthode de NavigationView comme ci-dessous et changer Typefase de L'AppCompatCheckedTextView:
public final class NavigationViewWithCustomFont extends NavigationView{
    private final Context context;
    private Typeface fontFace;

    public NavigationViewWithCustomFont(Context context, AttributeSet attrs){
        super(context, attrs);
        this.context = context;
        this.fontFace = null;
    }

    @Override
    protected void onLayout(boolean changed, int left, int top, int right, int bottom){
        super.onLayout(changed, left, top, right, bottom);
        final ViewGroup navMenuView = (ViewGroup)getChildAt(0);
        final int navMenuItemsCount = navMenuView.getChildCount();
        ViewGroup itemView;

        if(fontFace == null){
            fontFace = Typeface.createFromAsset(context.getAssets(), context.getString(R.string.BTrafficBold));
        }
        for(int i=0; i<navMenuItemsCount; i++){
            itemView = (ViewGroup)navMenuView.getChildAt(i);

            if(itemView instanceof NavigationMenuItemView ){
                CheckedTextView checkedTextView = (CheckedTextView)itemView.getChildAt(0);
                checkedTextView.setTypeface(fontFace, Typeface.BOLD);
            }
        }
    }
}
BottomNavigationView bottom_nav = findViewById(R.id.bottom_nav);
Typeface font = Typeface.createFromAsset(getAssets(), "--your customized font file--");
for (int i = 0; i <bottom_nav.getMenu().size(); i++) {
        MenuItem menuItem = bottom_nav.getMenu().getItem(i);
        SpannableStringBuilder spannableTitle = new SpannableStringBuilder(menuItem.getTitle());
        spannableTitle.setSpan(font.getStyle(), 0, spannableTitle.length(), Spannable.SPAN_INCLUSIVE_INCLUSIVE);
        menuItem.setTitle(spannableTitle);
    }
applyFontToMenuItem(popup.getMenu().getItem(0));
private void applyFontToMenuItem(MenuItem mi) {
    Typeface font = Typeface.createFromAsset(getAssets(), "fonts/Redressed.ttf");
    SpannableString mNewTitle = new SpannableString(mi.getTitle());
    mNewTitle.setSpan(new CustomTypefaceSpan("", font), 0, mNewTitle.length(),pannable.SPAN_INCLUSIVE_INCLUSIVE);
    mi.setTitle(mNewTitle);
}