Comment mettre RecyclerView dans NestedScrollView?
avec la création de NestedScrollView vous pouvez mettre la vue de défilement à l'intérieur d'une autre vue de défilement aussi longtemps que ceux mettre en œuvre NestedScrollingChild et NestedScrollingParent correctement.
(Ce n'est pas mauvais modèle de conception "Ian Lac (de Google) recommande de mettre un RecyclerView à l'intérieur d'un nestedscrollview ici: plus.google.com/u/0/+AndroidDevelopers/posts/9kZ3SsXdT2T")
je veux mettre RecyclerView à l'intérieur NestedScrollView et heureusement RecyclerView mise en œuvre des NestedScrollingChild de sorte que vous pouvez mettre à l'intérieur NestedScrollView .
public class RecyclerView extends ViewGroup implements ScrollingView, NestedScrollingChild
j'ai lu ces billets:
comment utiliser RecyclerView inside NestedScrollView?
Nestedscolling with Nestedscollview, RecyclerView (Horizontal), inside a CoordinatorLayout
mais le problème avec la solution la plus votée est, il appelle tous les éléments de RecyclerView donc par exemple si c'est un RecyclerView sans fin et quand l'utilisateur atteint la fin de la liste que vous voulez faire une demande de réseau puis avec cette solution le serveur d'appels RecyclerView parce qu'il atteint automatiquement le dernier élément de RecyclerView .
de toute façon, comment définir le paramètre pour que je puisse mettre RecyclerView à l'intérieur de NestedScrollView .(en fait, je veux mettre un groupe de vue comme framelayout ou relativelayout comme un simple childe de nestedscrollview et puis je veux mettre recyclerview à l'intérieur de framelayout ou relativelayout)
quand j'ai mis RecyclerView dans NestedScrollView il n'y a rien à afficher.
afin de créer un échantillon projet vous pouvez utiliser cheesesquare et changer le CheeseDetailActivity pour avoir une vue sur le recyclage.
bien que la réponse de BNK ne soit pas correcte, BNK a beaucoup essayé. Donc je lui attribue la bounty. Toujours à la recherche de solution sympa....
3 réponses
voici ma nouvelle réponse mise à jour:
<android.support.v4.widget.NestedScrollView
        android:id="@+id/scrollview"
        android:layout_width="match_parent"
        android:layout_height="match_parent"
        android:fillViewport="true"
        app:layout_behavior="@string/appbar_scrolling_view_behavior">

        <RelativeLayout
            android:layout_width="match_parent"
            android:layout_height="wrap_content">

            <android.support.v7.widget.CardView
                android:id="@+id/cardview1"
                android:layout_width="match_parent"
                android:layout_height="wrap_content"
                android:layout_margin="@dimen/card_margin">

                <LinearLayout
                    style="@style/Widget.CardContent"
                    android:layout_width="match_parent"
                    android:layout_height="wrap_content">

                    <TextView
                        android:layout_width="match_parent"
                        android:layout_height="wrap_content"
                        android:text="Info CardView1"
                        android:textAppearance="@style/TextAppearance.AppCompat.Title" />

                    <TextView
                        android:layout_width="match_parent"
                        android:layout_height="wrap_content"
                        android:text="@string/cheese_ipsum" />

                </LinearLayout>

            </android.support.v7.widget.CardView>

            <android.support.v7.widget.CardView
                android:id="@+id/cardview2"
                android:layout_width="match_parent"
                android:layout_height="wrap_content"
                android:layout_below="@+id/cardview1"
                android:layout_margin="@dimen/card_margin">

                <LinearLayout
                    style="@style/Widget.CardContent"
                    android:layout_width="match_parent"
                    android:layout_height="wrap_content">

                    <TextView
                        android:layout_width="match_parent"
                        android:layout_height="wrap_content"
                        android:text="Info CardView2"
                        android:textAppearance="@style/TextAppearance.AppCompat.Title" />

                    <TextView
                        android:layout_width="match_parent"
                        android:layout_height="wrap_content"
                        android:text="@string/cheese_ipsum" />

                </LinearLayout>

            </android.support.v7.widget.CardView>

            <android.support.v7.widget.RecyclerView
                android:id="@+id/recyclerview"
                android:layout_width="match_parent"
                android:layout_height="wrap_content"
                android:layout_below="@+id/cardview2"
                android:clipToPadding="false"
                android:paddingTop="0dp"/>

        </RelativeLayout>

    </android.support.v4.widget.NestedScrollView>
En Activité:
        RecyclerViewAdapter recyclerViewAdapter = new RecyclerViewAdapter(true); // true: with header
        RecyclerView recyclerView = (RecyclerView) findViewById(R.id.recyclerview);
        final MyLinearLayoutManager layoutManager = new MyLinearLayoutManager(this, LinearLayoutManager.VERTICAL, false, getScreenHeight(this));
        // final CustomLinearLayoutManager layoutManager = new CustomLinearLayoutManager(this, LinearLayoutManager.VERTICAL, false);
        recyclerView.setLayoutManager(layoutManager);
        recyclerView.setAdapter(recyclerViewAdapter);
        // recyclerView.setNestedScrollingEnabled(false); // Disables scrolling for RecyclerView, however, CustomLinearLayoutManager used instead of MyLinearLayoutManager
j'ai aussi mis à jour à mon projet d'échantillon de GitHub
Capture d'écran:
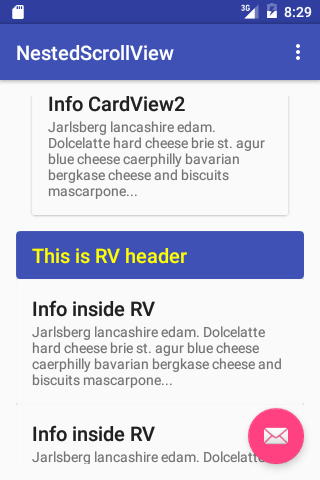
Voici la solution pour appeler le serveur seulement quand vous êtes vraiment besoin de charger plus de données. De cette façon, vous pouvez placer votre RecyclerView sans fin et de nombreuses autres vues à L'intérieur de NestedScrollView. Pour moi, c'est bien le travail.
1. Create Endlessparentscrollistener class to handle scroll events from NestedSrollView.
public abstract class EndlessParentScrollListener implements NestedScrollView.OnScrollChangeListener {
        // The current offset index of data you have loaded
        private int currentPage = 0;
        // The total number of items in the dataset after the last load
        private int previousTotalItemCount = 0;
        // True if we are still waiting for the last set of data to load.
        private boolean loading = true;
        // Sets the starting page index
        private int startingPageIndex = 0;
        // The minimum amount of pixels to have below your current scroll position
        // before loading more.
        private int visibleThresholdDistance = 300;

        RecyclerView.LayoutManager mLayoutManager;

        public EndlessParentScrollListener(RecyclerView.LayoutManager layoutManager) {
            this.mLayoutManager = layoutManager;
        }

        @Override
        public void onScrollChange(NestedScrollView scrollView, int x, int y, int oldx, int oldy) {
            // We take the last son in the scrollview
            View view = scrollView.getChildAt(scrollView.getChildCount() - 1);
            int distanceToEnd = (view.getBottom() - (scrollView.getHeight() + scrollView.getScrollY()));

            int totalItemCount = mLayoutManager.getItemCount();
            // If the total item count is zero and the previous isn't, assume the
            // list is invalidated and should be reset back to initial state
            if (totalItemCount < previousTotalItemCount) {
                this.currentPage = this.startingPageIndex;
                this.previousTotalItemCount = totalItemCount;
                if (totalItemCount == 0) {
                    this.loading = true;
                }
            }

            // If it’s still loading, we check to see if the dataset count has
            // changed, if so we conclude it has finished loading and update the current page
            // number and total item count.
            if (loading && (totalItemCount > previousTotalItemCount)) {
                loading = false;
                previousTotalItemCount = totalItemCount;
            }

            // If it isn’t currently loading, we check to see if we have breached
            // the visibleThreshold and need to reload more data.
            // If we do need to reload some more data, we execute onLoadMore to fetch the data.
            // threshold should reflect how many total columns there are too
            if (!loading && distanceToEnd <= visibleThresholdDistance) {
                currentPage++;
                onLoadMore(currentPage, totalItemCount);
                loading = true;
            }
        }

        // Defines the process for actually loading more data based on page
        public abstract void onLoadMore(int page, int totalItemsCount);
    }
2. auditeur
private void initRecycler() {
        //TODO init recycler adapter here

        recycler.setNestedScrollingEnabled(false);
        LinearLayoutManager _layoutManager = new LinearLayoutManager(this);
        recycler.setLayoutManager(_layoutManager);
        NestedScrollView scrollView = (NestedScrollView) findViewById(R.id.scrollView);
        scrollView.setOnScrollChangeListener(new EndlessParentScrollListener(_layoutManager) {
                @Override
                public void onLoadMore(int page, int totalItemsCount) {
                    if (loadedItemCount < serverItemsCount)
                        customLoadMoreDataFromApi();
                }
            });
        customLoadMoreDataFromApi();
    }
Court xml si quelqu'un la trouver utile:
<android.support.design.widget.CoordinatorLayout xmlns:android="http://schemas.android.com/apk/res/android"
        xmlns:app="http://schemas.android.com/apk/res-auto"
        android:layout_width="match_parent"
        android:layout_height="match_parent"
        android:background="@android:color/background_light"
        android:fitsSystemWindows="true">


        <android.support.design.widget.AppBarLayout>
            ...
        </android.support.design.widget.AppBarLayout>

        <android.support.v4.widget.NestedScrollView
            android:id="@+id/scrollView"
            android:layout_width="match_parent"
            android:layout_height="match_parent"
            android:fitsSystemWindows="true"
            android:scrollbars="vertical"
            android:scrollbarAlwaysDrawVerticalTrack="true"
            app:layout_behavior="@string/appbar_scrolling_view_behavior">

            <LinearLayout
                android:layout_width="match_parent"
                android:layout_height="match_parent"
                android:orientation="vertical"
                android:scrollbarAlwaysDrawVerticalTrack="false"
                android:scrollbars="vertical">

                <!-- some views goes here-->

                <android.support.v7.widget.RecyclerView
                    android:id="@+id/recyclerFeed"
                    android:scrollbars="vertical"
                    android:layout_width="match_parent"
                    android:layout_height="wrap_content"
                    app:layout_behavior="@string/appbar_scrolling_view_behavior"/>

                <!-- and possibly here-->

            </LinearLayout>
        </android.support.v4.widget.NestedScrollView>

    </android.support.design.widget.CoordinatorLayout>
donc mettre RecyclerView dans NestedScrollView directement n'affichera malheureusement rien. Cependant, il y a un moyen de placer le recyclerview dans le NestedScrollView indirectement - il suffit d'utiliser un frameLayout comme tiers pour tenir votre recyclerview.
ceci est le framelayout qui détient le recyclerview emboîté dans votre activité classe:
    <FrameLayout
        android:id="@+id/container"
        android:layout_width="match_parent"
        android:layout_height="match_parent"
        android:fitsSystemWindows="true"
        tools:context=".ExampleFragment"
        app:layout_behavior="@string/appbar_scrolling_view_behavior">

        <android.support.v4.widget.NestedScrollView
            android:layout_width="match_parent"
            android:layout_height="match_parent"
            android:fillViewport="true"
            >
        </android.support.v4.widget.NestedScrollView>
   </FrameLayout>
mettez votre fragment dans le framelayout (code se trouve dans la classe activité ):
 ExampleFragment exampleFragment = new ExampleFragment();

    FragmentManager fm = getSupportFragmentManager();
    FragmentTransaction ft = fm.beginTransaction();
    ft.add(R.id.container, exampleFragment);
    ft.commit();
dans votre exampleFragment , vous pouvez alors mettre votre recyclerview.
<?xml version="1.0" encoding="utf-8"?>
    <RelativeLayout
        xmlns:android="http://schemas.android.com/apk/res/android"
        xmlns:tools="http://schemas.android.com/tools"
        xmlns:app="http://schemas.android.com/apk/res-auto"
        android:layout_width="match_parent"
        android:layout_height="match_parent"
        android:id="@+id/post_container"
        android:background="#E0E0E0">

            <android.support.v7.widget.RecyclerView
                android:id="@+id/my_recycler_view"
                android:scrollbars="vertical"

                android:layout_width="match_parent"
                android:layout_height="match_parent">
            </android.support.v7.widget.RecyclerView>


    </RelativeLayout>
c'est le fragment code:
@Override
public View onCreateView(LayoutInflater inflater, ViewGroup container,
                         Bundle savedInstanceState) {

    super.onCreateView(inflater, container, savedInstanceState);
            llLayout = (RelativeLayout) inflater.inflate(R.layout.example_fragment_layout, container, false);
                    mRecyclerView = (RecyclerView) llLayout.findViewById(R.id.my_recycler_view);
ce qui suit est le CheeseSquare XML layout you should have:
<android.support.design.widget.CoordinatorLayout xmlns:android="http://schemas.android.com/apk/res/android"
    xmlns:app="http://schemas.android.com/apk/res-auto"
    android:id="@+id/main_content"
    android:layout_width="match_parent"
    android:layout_height="match_parent"
    android:fitsSystemWindows="true">

    <android.support.design.widget.AppBarLayout
        android:id="@+id/appbar"
        android:layout_width="match_parent"
        android:layout_height="@dimen/detail_backdrop_height"
        android:theme="@style/ThemeOverlay.AppCompat.Dark.ActionBar"
        android:fitsSystemWindows="true">

        <android.support.design.widget.CollapsingToolbarLayout
            android:id="@+id/collapsing_toolbar"
            android:layout_width="match_parent"
            android:layout_height="match_parent"
            app:layout_scrollFlags="scroll|exitUntilCollapsed"
            android:fitsSystemWindows="true"
            app:contentScrim="?attr/colorPrimary"
            app:expandedTitleMarginStart="48dp"
            app:expandedTitleMarginEnd="64dp">

            <ImageView
                android:id="@+id/backdrop"
                android:layout_width="match_parent"
                android:layout_height="match_parent"
                android:scaleType="centerCrop"
                android:fitsSystemWindows="true"
                app:layout_collapseMode="parallax" />

            <android.support.v7.widget.Toolbar
                android:id="@+id/toolbar"
                android:layout_width="match_parent"
                android:layout_height="?attr/actionBarSize"
                app:popupTheme="@style/ThemeOverlay.AppCompat.Light"
                app:layout_collapseMode="pin" />

        </android.support.design.widget.CollapsingToolbarLayout>

    </android.support.design.widget.AppBarLayout>

   <FrameLayout
        android:id="@+id/container"
        android:layout_width="match_parent"
        android:layout_height="match_parent"
        android:fitsSystemWindows="true"
        tools:context=".ExampleFragment"
        app:layout_behavior="@string/appbar_scrolling_view_behavior">

        <android.support.v4.widget.NestedScrollView
            android:layout_width="match_parent"
            android:layout_height="match_parent"
            android:fillViewport="true"
            >
        </android.support.v4.widget.NestedScrollView>
   </FrameLayout>

    <android.support.design.widget.FloatingActionButton
        android:layout_height="wrap_content"
        android:layout_width="wrap_content"
        app:layout_anchor="@id/appbar"
        app:layout_anchorGravity="bottom|right|end"
        android:src="@drawable/ic_discuss"
        android:layout_margin="@dimen/fab_margin"
        android:clickable="true"/>

</android.support.design.widget.CoordinatorLayout>