Comment personnaliser une barre de progression dans Android
je travaille sur une application dans laquelle je veux afficher un ProgressBar , mais je veux remplacer L'Android par défaut ProgressBar .
alors comment personnaliser le ProgressBar ?
ai-je besoin de graphiques et d'animation pour ça?
j'ai lu le post suivant mais je n'ai pas pu le faire fonctionner:
barre de Progression Personnalisée d'Android
8 réponses
personnaliser un ProgressBar nécessite de définir l'attribut ou les propriétés pour l'arrière-plan et la progression de votre barre de progression.
créez un fichier XML nommé customprogressbar.xml dans votre dossier res->drawable :
custom_progressbar.xml
<layer-list xmlns:android="http://schemas.android.com/apk/res/android">

    <!-- Define the background properties like color etc -->
    <item android:id="@android:id/background">
    <shape>
        <gradient
                android:startColor="#000001"
                android:centerColor="#0b131e"
                android:centerY="1.0"
                android:endColor="#0d1522"
                android:angle="270"
        />
    </shape>
   </item>

  <!-- Define the progress properties like start color, end color etc -->
  <item android:id="@android:id/progress">
    <clip>
        <shape>
            <gradient
                android:startColor="#007A00"
                android:centerColor="#007A00"
                android:centerY="1.0"
                android:endColor="#06101d"
                android:angle="270"
            />
        </shape>
    </clip>
    </item>
</layer-list>
Maintenant vous devez définir la propriété progressDrawable dans customprogressbar.xml (tirable)
vous pouvez le faire dans le fichier XML ou dans l'Activité (au moment de l'exécution).
faites ce qui suit dans votre XML:
<ProgressBar
    android:id="@+id/progressBar1"
    style="?android:attr/progressBarStyleHorizontal"
    android:progressDrawable="@drawable/custom_progressbar"
    android:layout_width="wrap_content"
    android:layout_height="wrap_content" />
au moment de l'exécution faire la suivante
// Get the Drawable custom_progressbar
    Drawable draw=res.getDrawable(R.drawable.custom_progressbar);
// set the drawable as progress drawable
    progressBar.setProgressDrawable(draw);
modifier: mise en page xml corrigée
en cas de complexe ProgressBar comme ceci,
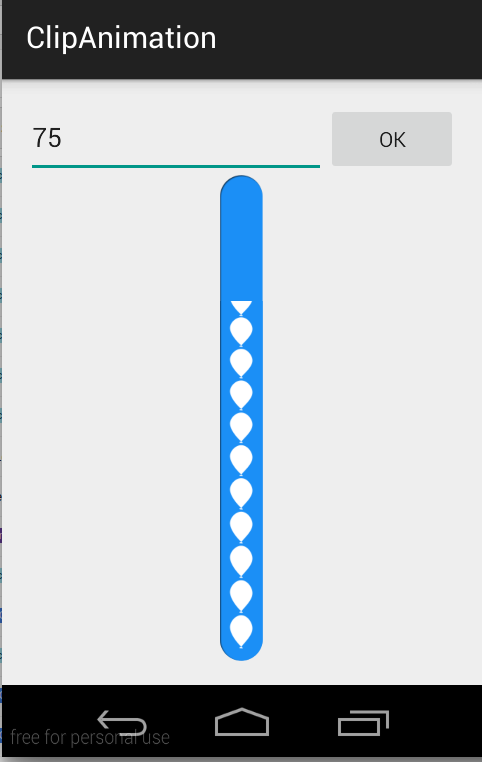
utiliser ClipDrawable .
NOTE: je n'ai pas utilisé
ProgressBarici dans cet exemple. J'ai réalisé ceci en utilisant ClipDrawable en découpant l'image avecAnimation.
Un Drawable que les clips de l'autre Drawable basé sur cette Drawable niveau actuel de la valeur. Vous pouvez contrôler combien l'enfant Drawable est coupé dans la largeur et la hauteur en fonction du niveau, ainsi que la gravité pour contrôler où il est placé dans son conteneur global. Most often used to implement things like progress bars , en augmentant le niveau du tirable avec setLevel() .
NOTE : le tirable est coupé complètement et non visible lorsque le niveau est 0 et complètement révélé quand le niveau est de 10 000.
j'ai utilisé ces deux images pour faire ce CustomProgressBar .
scall.png

ballon_progress.png

activité principale.java
public class MainActivity extends ActionBarActivity {

private EditText etPercent;
private ClipDrawable mImageDrawable;

// a field in your class
private int mLevel = 0;
private int fromLevel = 0;
private int toLevel = 0;

public static final int MAX_LEVEL = 10000;
public static final int LEVEL_DIFF = 100;
public static final int DELAY = 30;

private Handler mUpHandler = new Handler();
private Runnable animateUpImage = new Runnable() {

    @Override
    public void run() {
        doTheUpAnimation(fromLevel, toLevel);
    }
};

private Handler mDownHandler = new Handler();
private Runnable animateDownImage = new Runnable() {

    @Override
    public void run() {
        doTheDownAnimation(fromLevel, toLevel);
    }
};

@Override
protected void onCreate(Bundle savedInstanceState) {
    super.onCreate(savedInstanceState);
    setContentView(R.layout.activity_main);

    etPercent = (EditText) findViewById(R.id.etPercent);

    ImageView img = (ImageView) findViewById(R.id.imageView1);
    mImageDrawable = (ClipDrawable) img.getDrawable();
    mImageDrawable.setLevel(0);
}

private void doTheUpAnimation(int fromLevel, int toLevel) {
    mLevel += LEVEL_DIFF;
    mImageDrawable.setLevel(mLevel);
    if (mLevel <= toLevel) {
        mUpHandler.postDelayed(animateUpImage, DELAY);
    } else {
        mUpHandler.removeCallbacks(animateUpImage);
        MainActivity.this.fromLevel = toLevel;
    }
}

private void doTheDownAnimation(int fromLevel, int toLevel) {
    mLevel -= LEVEL_DIFF;
    mImageDrawable.setLevel(mLevel);
    if (mLevel >= toLevel) {
        mDownHandler.postDelayed(animateDownImage, DELAY);
    } else {
        mDownHandler.removeCallbacks(animateDownImage);
        MainActivity.this.fromLevel = toLevel;
    }
}

public void onClickOk(View v) {
    int temp_level = ((Integer.parseInt(etPercent.getText().toString())) * MAX_LEVEL) / 100;

    if (toLevel == temp_level || temp_level > MAX_LEVEL) {
        return;
    }
    toLevel = (temp_level <= MAX_LEVEL) ? temp_level : toLevel;
    if (toLevel > fromLevel) {
        // cancel previous process first
        mDownHandler.removeCallbacks(animateDownImage);
        MainActivity.this.fromLevel = toLevel;

        mUpHandler.post(animateUpImage);
    } else {
        // cancel previous process first
        mUpHandler.removeCallbacks(animateUpImage);
        MainActivity.this.fromLevel = toLevel;

        mDownHandler.post(animateDownImage);
    }
}
}
activity_main.xml
<LinearLayout xmlns:android="http://schemas.android.com/apk/res/android"
xmlns:tools="http://schemas.android.com/tools"
android:layout_width="match_parent"
android:layout_height="match_parent"
android:paddingLeft="16dp"
android:paddingRight="16dp"
android:paddingTop="16dp"
android:paddingBottom="16dp"
android:orientation="vertical"
tools:context=".MainActivity">

<LinearLayout
    android:layout_width="match_parent"
    android:layout_height="wrap_content"
    android:orientation="horizontal">

    <EditText
        android:id="@+id/etPercent"
        android:layout_width="0dp"
        android:layout_height="wrap_content"
        android:layout_weight="1"
        android:inputType="number"
        android:maxLength="3" />

    <Button
        android:layout_width="wrap_content"
        android:layout_height="wrap_content"
        android:text="Ok"
        android:onClick="onClickOk" />

</LinearLayout>

<FrameLayout
    android:layout_width="wrap_content"
    android:layout_height="wrap_content"
    android:layout_gravity="center">

    <ImageView
        android:id="@+id/imageView2"
        android:layout_width="match_parent"
        android:layout_height="match_parent"
        android:src="@drawable/scall" />

    <ImageView
        android:id="@+id/imageView1"
        android:layout_width="wrap_content"
        android:layout_height="wrap_content"
        android:src="@drawable/clip_source" />

</FrameLayout>
clip_source.xml
<?xml version="1.0" encoding="utf-8"?>
<clip xmlns:android="http://schemas.android.com/apk/res/android"
    android:clipOrientation="vertical"
    android:drawable="@drawable/ballon_progress"
    android:gravity="bottom" />
en cas de complexe HorizontalProgressBar juste changer cliporientation en clip_source.xml comme ça", 1519180920"
android:clipOrientation="horizontal"
vous pouvez télécharger la démo complète de ici .
dans votre xml
<ProgressBar
        android:id="@+id/progressBar1"
        android:layout_width="fill_parent"
        android:layout_height="wrap_content"
        style="@style/CustomProgressBar"
        android:layout_margin="5dip" />
et dans res/values/styles.xml :
<resources>
        <style name="CustomProgressBar" parent="android:Widget.ProgressBar.Horizontal">
          <item name="android:indeterminateOnly">false</item>
          <item name="android:progressDrawable">@drawable/custom_progress_bar_horizontal</item>
          <item name="android:minHeight">10dip</item>
          <item name="android:maxHeight">20dip</item>
        </style>
    <style name="AppTheme" parent="android:Theme.Light" />
</resources>
et custom_progress_bar_horizontal est un xml stocké dans un dossier dessinable qui définit votre barre de progression personnalisée. Pour plus de détails voir ce blog .
j'espère que cela vous aidera.
personnaliser la couleur de progressbar à savoir en cas de type spinner a besoin d'un fichier xml et d'initier des codes dans leurs fichiers java respectifs.
créer un fichier xml et le nommer comme progressbar.xml
<?xml version="1.0" encoding="utf-8"?>
<LinearLayout xmlns:android="http://schemas.android.com/apk/res/android"
    xmlns:tools="http://schemas.android.com/tools"
    android:layout_width="wrap_content"
    android:layout_height="wrap_content"
    android:gravity="center"
    tools:context=".Radio_Activity" >

    <LinearLayout
        android:id="@+id/progressbar"
        android:layout_width="wrap_content"
        android:layout_height="wrap_content" >

        <ProgressBar
            android:id="@+id/spinner"
            android:layout_width="wrap_content"
            android:layout_height="wrap_content" >
        </ProgressBar>
    </LinearLayout>

</LinearLayout>
utilisez le code suivant pour obtenir le spinner de différentes couleurs attendues.Ici, nous utilisons l'hexadécimal pour afficher spinner en couleur bleu.
Progressbar spinner = (ProgressBar) progrees.findViewById(R.id.spinner);
spinner.getIndeterminateDrawable().setColorFilter(Color.parseColor("#80DAEB"),
                android.graphics.PorterDuff.Mode.MULTIPLY);
créant une barre de progression personnalisée comme hotstar.
- ajouter la barre de progression sur le fichier de mise en page et définir l'indeterminateDrawable avec le fichier dessinable.
activity_main.xml
<ProgressBar
    style="?android:attr/progressBarStyleLarge"
    android:layout_width="wrap_content"
    android:layout_height="wrap_content"
    android:layout_centerVertical="true"
    android:layout_centerHorizontal="true"
    android:id="@+id/player_progressbar"
    android:indeterminateDrawable="@drawable/custom_progress_bar"
    />
- créer un nouveau fichier xml dans res\drawable
custom_progress_bar.xml
<?xml version="1.0" encoding="utf-8"?>
    <rotate  xmlns:android="http://schemas.android.com/apk/res/android"
    android:duration="2000"
    android:fromDegrees="0"
    android:pivotX="50%"
    android:pivotY="50%"
    android:toDegrees="1080" >

    <shape
        android:innerRadius="35dp"
        android:shape="ring"
        android:thickness="3dp"
        android:useLevel="false" >
       <size
           android:height="80dp"
           android:width="80dp" />

       <gradient
            android:centerColor="#80b7b4b2"
            android:centerY="0.5"
            android:endColor="#f4eef0"
            android:startColor="#00938c87"
            android:type="sweep"
            android:useLevel="false" />
    </shape>

</rotate>
il existe deux types de barres de progression appelées barre de progression déterminée (durée déterminée) et barre de progression indéterminée (durée inconnue).
Les tiragespour les deux types de barre de progression peuvent être personnalisés en définissant tirable comme ressource xml. Vous pouvez trouver plus d'informations sur les styles de barre de progrès et la personnalisation à http://www.zoftino.com/android-progressbar-and-custom-progressbar-examples .
Personnalisation Barre de progression fixe ou horizontale:
ci-dessous xml est une ressource pouvant être tirée pour personnaliser la barre de progression horizontale.
 <?xml version="1.0" encoding="utf-8"?>
<layer-list xmlns:android="http://schemas.android.com/apk/res/android">
    <item android:id="@android:id/background"
        android:gravity="center_vertical|fill_horizontal">
        <shape android:shape="rectangle"
            android:tint="?attr/colorControlNormal">
            <corners android:radius="8dp"/>
            <size android:height="20dp" />
            <solid android:color="#90caf9" />
        </shape>
    </item>
    <item android:id="@android:id/progress"
        android:gravity="center_vertical|fill_horizontal">
        <scale android:scaleWidth="100%">
            <shape android:shape="rectangle"
                android:tint="?attr/colorControlActivated">
                <corners android:radius="8dp"/>
                <size android:height="20dp" />
                <solid android:color="#b9f6ca" />
            </shape>
        </scale>
    </item>
</layer-list>
Personnalisation Barre de progression indéterminée
ci-dessous xml est une ressource à dessiner pour la personnalisation de la barre de progression circulaire.
<?xml version="1.0" encoding="utf-8"?>
<layer-list xmlns:android="http://schemas.android.com/apk/res/android">
    <item android:id="@android:id/progress"
        android:top="16dp"
        android:bottom="16dp">
                <rotate
                    android:fromDegrees="45"
                    android:pivotX="50%"
                    android:pivotY="50%"
                    android:toDegrees="315">
                    <shape android:shape="rectangle">
                        <size
                            android:width="80dp"
                            android:height="80dp" />
                        <stroke
                            android:width="6dp"
                            android:color="#b71c1c" />
                    </shape>
                </rotate>
    </item>
</layer-list>
la façon la plus simple de créer personnaliser une barre de progrès dans Android:
-
Initialiser et afficher le dialogue:
MyProgressDialog progressdialog = new MyProgressDialog(getActivity()); progressdialog.show(); -
Créer de la méthode:
public class MyProgressDialog extends AlertDialog { public MyProgressDialog(Context context) { super(context); getWindow().setBackgroundDrawable(new ColorDrawable(android.graphics.Color.TRANSPARENT)); } @Override public void show() { super.show(); setContentView(R.layout.dialog_progress); } } -
créer layout XML:
<RelativeLayout xmlns:android="http://schemas.android.com/apk/res/android" xmlns:tools="http://schemas.android.com/tools" android:layout_width="match_parent" android:layout_height="match_parent" android:background="@android:color/transparent" android:clickable="true"> <RelativeLayout android:layout_width="wrap_content" android:layout_height="wrap_content" android:layout_centerInParent="true"> <ProgressBar android:id="@+id/progressbarr" android:layout_width="@dimen/eightfive" android:layout_height="@dimen/eightfive" android:layout_centerInParent="true" android:indeterminateDrawable="@drawable/progresscustombg" /> <TextView android:layout_width="wrap_content" android:layout_height="wrap_content" android:layout_centerHorizontal="true" android:layout_below="@+id/progressbarr" android:layout_marginTop="@dimen/_3sdp" android:textColor="@color/white" android:text="Please wait"/> </RelativeLayout> </RelativeLayout> -
Créer la forme progresscustombg.xml et mettre res/drawable:
<?xml version="1.0" encoding="utf-8"?>
<rotate xmlns:android="http://schemas.android.com/apk/res/android"
  android:fromDegrees="0"
  android:pivotX="50%"
  android:pivotY="50%"
  android:toDegrees="360" >

    <shape
       android:innerRadiusRatio="3"
       android:shape="ring"
       android:thicknessRatio="20"
       android:useLevel="false" >
        <size
            android:height="@dimen/eightfive"
            android:width="@dimen/eightfive" />

        <gradient
            android:centerY="0.50"
            android:endColor="@color/color_green_icash"
            android:startColor="#FFFFFF"
            android:type="sweep"
            android:useLevel="false" />
    </shape>

</rotate>
si vous voulez le faire en code, Voici un exemple:
pd = new ProgressDialog(MainActivity.this);
pd.setProgressStyle(ProgressDialog.STYLE_SPINNER);
pd.getWindow().setBackgroundDrawable(new ColorDrawable(Color.TRANSPARENT));
pd.getWindow().setGravity(Gravity.CENTER_HORIZONTAL|Gravity.CENTER_VERTICAL);
TextView tv = new TextView(this);
tv.setTextColor(Color.WHITE);
tv.setTextSize(20);
tv.setText("Waiting...");
pd.setCustomTitle(tv);
pd.setIndeterminate(true);
pd.show();
L'utilisation de TextView vous donne une option pour changer la couleur, la taille et la police de votre texte. Sinon, vous pouvez simplement appeler setMessage(), comme d'habitude.