Comment changer la couleur de fond de la barre d'état et la couleur du texte sur iOS 7?
mon application actuelle fonctionne sur iOS 5 et 6.
la barre de navigation a une couleur orange et la barre d'État a une couleur de fond noire avec une couleur de texte blanc. Cependant, lorsque j'exécute la même application sur iOS 7, j'observe que la barre d'état est transparente avec la même couleur de fond orange que la barre de navigation et que la couleur du texte de la barre d'état est noire.
pour cette raison Je ne suis pas en mesure de faire la différence entre la barre d'état et la barre de navigation.
Comment faire pour que la barre d'État soit la même que dans iOS 5 et 6, c'est-à-dire avec un fond noir et un texte blanc? Comment puis-je faire cela programmatiquement?
18 réponses
j'ai dû essayer de chercher d'autres moyens. Qui n'implique pas addSubview sur la fenêtre. Parce que je remonte la fenêtre quand le clavier est présenté.
Objectif C
- (void)setStatusBarBackgroundColor:(UIColor *)color {

    UIView *statusBar = [[[UIApplication sharedApplication] valueForKey:@"statusBarWindow"] valueForKey:@"statusBar"];

    if ([statusBar respondsToSelector:@selector(setBackgroundColor:)]) {
        statusBar.backgroundColor = color;
    }
}
Swift
func setStatusBarBackgroundColor(color: UIColor) {

    guard  let statusBar = UIApplication.sharedApplication().valueForKey("statusBarWindow")?.valueForKey("statusBar") as? UIView else {
        return
    }

    statusBar.backgroundColor = color
}
Swift 3
func setStatusBarBackgroundColor(color: UIColor) {

    guard let statusBar = UIApplication.shared.value(forKeyPath: "statusBarWindow.statusBar") as? UIView else { return }

    statusBar.backgroundColor = color
}
appeler ce formulaire application:didFinishLaunchingWithOptions ça a marché pour moi.
N.B. nous avons une application dans l'app store avec cette logique. Donc je suppose que c'est d'accord avec le application de la politique du magasin.
modifier:
utilisez à vos risques et périls. Formez le commentateur @Sebyddd
j'ai eu un app rejeté cause de cela, tandis qu'un autre a été accepté juste fin. Ils considèrent que C'est L'utilisation de L'API privée, donc vous êtes soumis à la chance au cours de la procédure d'examen :) – Sebyddd
Goto de votre application info.plist
1) View controller-based status bar appearance à NO
2) Mettre Status bar style à UIStatusBarStyleLightContent
Ensuite, allez sur votre délégué d'application et collez le code suivant où vous définissez votre RootViewController Windows.
#define SYSTEM_VERSION_GREATER_THAN_OR_EQUAL_TO(v)  ([[[UIDevice currentDevice] systemVersion] compare:v options:NSNumericSearch] != NSOrderedAscending)

if (SYSTEM_VERSION_GREATER_THAN_OR_EQUAL_TO(@"7.0"))
{
    UIView *view=[[UIView alloc] initWithFrame:CGRectMake(0, 0,[UIScreen mainScreen].bounds.size.width, 20)];
    view.backgroundColor=[UIColor blackColor];
    [self.window.rootViewController.view addSubview:view];
}
J'espère que ça aidera.
1) Réglez L'UIViewControllerBasedStatusBarAppearance à YES in the plist
2) dans le viewDidLoad faire un [self setNeedsStatusBarAppearanceUpdate];
3) Ajouter la méthode suivante:
 -(UIStatusBarStyle)preferredStatusBarStyle{
    return UIStatusBarStyleLightContent;
 }
mise à jour:
cochez aussi développeurs-guide-de-la-ios-7-dans la barre d'état
lors de la manipulation de la couleur de fond de la barre d'état dans iOS 7, Il ya 2 cas
Case 1: vue avec barre de Navigation
dans ce cas, utilisez le code suivant dans votre méthode viewDidLoad
 UIApplication *app = [UIApplication sharedApplication];
 CGFloat statusBarHeight = app.statusBarFrame.size.height;

 UIView *statusBarView = [[UIView alloc] initWithFrame:CGRectMake(0, -statusBarHeight, [UIScreen mainScreen].bounds.size.width, statusBarHeight)];
 statusBarView.backgroundColor = [UIColor yellowColor];
 [self.navigationController.navigationBar addSubview:statusBarView];
cas 2: vue sans barre de Navigation
dans ce cas, utilisez le code suivant dans votre méthode viewDidLoad
 UIApplication *app = [UIApplication sharedApplication];
 CGFloat statusBarHeight = app.statusBarFrame.size.height;

 UIView *statusBarView =  [[UIView alloc] initWithFrame:CGRectMake(0, 0, [UIScreen mainScreen].bounds.size.width, statusBarHeight)];
 statusBarView.backgroundColor  =  [UIColor yellowColor];
 [self.view addSubview:statusBarView];
Source du lien de http://code-ios.blogspot.in/2014/08/how-to-change-background-color-of.html
dans iOS 7 la barre d'état n'a pas de fond, donc si vous mettez une vue haute 20px noire derrière elle, vous obtiendrez le même résultat que iOS 6.
vous pouvez aussi lire le iOS 7 UI Transition Guide pour plus d'information à ce sujet.
vous pouvez définir la couleur de fond pour la barre d'état pendant le lancement de l'application ou pendant viewDidLoad de votre contrôleur de vue.
extension UIApplication {

    var statusBarView: UIView? {
        return value(forKey: "statusBar") as? UIView
    }

}

// Set upon application launch, if you've application based status bar
class AppDelegate: UIResponder, UIApplicationDelegate {

    var window: UIWindow?

    func application(_ application: UIApplication, didFinishLaunchingWithOptions launchOptions: [UIApplicationLaunchOptionsKey: Any]?) -> Bool {
        UIApplication.shared.statusBarView?.backgroundColor = UIColor.red
        return true
    }
}


or
// Set it from your view controller if you've view controller based statusbar
class ViewController: UIViewController {

    override func viewDidLoad() {
        super.viewDidLoad()

        UIApplication.shared.statusBarView?.backgroundColor = UIColor.red
    }

}
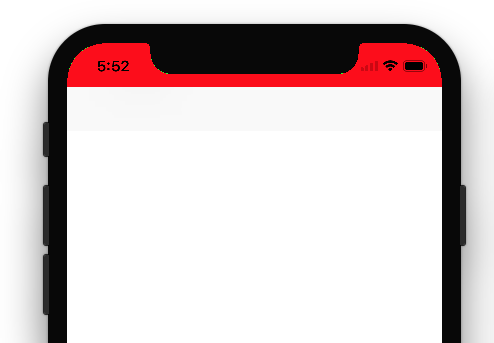
Voici le résultat:
Voici Apple Guidelines / Instruction à propos du changement de statut de la barre. Seul L'obscurité et la lumière (tandis que le noir) sont autorisés dans barre d'état.
Voici - Comment changer la barre d'état style:
si vous voulez définir le style de barre de statut, le niveau d'application puis UIViewControllerBasedStatusBarAppearance à NO dans votre".plist".
si vous voulez définir le style de la barre d'état, au niveau du contrôleur de vue, suivez les étapes suivantes:
- définissez le
UIViewControllerBasedStatusBarAppearanceàYESdans le fichier.plist, si vous avez besoin de définir style de barre d'état au niveau UIViewController seulement. -
dans le viewDidLoad ajouter la fonction -
setNeedsStatusBarAppearanceUpdate -
override preferredStatusBarStyle dans votre contrôleur de vue.
-
override func viewDidLoad() {
    super.viewDidLoad()
    self.setNeedsStatusBarAppearanceUpdate()
}

override var preferredStatusBarStyle: UIStatusBarStyle {
    return .lightContent
}
écrivez ceci dans votre méthode ViewDidLoad:
if ([self respondsToSelector:@selector(setEdgesForExtendedLayout:)]) {
    self.edgesForExtendedLayout=UIRectEdgeNone;
    self.extendedLayoutIncludesOpaqueBars=NO;
    self.automaticallyAdjustsScrollViewInsets=NO;
}
il a fixé la couleur de barre de statut pour moi et d'autres inexactitudes D'UI aussi dans une certaine mesure.
juste pour ajouter à la réponse de Shahid - vous pouvez tenir compte des changements d'orientation ou de différents dispositifs en utilisant ceci (iOS7+):
- (BOOL) application:(UIApplication *)application didFinishLaunchingWithOptions:(NSDictionary *)launchOptions
{
  ...

  //Create the background
  UIView* statusBg = [[UIView alloc] initWithFrame:CGRectMake(0, 0, self.window.frame.size.width, 20)];
  statusBg.backgroundColor = [UIColor colorWithWhite:1 alpha:.7];

  //Add the view behind the status bar
  [self.window.rootViewController.view addSubview:statusBg];

  //set the constraints to auto-resize
  statusBg.translatesAutoresizingMaskIntoConstraints = NO;
  [statusBg.superview addConstraint:[NSLayoutConstraint constraintWithItem:statusBg attribute:NSLayoutAttributeTop relatedBy:NSLayoutRelationEqual toItem:statusBg.superview attribute:NSLayoutAttributeTop multiplier:1.0 constant:0.0]];
  [statusBg.superview addConstraint:[NSLayoutConstraint constraintWithItem:statusBg attribute:NSLayoutAttributeLeft relatedBy:NSLayoutRelationEqual toItem:statusBg.superview attribute:NSLayoutAttributeLeft multiplier:1.0 constant:0.0]];
  [statusBg.superview addConstraint:[NSLayoutConstraint constraintWithItem:statusBg attribute:NSLayoutAttributeRight relatedBy:NSLayoutRelationEqual toItem:statusBg.superview attribute:NSLayoutAttributeRight multiplier:1.0 constant:0.0]];
  [statusBg.superview addConstraints:[NSLayoutConstraint constraintsWithVisualFormat:@"V:[statusBg(==20)]" options:0 metrics:nil views:NSDictionaryOfVariableBindings(statusBg)]];
  [statusBg.superview setNeedsUpdateConstraints];
  ...
}
pour le fond, vous pouvez facilement ajouter une vue, comme dans l'exemple:
 UIView *view=[[UIView alloc] initWithFrame:CGRectMake(0, 0,320, 20)];
    view.backgroundColor=[UIColor colorWithRed:0/255.0 green:0/255.0 blue:0/255.0 alpha:0.1];
    [navbar addSubview:view];
où "navbar" est un UINavigationBar.
j'espère qu'il pourra vous aider!
Voici une solution de total, copier et coller, avec un
explication absolument correcte
de toutes les questions en jeu.
avec merci à Warif Akhand Rishi !
pour la trouvaille étonnante concernant le chemin d'accès statusBarWindow.statusBar . Bon.
func application(_ application: UIApplication, didFinishLaunchingWithOptions launchOptions: [UIApplicationLaunchOptionsKey: Any]?) -> Bool {

    // handle the iOS bar!

    // >>>>>NOTE<<<<<
    // >>>>>NOTE<<<<<
    // >>>>>NOTE<<<<<
    // "Status Bar Style" refers to the >>>>>color of the TEXT<<<<<< of the Apple status bar,
    // it does NOT refer to the background color of the bar. This causes a lot of confusion.
    // >>>>>NOTE<<<<<
    // >>>>>NOTE<<<<<
    // >>>>>NOTE<<<<<

    // our app is white, so we want the Apple bar to be white (with, obviously, black writing)

    // make the ultimate window of OUR app actually start only BELOW Apple's bar....
    // so, in storyboard, never think about the issue. design to the full height in storyboard.
    let h = UIApplication.shared.statusBarFrame.size.height
    let f = self.window?.frame
    self.window?.frame = CGRect(x: 0, y: h, width: f!.size.width, height: f!.size.height - h)

    // next, in your plist be sure to have this: you almost always want this anyway:
    // <key>UIViewControllerBasedStatusBarAppearance</key>
    // <false/>

    // next - very simply in the app Target, select "Status Bar Style" to Default.
    // Do nothing in the plist regarding "Status Bar Style" - in modern Xcode, setting
    // the "Status Bar Style" toggle simply sets the plist for you.

    // finally, method A:
    // set the bg of the Apple bar to white.  Technique courtesy Warif Akhand Rishi.
    // note: self.window?.clipsToBounds = true-or-false, makes no difference in method A.
    if let sb = UIApplication.shared.value(forKeyPath: "statusBarWindow.statusBar") as? UIView {
        sb.backgroundColor = UIColor.white
        // if you prefer a light gray under there...
        //sb.backgroundColor = UIColor(hue: 0, saturation: 0, brightness: 0.9, alpha: 1)
    }

    /*
    // if you prefer or if necessary, method B:
    // explicitly actually add a background, in our app, to sit behind the apple bar....
    self.window?.clipsToBounds = false // MUST be false if you use this approach
    let whiteness = UIView()
    whiteness.frame = CGRect(x: 0, y: -h, width: f!.size.width, height: h)
    whiteness.backgroundColor = UIColor.green
    self.window!.addSubview(whiteness)
    */

    return true
}
changer la couleur de fond de la barre d'état: Swift:
let proxyViewForStatusBar : UIView = UIView(frame: CGRectMake(0, 0,self.view.frame.size.width, 20))
        proxyViewForStatusBar.backgroundColor=UIColor.whiteColor()
        self.view.addSubview(proxyViewForStatusBar)
dans le cas de swift 2.0 sur iOS 9
Placez les éléments suivants dans l'application déléguer, sous didFinishLaunchingWithOptions:
    let view: UIView = UIView.init(frame: CGRectMake(0, 0, UIScreen.mainScreen().bounds.size.width, 20))

    view.backgroundColor = UIColor.blackColor()  //The colour you want to set

    view.alpha = 0.1   //This and the line above is set like this just if you want
                          the status bar a darker shade of
                          the colour you already have behind it.

    self.window!.rootViewController!.view.addSubview(view)
iTroid23 solution a fonctionné pour moi. J'ai raté la solution Swift. Alors peut-être que c'est utile:
1) dans mon plist j'ai dû ajouter ceci:
<key>UIViewControllerBasedStatusBarAppearance</key>
<true/>
2) Je n'ai pas eu besoin d'appeler "setNeedsStatusBarAppearanceUpdate".
3) dans swift j'ai dû ajouter ceci à mon UIViewController:
override func preferredStatusBarStyle() -> UIStatusBarStyle {
    return UIStatusBarStyle.LightContent
}
pour la couleur de la barre: vous fournissez une image de fond personnalisée pour la barre.
Pour la couleur de texte: Utilisation de l'information dans à Propos de la Manipulation de Texte sous iOS
Si vous utilisez un UINavigationController , vous pouvez utiliser une extension comme ceci:
extension UINavigationController {
    private struct AssociatedKeys {
        static var navigationBarBackgroundViewName = "NavigationBarBackground"
    }

    var navigationBarBackgroundView: UIView? {
        get {
            return objc_getAssociatedObject(self,
                                        &AssociatedKeys.navigationBarBackgroundViewName) as? UIView
        }
        set(newValue) {
             objc_setAssociatedObject(self,
                                 &AssociatedKeys.navigationBarBackgroundViewName,
                                 newValue,
                                 .OBJC_ASSOCIATION_RETAIN)
        }
    }

    func setNavigationBar(hidden isHidden: Bool, animated: Bool = false) {
       if animated {
           UIView.animate(withDuration: 0.3) {
               self.navigationBarBackgroundView?.isHidden = isHidden
           }
       } else {
           navigationBarBackgroundView?.isHidden = isHidden
       }
    }

    func setNavigationBarBackground(color: UIColor, includingStatusBar: Bool = true, animated: Bool = false) {
        navigationBarBackgroundView?.backgroundColor = UIColor.clear
        navigationBar.backgroundColor = UIColor.clear
        navigationBar.barTintColor = UIColor.clear

        let setupOperation = {
            if includingStatusBar {
                self.navigationBarBackgroundView?.isHidden = false
                if self.navigationBarBackgroundView == nil {
                    self.setupBackgroundView()
                }
                self.navigationBarBackgroundView?.backgroundColor = color
            } else {
                self.navigationBarBackgroundView?.isHidden = true
                self.navigationBar.backgroundColor = color
            }
        }

        if animated {
            UIView.animate(withDuration: 0.3) {
                setupOperation()
            }
        } else {
            setupOperation()
        }
    }

    private func setupBackgroundView() {
        var frame = navigationBar.frame
        frame.origin.y = 0
        frame.size.height = 64

        navigationBarBackgroundView = UIView(frame: frame)
        navigationBarBackgroundView?.translatesAutoresizingMaskIntoConstraints = true
        navigationBarBackgroundView?.autoresizingMask = [.flexibleWidth, .flexibleBottomMargin]

        navigationBarBackgroundView?.isUserInteractionEnabled = false

        view.insertSubview(navigationBarBackgroundView!, aboveSubview: navigationBar)
    }
}
il rend essentiellement la barre de navigation arrière-plan transparent et utilise un autre uivi comme arrière-plan. Vous pouvez appeler la méthode setNavigationBarBackground de votre contrôleur de navigation pour définir la couleur de fond de la barre de navigation avec la barre d'état.
gardez à l'esprit que vous devez ensuite utiliser la méthode setNavigationBar(hidden: Bool, animated: Bool) dans l'extension lorsque vous voulez masquez la barre de navigation sinon la vue qui a été utilisée comme arrière-plan sera toujours visible.
essayez ceci. Utilisez ce code dans votre classe appdelegate "didFinishLaunchingWithOptions" function
[[UIApplication sharedApplication] setStatusBarStyle:UIStatusBarStyleLightContent];
    [application setStatusBarHidden:NO];
    UIView *statusBar = [[[UIApplication sharedApplication] valueForKey:@"statusBarWindow"] valueForKey:@"statusBar"];
    if ([statusBar respondsToSelector:@selector(setBackgroundColor:)]) {
        statusBar.backgroundColor = [UIColor blackColor];
    }
j'ai réussi à personnaliser la couleur StatusBar assez simple ajoutant dans AppDelegate.cs fichier dans la méthode:
public override bool FinishedLaunching(UIApplication app, NSDictionary options)
code suivant:
UIView statusBar = UIApplication.SharedApplication.ValueForKey(new NSString("statusBar")) as UIView;

if (statusBar!=null && statusBar.RespondsToSelector(new Selector("setBackgroundColor:")))
{
   statusBar.BackgroundColor = Color.FromHex(RedColorHex).ToUIColor();
}
donc vous obtenez quelque chose comme ceci:
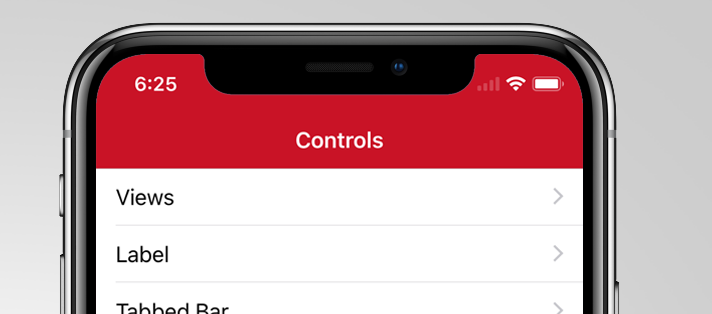
lien: https://jorgearamirez.wordpress.com/2016/07/18/lesson-x-effects-for-the-status-bar /
Swift 4
dans Info.plist ajouter ce bien
afficher l'apparence de la barre d'état basée sur le contrôleur au NO
et après AppDelegate à l'intérieur du didFinishLaunchingWithOptions ajouter ces lignes de code
UIApplication.shared.isStatusBarHidden = false
UIApplication.shared.statusBarStyle = .lightContent