Comment changer la taille de la police sur un tracé matplotlib
Comment change-t - on la taille de la police pour tous les éléments (ticks, labels, title) sur un tracé matplotlib?
Je sais comment changer les tailles d'étiquette de tique, ceci est fait avec:
import matplotlib
matplotlib.rc('xtick', labelsize=20)
matplotlib.rc('ytick', labelsize=20)
, Mais comment peut-on changer le reste?
9 réponses
À partir de la documentation matplotlib ,
font = {'family' : 'normal',
        'weight' : 'bold',
        'size'   : 22}

matplotlib.rc('font', **font)
Définit la police de tous les éléments sur la police spécifiée par l'objet kwargs, font.
Sinon, vous pouvez également utiliser le rcParams update méthode comme il est suggéré dans cette réponse:
matplotlib.rcParams.update({'font.size': 22})
Ou
import matplotlib.pyplot as plt
plt.rcParams.update({'font.size': 22})
Vous trouverez une liste complète des propriétés disponibles sur la page personnalisation de matplotlib .
Si vous voulez changer la taille de la fontsize pour un tracé spécifique qui a déjà été créé, essayez ceci:
import matplotlib.pyplot as plt

ax = plt.subplot(111, xlabel='x', ylabel='y', title='title')
for item in ([ax.title, ax.xaxis.label, ax.yaxis.label] +
             ax.get_xticklabels() + ax.get_yticklabels()):
    item.set_fontsize(20)
Si vous êtes un monstre de contrôle comme moi, vous pouvez définir explicitement toutes vos tailles de police:
import matplotlib.pyplot as plt

SMALL_SIZE = 8
MEDIUM_SIZE = 10
BIGGER_SIZE = 12

plt.rc('font', size=SMALL_SIZE)          # controls default text sizes
plt.rc('axes', titlesize=SMALL_SIZE)     # fontsize of the axes title
plt.rc('axes', labelsize=MEDIUM_SIZE)    # fontsize of the x and y labels
plt.rc('xtick', labelsize=SMALL_SIZE)    # fontsize of the tick labels
plt.rc('ytick', labelsize=SMALL_SIZE)    # fontsize of the tick labels
plt.rc('legend', fontsize=SMALL_SIZE)    # legend fontsize
plt.rc('figure', titlesize=BIGGER_SIZE)  # fontsize of the figure title
Notez que vous pouvez également définir les tailles appelant la méthode rc sur matplotlib:
import matplotlib

SMALL_SIZE = 8
matplotlib.rc('font', size=SMALL_SIZE)
matplotlib.rc('axes', titlesize=SMALL_SIZE)

# and so on ...
Update: Voir le bas de la réponse pour une façon légèrement meilleure de le faire.
Mise à jour # 2: j'ai aussi compris changer les polices de titre de légende.
Mise à jour # 3: Il y a un bogue dans Matplotlib 2.0.0 qui fait que les étiquettes des axes logarithmiques reviennent à la police par défaut. Devrait être corrigé dans 2.0.1 mais j'ai inclus la solution de contournement dans la 2ème partie de la réponse.
Cette réponse est pour tous ceux qui essaient de changer toutes les polices, y compris pour le légende, et pour tous ceux qui essaient d'utiliser différentes polices et tailles pour chaque chose. Il n'utilise pas rc (ce qui ne semble pas fonctionner pour moi). C'est plutôt lourd mais je ne pouvais pas m'attaquer personnellement à toute autre méthode. Il combine essentiellement la réponse de ryggyr ici avec D'autres réponses sur SO.
import numpy as np
import matplotlib.pyplot as plt
import matplotlib.font_manager as font_manager

# Set the font dictionaries (for plot title and axis titles)
title_font = {'fontname':'Arial', 'size':'16', 'color':'black', 'weight':'normal',
              'verticalalignment':'bottom'} # Bottom vertical alignment for more space
axis_font = {'fontname':'Arial', 'size':'14'}

# Set the font properties (for use in legend)
font_path = 'C:\Windows\Fonts\Arial.ttf'
font_prop = font_manager.FontProperties(fname=font_path, size=14)

ax = plt.subplot() # Defines ax variable by creating an empty plot

# Set the tick labels font
for label in (ax.get_xticklabels() + ax.get_yticklabels()):
    label.set_fontname('Arial')
    label.set_fontsize(13)

x = np.linspace(0, 10)
y = x + np.random.normal(x) # Just simulates some data

plt.plot(x, y, 'b+', label='Data points')
plt.xlabel("x axis", **axis_font)
plt.ylabel("y axis", **axis_font)
plt.title("Misc graph", **title_font)
plt.legend(loc='lower right', prop=font_prop, numpoints=1)
plt.text(0, 0, "Misc text", **title_font)
plt.show()
L'avantage de cette méthode est que, en ayant plusieurs dictionnaires de polices, vous pouvez choisir différentes polices / tailles/poids / couleurs pour les différents titres, choisir la police pour les étiquettes de tiques, et choisissez la police pour la légende, tous indépendamment.
Mise à jour:
J'ai élaboré une approche légèrement différente, moins encombrée qui supprime les dictionnaires de polices, et permet à n'importe quelle police sur votre système, même .les polices otf. Pour avoir des polices séparées pour chaque chose, écrivez simplement plus font_path et font_prop comme des variables.
import numpy as np
import matplotlib.pyplot as plt
import matplotlib.font_manager as font_manager
import matplotlib.ticker
# Workaround for Matplotlib 2.0.0 log axes bug https://github.com/matplotlib/matplotlib/issues/8017 :
matplotlib.ticker._mathdefault = lambda x: '\\mathdefault{%s}'%x

# Set the font properties (can use more variables for more fonts)
font_path = 'C:\Windows\Fonts\AGaramondPro-Regular.otf'
font_prop = font_manager.FontProperties(fname=font_path, size=14)

ax = plt.subplot() # Defines ax variable by creating an empty plot

# Define the data to be plotted
x = np.linspace(0, 10)
y = x + np.random.normal(x)
plt.plot(x, y, 'b+', label='Data points')

for label in (ax.get_xticklabels() + ax.get_yticklabels()):
    label.set_fontproperties(font_prop)
    label.set_fontsize(13) # Size here overrides font_prop

plt.title("Exponentially decaying oscillations", fontproperties=font_prop,
          size=16, verticalalignment='bottom') # Size here overrides font_prop
plt.xlabel("Time", fontproperties=font_prop)
plt.ylabel("Amplitude", fontproperties=font_prop)
plt.text(0, 0, "Misc text", fontproperties=font_prop)

lgd = plt.legend(loc='lower right', prop=font_prop) # NB different 'prop' argument for legend
lgd.set_title("Legend", prop=font_prop)

plt.show()
Espérons que c'est une réponse complète
Voici une approche totalement différente qui fonctionne étonnamment bien pour changer les tailles de police:
Modifiez la taille de la figure !
J'utilise habituellement du code comme ceci:
import matplotlib.pyplot as plt
import numpy as np
fig = plt.figure(figsize=(4,3))
ax = fig.add_subplot(111)
x = np.linspace(0,6.28,21)
ax.plot(x, np.sin(x), '-^', label="1 Hz")
ax.set_title("Oscillator Output")
ax.set_xlabel("Time (s)")
ax.set_ylabel("Output (V)")
ax.grid(True)
ax.legend(loc=1)
fig.savefig('Basic.png', dpi=300)
Le petits vous faire de la figure de la taille, de la plus la police est par rapport à l'intrigue. Cela augmente également les marqueurs. Remarque j'ai également défini le dpi ou point par pouce. J'ai appris cela à partir d'un affichage de l'AMTA (professeur de modélisation américaine de l'Amérique) forum.
Exemple de le code ci-dessus: 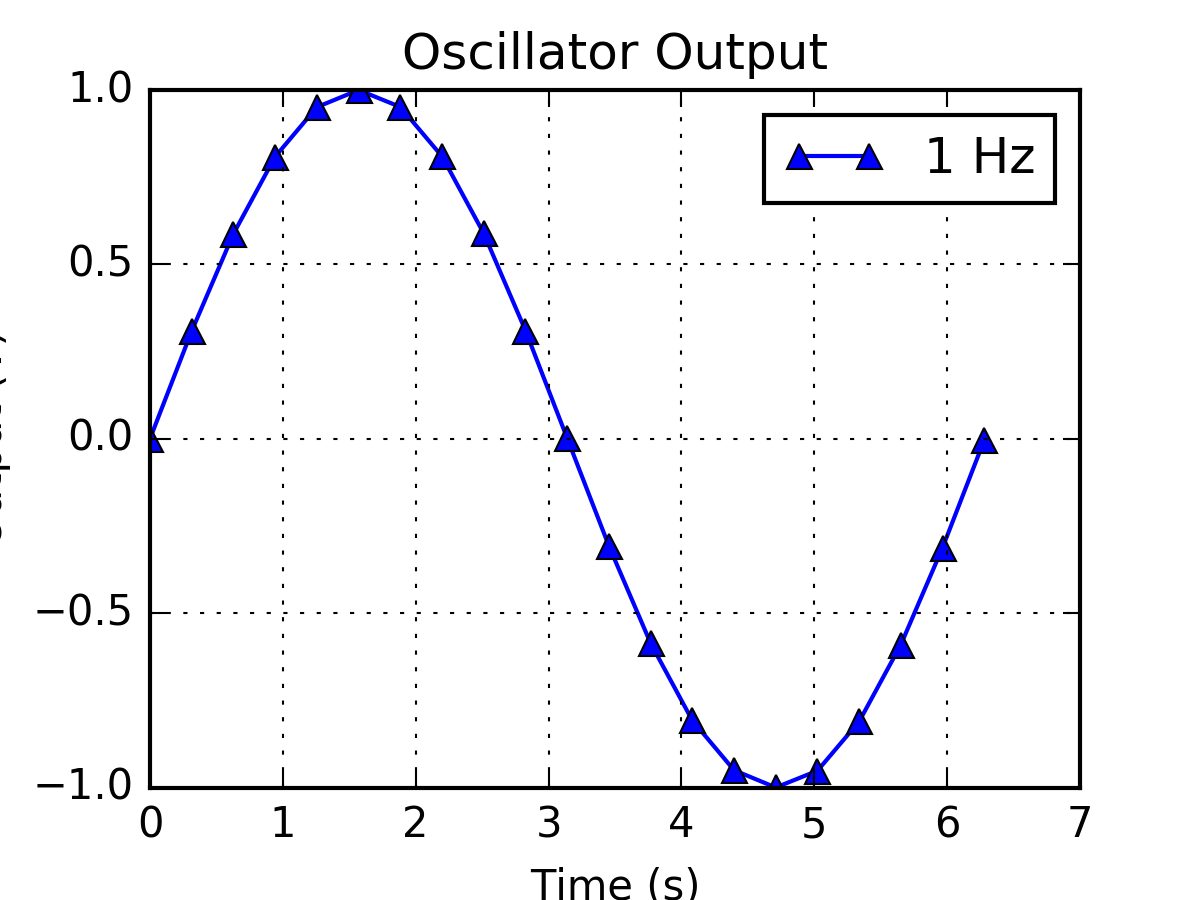
Basé sur les éléments ci-dessus:
import matplotlib.pyplot as plt
import matplotlib.font_manager as fm

fontPath = "/usr/share/fonts/abc.ttf"
font = fm.FontProperties(fname=fontPath, size=10)
font2 = fm.FontProperties(fname=fontPath, size=24)

fig = plt.figure(figsize=(32, 24))
fig.text(0.5, 0.93, "This is my Title", horizontalalignment='center', fontproperties=font2)

plot = fig.add_subplot(1, 1, 1)

plot.xaxis.get_label().set_fontproperties(font)
plot.yaxis.get_label().set_fontproperties(font)
plot.legend(loc='upper right', prop=font)

for label in (plot.get_xticklabels() + plot.get_yticklabels()):
    label.set_fontproperties(font)
Ceci est une extension pour Marius Retegan réponse. Vous pouvez créer un fichier JSON séparé avec toutes vos modifications et le charger avec rcParams.mettre. Les modifications ne s'appliqueront qu'au script actuel. Donc
import json
from matplotlib import pyplot as plt, rcParams

s = json.load(open("example_file.json")
rcParams.update(s)
Et enregistrez ce ' example_file.json " dans le même dossier.
{
  "lines.linewidth": 2.0,
  "axes.edgecolor": "#bcbcbc",
  "patch.linewidth": 0.5,
  "legend.fancybox": true,
  "axes.color_cycle": [
    "#348ABD",
    "#A60628",
    "#7A68A6",
    "#467821",
    "#CF4457",
    "#188487",
    "#E24A33"
  ],
  "axes.facecolor": "#eeeeee",
  "axes.labelsize": "large",
  "axes.grid": true,
  "patch.edgecolor": "#eeeeee",
  "axes.titlesize": "x-large",
  "svg.fonttype": "path",
  "examples.directory": ""
}
Je suis tout à fait d'accord avec le professeur Huster que la façon la plus simple de procéder est de changer la taille de la figure, ce qui permet de conserver les polices par défaut. Je devais juste compléter cela avec une option bbox_inches lors de l'enregistrement de la figure en pdf car les étiquettes d'axe ont été coupées.
import matplotlib.pyplot as plt
plt.figure(figsize=(4,3))
plt.savefig('Basic.pdf', bbox_inches='tight')