Comment construire une ListView horizontale avec RecyclerView?
je dois implémenter un listview horizontal dans mon application Android. J'ai fait un peu de recherche et je suis tombé sur Comment puis-je faire un ListView horizontal dans Android? et ListView Horizontal sur Android? cependant, ces questions ont été posées avant que Recyclerview ne soit libéré. Est-il une meilleure façon de mettre en œuvre avec Recyclerview?
9 réponses
y a-t-il une meilleure façon de mettre en œuvre cela maintenant avec Recyclerview maintenant?
Oui.
Lorsque vous utilisez un RecyclerView , vous devez spécifier un LayoutManager , qui est responsable pour la pose de chaque élément dans la vue. Le LinearLayoutManager vous permet de spécifier une orientation, tout comme le ferait un LinearLayout normal.
Pour créer une liste horizontale avec RecyclerView , vous pourrait faire quelque chose comme ceci:
LinearLayoutManager layoutManager
    = new LinearLayoutManager(this, LinearLayoutManager.HORIZONTAL, false);

RecyclerView myList = (RecyclerView) findViewById(R.id.my_recycler_view);
myList.setLayoutManager(layoutManager);
 <android.support.v7.widget.RecyclerView
        android:layout_width="wrap_content"
        android:layout_height="wrap_content"
        android:orientation="horizontal"
        app:layoutManager="android.support.v7.widget.LinearLayoutManager" />
exemple Complet
la seule différence réelle entre un vertical RecyclerView et un horizontal est la façon dont vous mettez en place le LinearLayoutManager . Voici l'extrait de code. L'exemple complet est ci-dessous.
LinearLayoutManager horizontalLayoutManagaer = new LinearLayoutManager(MainActivity.this, LinearLayoutManager.HORIZONTAL, false);
recyclerView.setLayoutManager(horizontalLayoutManagaer);
Ce fuller exemple est modélisé d'après mon verticale RecyclerView réponse .
mise à jour Grad-dependencies
assurez-vous que les dépendances suivantes sont dans votre application gradle.build fichier:
implementation 'com.android.support:appcompat-v7:27.1.1'
implementation 'com.android.support:recyclerview-v7:27.1.1'
vous pouvez mettre à jour les numéros de version à tout ce qui est le plus récent .
créer la mise en page de l'activité
ajoutez le RecyclerView à votre disposition xml.
activity_main.xml
<?xml version="1.0" encoding="utf-8"?>
<RelativeLayout
    xmlns:android="http://schemas.android.com/apk/res/android"
    android:layout_width="match_parent"
    android:layout_height="match_parent">

    <android.support.v7.widget.RecyclerView
        android:id="@+id/rvAnimals"
        android:layout_width="match_parent"
        android:layout_height="match_parent"/>

</RelativeLayout>
Créer un élément de mise en page
chaque article de notre RecyclerView va avoir un simple a coloré View sur un TextView . Créer un nouveau fichier de ressources de mise en page.
recyclerview_item.xml
<?xml version="1.0" encoding="utf-8"?>
<LinearLayout
    xmlns:android="http://schemas.android.com/apk/res/android"
    android:layout_width="wrap_content"
    android:layout_height="match_parent"
    android:orientation="vertical"
    android:padding="10dp">

    <View
        android:id="@+id/colorView"
        android:layout_width="100dp"
        android:layout_height="100dp"/>

    <TextView
        android:id="@+id/tvAnimalName"
        android:layout_width="wrap_content"
        android:layout_height="wrap_content"
        android:textSize="20sp"/>

</LinearLayout>
créer l'adaptateur
le RecyclerView nécessite un adaptateur pour remplir les vues dans chaque rangée (élément horizontal) avec vos données. Créer un nouveau fichier java.
MyRecyclerViewAdapter.java
public class MyRecyclerViewAdapter extends RecyclerView.Adapter<MyRecyclerViewAdapter.ViewHolder> {

    private List<Integer> mViewColors;
    private List<String> mAnimals;
    private LayoutInflater mInflater;
    private ItemClickListener mClickListener;

    // data is passed into the constructor
    MyRecyclerViewAdapter(Context context, List<Integer> colors, List<String> animals) {
        this.mInflater = LayoutInflater.from(context);
        this.mViewColors = colors;
        this.mAnimals = animals;
    }

    // inflates the row layout from xml when needed
    @Override
    @NonNull
    public ViewHolder onCreateViewHolder(@NonNull ViewGroup parent, int viewType) {
        View view = mInflater.inflate(R.layout.recyclerview_item, parent, false);
        return new ViewHolder(view);
    }

    // binds the data to the view and textview in each row
    @Override
    public void onBindViewHolder(@NonNull ViewHolder holder, int position) {
        int color = mViewColors.get(position);
        String animal = mAnimals.get(position);
        holder.myView.setBackgroundColor(color);
        holder.myTextView.setText(animal);
    }

    // total number of rows
    @Override
    public int getItemCount() {
        return mAnimals.size();
    }

    // stores and recycles views as they are scrolled off screen
    public class ViewHolder extends RecyclerView.ViewHolder implements View.OnClickListener {
        View myView;
        TextView myTextView;

        ViewHolder(View itemView) {
            super(itemView);
            myView = itemView.findViewById(R.id.colorView);
            myTextView = itemView.findViewById(R.id.tvAnimalName);
            itemView.setOnClickListener(this);
        }

        @Override
        public void onClick(View view) {
            if (mClickListener != null) mClickListener.onItemClick(view, getAdapterPosition());
        }
    }

    // convenience method for getting data at click position
    public String getItem(int id) {
        return mAnimals.get(id);
    }

    // allows clicks events to be caught
    public void setClickListener(ItemClickListener itemClickListener) {
        this.mClickListener = itemClickListener;
    }

    // parent activity will implement this method to respond to click events
    public interface ItemClickListener {
        void onItemClick(View view, int position);
    }
}
Notes
- bien que ce ne soit pas strictement nécessaire, j'ai inclus la fonctionnalité pour écouter les événements de clic sur les articles. Ce qui était disponible dans l'ancien
ListViewset est un besoin commun. Vous pouvez supprimer ce code si vous n'en avez pas besoin.
Initialiser RecyclerView en Activité
ajouter le code suivant à votre activité principale.
activité principale.java
public class MainActivity extends AppCompatActivity implements MyRecyclerViewAdapter.ItemClickListener {

    private MyRecyclerViewAdapter adapter;

    @Override
    protected void onCreate(Bundle savedInstanceState) {
        super.onCreate(savedInstanceState);
        setContentView(R.layout.activity_main);

        // data to populate the RecyclerView with
        ArrayList<Integer> viewColors = new ArrayList<>();
        viewColors.add(Color.BLUE);
        viewColors.add(Color.YELLOW);
        viewColors.add(Color.MAGENTA);
        viewColors.add(Color.RED);
        viewColors.add(Color.BLACK);

        ArrayList<String> animalNames = new ArrayList<>();
        animalNames.add("Horse");
        animalNames.add("Cow");
        animalNames.add("Camel");
        animalNames.add("Sheep");
        animalNames.add("Goat");

        // set up the RecyclerView
        RecyclerView recyclerView = findViewById(R.id.rvAnimals);
        LinearLayoutManager horizontalLayoutManager
                = new LinearLayoutManager(MainActivity.this, LinearLayoutManager.HORIZONTAL, false);
        recyclerView.setLayoutManager(horizontalLayoutManager);
        adapter = new MyRecyclerViewAdapter(this, viewColors, animalNames);
        adapter.setClickListener(this);
        recyclerView.setAdapter(adapter);
    }

    @Override
    public void onItemClick(View view, int position) {
        Toast.makeText(this, "You clicked " + adapter.getItem(position) + " on item position " + position, Toast.LENGTH_SHORT).show();
    }
}
Notes
- notez que l'activité implémente le
ItemClickListenerque nous avons défini dans notre adaptateur. Cela nous permet de gérer les événements de clic d'article dansonItemClick.
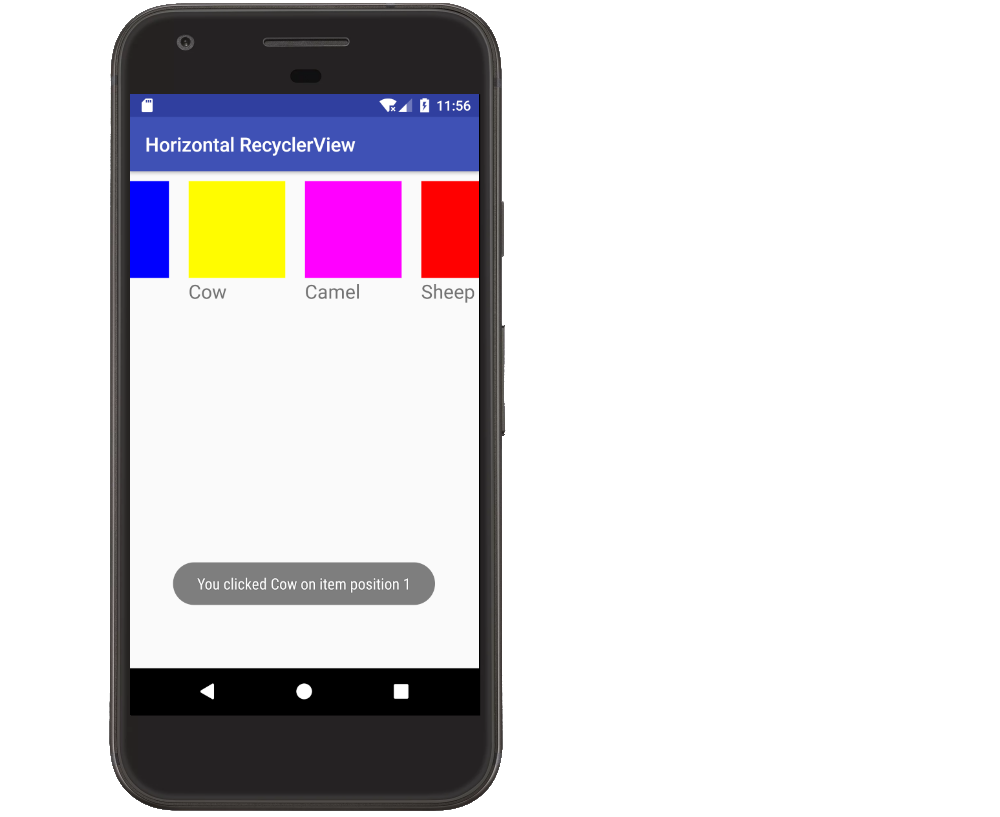
fini
C'est ça. Vous devriez être capable de courir votre projet maintenant et obtenir quelque chose de similaire à l'image ci-dessus.
Notes
- les vues colorées dans mon exemple pourraient bien sûr être remplacées par des images dans un vrai projet.
- Vertical RecyclerView example
si vous voulez utiliser un RecyclerView avec le GridLayoutManager , c'est la façon d'obtenir le rouleau horizontal.
recyclerView.setLayoutManager(
new GridLayoutManager(recyclerView.getContext(), rows, GridLayoutManager.HORIZONTAL, false));
essayer de construire un ListView horizontal prend trop de temps. J'ai résolu de deux manières.
1.By en utilisant un ViewPager dont l'adaptateur s'étend du PagerAdapter.
2.By utiliser RecyclerView comme ci-dessus. Besoin d'appliquer LayoutManager comme dans le code suivant:
LinearLayoutManager layoutManager
    = new LinearLayoutManager(this, LinearLayoutManager.HORIZONTAL, false);

RecyclerView myList = (RecyclerView) findViewById(R.id.my_recycler_view);
myList.setLayoutManager(layoutManager);
si vous souhaitez utiliser la vue Horizontal Recycler pour agir comme un ViewPager alors il est possible maintenant avec l'aide de LinearSnapHelper qui est ajouté dans la bibliothèque de soutien version 24.2.0.
ajoutez D'abord RecyclerView à votre activité / Fragment
<android.support.v7.widget.RecyclerView
        android:layout_below="@+id/sign_in_button"
        android:layout_width="match_parent"
        android:orientation="horizontal"
        android:id="@+id/blog_list"
        android:layout_height="match_parent">
    </android.support.v7.widget.RecyclerView>
dans mon cas j'ai utilisé un CardView dans le RecyclerView
blog_row.xml
<?xml version="1.0" encoding="utf-8"?>
<android.support.v7.widget.CardView

    xmlns:android="http://schemas.android.com/apk/res/android"
        android:layout_width="match_parent"
        android:layout_height="match_parent"
        xmlns:app="http://schemas.android.com/apk/res-auto"
        android:layout_margin="15dp"
        android:orientation="vertical">

        <LinearLayout
            android:layout_width="match_parent"
            android:layout_height="match_parent"
            android:gravity="center"
            android:orientation="vertical">

            <com.android.volley.toolbox.NetworkImageView
                android:id="@+id/imageBlogPost"
                android:layout_width="match_parent"
                android:layout_height="wrap_content"
                android:adjustViewBounds="true"
                android:paddingBottom="15dp"
                android:src="@drawable/common_google_signin_btn_text_light_normal" />

            <TextView
                android:id="@+id/TitleTextView"
                android:layout_width="wrap_content"
                android:layout_height="wrap_content"
               android:layout_marginBottom="20dp"

                android:text="Post Title Here"
                android:textSize="16sp" />

            <TextView
                android:id="@+id/descriptionTextView"
                android:layout_width="wrap_content"
                android:layout_height="wrap_content"
                android:text="Post Description Here"
                android:paddingBottom="15dp"
                android:textSize="14sp" />
        </LinearLayout>

    </android.support.v7.widget.CardView>
dans votre activité / Fragment
    private RecyclerView mBlogList;


 LinearLayoutManager layoutManager
                    = new LinearLayoutManager(this, LinearLayoutManager.HORIZONTAL, false);
            mBlogList = (RecyclerView) findViewById(R.id.blog_list);

            mBlogList.setHasFixedSize(true);
            mBlogList.setLayoutManager(layoutManager);

LinearSnapHelper snapHelper = new LinearSnapHelper() {
            @Override
            public int findTargetSnapPosition(RecyclerView.LayoutManager lm, int velocityX, int velocityY) {
                View centerView = findSnapView(lm);
                if (centerView == null)
                    return RecyclerView.NO_POSITION;

                int position = lm.getPosition(centerView);
                int targetPosition = -1;
                if (lm.canScrollHorizontally()) {
                    if (velocityX < 0) {
                        targetPosition = position - 1;
                    } else {
                        targetPosition = position + 1;
                    }
                }

                if (lm.canScrollVertically()) {
                    if (velocityY < 0) {
                        targetPosition = position - 1;
                    } else {
                        targetPosition = position + 1;
                    }
                }

                final int firstItem = 0;
                final int lastItem = lm.getItemCount() - 1;
                targetPosition = Math.min(lastItem, Math.max(targetPosition, firstItem));
                return targetPosition;
            }
        };
        snapHelper.attachToRecyclerView(mBlogList);
la dernière étape consiste à régler l'adaptateur à RecyclerView
mBlogList.setAdapter(firebaseRecyclerAdapter);
avec la sortie de la bibliothèque RecyclerView, vous pouvez maintenant aligner facilement une liste d'images liées avec du texte. Vous pouvez utiliser LinearLayoutManager pour spécifier la direction dans laquelle vous souhaitez orienter votre liste, soit verticale, soit horizontale comme indiqué ci-dessous.
vous pouvez télécharger une démo de travail à partir de ce post
il existe une sous-classe de RecyclerView appelée HorizontalGridView vous pouvez l'utiliser pour avoir une direction horizontale. VerticalGridView pour la direction verticale
essayez ceci:
myrecyclerview.setLayoutManager(
        new LinearLayoutManager(getActivity(),
                                LinearLayoutManager.HORIZONTAL,false));
myrecyclerview.setAdapter(recyclerAdapter);
seulement au cas où vous avez une vue de recycleur avec quelques fragments dessus.