Comment ajouter un bouton radio dynamiquement selon le nombre de comptes donné?
j'ai essayé ce code..il affichera trois boutons radio dans une seule rangée quand l'émulateur démarre. Mais j'ai besoin d'un événement bouton pour ça. I. e; si je clique sur le bouton, il devrait demander le nombre de boutons radio. alors si je donne le compte, il doit afficher les boutons radio basés sur le compte donné. Par exemple, si je donne le compte à 3, il doit afficher les trois boutons radio dans une seule rangée. Votre aide est très appréciée. Merci à l'avance.
  public class MyActivity extends Activity {
    /**
     * Called when the activity is first created.
     */
    @Override
    public void onCreate(Bundle savedInstanceState) {
        super.onCreate(savedInstanceState);
        setContentView(R.layout.main);
        for(int row=0; row < 1; row++)
        {
            LinearLayout ll = new LinearLayout(this);
            ll.setOrientation(LinearLayout.HORIZONTAL);
            for(int i = 1; i < 4; i++) {
                RadioButton rdbtn = new RadioButton(this);
                rdbtn.setId((row * 2) + i);
                rdbtn.setText("Radio " + rdbtn.getId());
                ll.addView(rdbtn);
            }
            ((ViewGroup)findViewById(R.id.radiogroup)).addView(ll);
        }
    }
    }
c'est xml
<?xml version="1.0" encoding="utf-8"?>
<RelativeLayout xmlns:android="http://schemas.android.com/apk/res/android"
                xmlns:tools="http://schemas.android.com/tools"
                android:layout_width="match_parent"
                android:layout_height="match_parent"
                tools:context=".MainActivity" >

    <RadioGroup
            android:id="@+id/radiogroup"
            android:orientation="vertical"
            android:layout_width="wrap_content"
            android:layout_height="wrap_content"
            android:layout_centerHorizontal="true"
            android:layout_centerVertical="true"/>

    </RelativeLayout>
4 réponses
Veuillez trouver ci-dessous le code, j'ai créé un "EditText" et un "Bouton" dans le fichier xml de mise en page. Saisissez un nombre dans le 'texte édité' et cliquez sur le bouton , le même non. des boutons radio seront ajoutés dans le Layout.
C'est votre ActivityMain
public class ActivityMain extends Activity {
    @Override
    protected void onCreate(Bundle savedInstanceState) {
        super.onCreate(savedInstanceState);
        setContentView(R.layout.activity_main);

        final EditText editText=(EditText)findViewById(R.id.et_no);

        findViewById(R.id.btn).setOnClickListener(new OnClickListener() {
            @Override
            public void onClick(View v) {
                // TODO Auto-generated method stub

                int number=Integer.parseInt(editText.getText().toString());
                addRadioButtons(number);
            }
        });
    }

    public void addRadioButtons(int number) {
        for (int row = 0; row < 1; row++) {
            RadioGroup ll = new RadioGroup(this);
            ll.setOrientation(LinearLayout.HORIZONTAL);

            for (int i = 1; i <= number; i++) {
                RadioButton rdbtn = new RadioButton(this);
                rdbtn.setId((row * 2) + i);
                rdbtn.setText("Radio " + rdbtn.getId());
                ll.addView(rdbtn);
            }
            ((ViewGroup) findViewById(R.id.radiogroup)).addView(ll);
        }
    }
}
Et voici votre fichier de mise en page
<?xml version="1.0" encoding="utf-8"?>
<RelativeLayout xmlns:android="http://schemas.android.com/apk/res/android"
    xmlns:tools="http://schemas.android.com/tools"
    android:layout_width="match_parent"
    android:layout_height="match_parent"
    tools:context=".MainActivity" >

    <RadioGroup
        android:id="@+id/radiogroup"
        android:layout_width="wrap_content"
        android:layout_height="wrap_content"
        android:layout_centerHorizontal="true"
        android:layout_centerVertical="true"
        android:orientation="vertical" />

    <LinearLayout
        android:layout_marginTop="20dp"
        android:layout_marginLeft="20dp"
        android:layout_height="wrap_content"
        android:layout_width="match_parent">

        <EditText android:layout_height="wrap_content"
            android:layout_width="wrap_content"
            android:hint="Enter no."
            android:inputType="number"
            android:id="@+id/et_no"/>

        <Button
            android:layout_height="wrap_content"
            android:layout_width="wrap_content"
            android:text="Add Radio btn"
            android:id="@+id/btn"/>

    </LinearLayout>

</RelativeLayout>
Essayez quelque Chose comme ci-dessous:
RadioGroup rgp= (RadioGroup) findViewById(R.id.radiogroup);
RadioGroup.LayoutParams rprms;

for(int i=0;i<3;i++){
      RadioButton radioButton = new RadioButton(this);
      radioButton.setText("new"+i);
      radioButton.setId("rbtn"+i);
      rprms= new RadioGroup.LayoutParams(LayoutParams.WRAP_CONTENT, LayoutParams.WRAP_CONTENT);
      rgp.addView(radioButton, rprms);
}
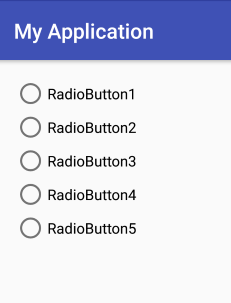
C'est la manière de faire ceci:
    RadioGroup rgp = (RadioGroup) findViewById(R.id.radio_group);
    int buttons = 5;
    for (int i = 1; i <= buttons ; i++) {
        RadioButton rbn = new RadioButton(this);
        rbn.setId(i + 1000);
        rbn.setText("RadioButton" + i);
        rgp.addView(rbn);
    }
mais que faire si vous devez faire cela horizontalement, ajoutez juste l'orientation (la valeur par défaut est verticale) avec setOrientation() méthode:
    RadioGroup rgp = (RadioGroup) findViewById(R.id.radio_group);
    rgp.setOrientation(LinearLayout.HORIZONTAL);
    int buttons = 5;
    for (int i = 1; i <= buttons; i++) {
        RadioButton rbn = new RadioButton(this);
        rbn.setId(1 + 1000);
        rbn.setText("RadioButton" + i);
        rbn.setLayoutParams(params);
        rgp.addView(rbn);
    }
Ceci est le code complet:
tout d'abord définir à l'intérieur de notre mise en page le Radiogroupe:
<?xml version="1.0" encoding="utf-8"?>
<RelativeLayout xmlns:android="http://schemas.android.com/apk/res/android"
    xmlns:tools="http://schemas.android.com/tools"
    android:id="@+id/activity_main"
    android:layout_width="match_parent"
    android:layout_height="match_parent"
    android:paddingBottom="@dimen/activity_vertical_margin"
    android:paddingLeft="@dimen/activity_horizontal_margin"
    android:paddingRight="@dimen/activity_horizontal_margin"
    android:paddingTop="@dimen/activity_vertical_margin">

    <RadioGroup
        android:id="@+id/radio_group"
        android:layout_width="match_parent"
        android:layout_height="wrap_content"/>
</RelativeLayout>
le code dans Le MainActivity:
public class MainActivity extends AppCompatActivity {

    @Override
    protected void onCreate(Bundle savedInstanceState) {
        super.onCreate(savedInstanceState);
        setContentView(R.layout.activity_main);

        //Defining 5 buttons.
        int buttons = 5;
        AppCompatRadioButton[] rb = new AppCompatRadioButton[buttons];

        RadioGroup rgp = (RadioGroup) findViewById(R.id.radio_group);
        rgp.setOrientation(LinearLayout.HORIZONTAL);

        for (int i = 1; i <= buttons; i++) {
            RadioButton rbn = new RadioButton(this);
            rbn.setId(i + 1000);
            rbn.setText("RadioButton" + i);
            LinearLayout.LayoutParams params = new LinearLayout.LayoutParams(LayoutParams.MATCH_PARENT, LayoutParams.WRAP_CONTENT, 1f);
            rbn.setLayoutParams(params);
            rgp.addView(rbn);
        }

    }
}
Ajouter un Button et EditText en xml et de prendre l'entrée d'editText à la variable inputValue l'essayer,
 public class MyActivity extends Activity {

    /**
     * Called when the activity is first created.
     */
     LinearLayout ll=null;
     ViewGroup  vwgroup;
     Button btnClick;
    @Override
    public void onCreate(Bundle savedInstanceState) {
        super.onCreate(savedInstanceState);
        setContentView(R.layout.main);
    vwgroup=((ViewGroup)findViewById(R.id.radiogroup)
    btnClick=(Button)findViewById(R.id.button1);


        btnClick.setOnClickListener(new OnClickListener() {

            @Override
            public void onClick(View arg0) {
                if(ll!=null)
                    viewgroup.removeView(ll);
                ll = new LinearLayout(this);
                for(int i = 1; i < inputValue; i++) {
                    RadioButton rdbtn = new RadioButton(this);
                    rdbtn.setId((row * 2) + i);
                    rdbtn.setText("Radio " + rdbtn.getId());
                    ll.addView(rdbtn);
                }
                vwgroup.addView(ll);

            }
        });
    }
    }

