GridLayout Hétérogène
mise à jour - ma solution de travail:https://stackoverflow.com/a/21233824/902172
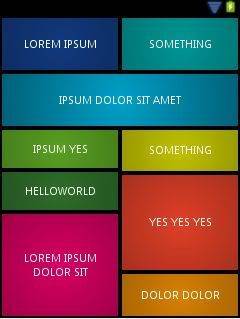
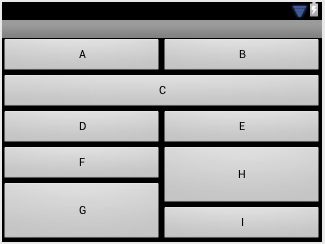
je suis en train de mettre en œuvre la disposition ci-dessous:
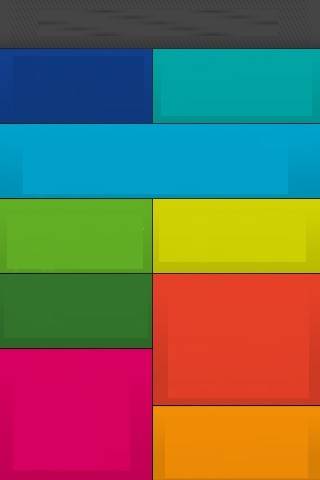
je pense GridLayout est adapté à mes besoins mais après 2 heures de lutte Je n'ai pas pu créer même une disposition similaire.. La mise en page est se redimensionner à tort,dépasse l'écran du téléphone et elle aussi ne couvrent pas les lignes et les colonnes spécifiées.
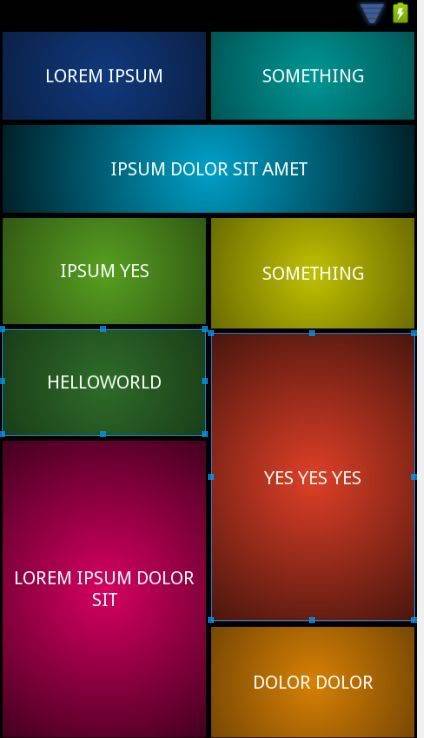
ici j'ai sélectionné un bouton pour que vous puissiez voir comment il dépasse les limites:
et voici le code xml associé:https://gist.github.com/2834492
j'ai atteint une mise en page similaire avec des linearlayouts imbriqués mais il n'est pas possible de redimensionner correctement pour l'écran taille.
mise à JOUR - approximative de LinearLayout mise en œuvre:
le code XML:https://gist.github.com/cdoger/2835887 Cependant, le problème est qu'il ne se redimensionne pas correctement ici quelques screenshots avec différentes configurations d'écran:
TLDR: Quelqu'un peut-il me montrer une mise en page hétérogène avec GridLayout comme sur la première image?
7 réponses
C. D.,
le problème auquel vous êtes confrontés est dû à une utilisation inappropriée du GridLayout. Le GridLayout est fait pour montrer ses enfants dans une grille et vous essayez d'outrepasser cela sans étendre le GridLayout. Alors que ce que vous voulez peut être accompli en code (en utilisant numcolumns et columnsize), il ne sera pas utile pour les tailles d'écran multiples sans un diable de beaucoup de code.
la seule solution adéquate qui ne nécessitera pas une tonne de piratage est l'utilisation judicieuse de à la fois les essais linéaires et les essais relativement courts. LinearLayout ne doit pas être utilisé exclusivement car il est fait pour déposer des articles dans une ligne (horizontalement ou verticalement seulement). Cela devient particulièrement évident lorsque vous essayez de faire les quatre boutons du bas. Alors que les boutons ci-dessus peut être fait avec LinearLayout avec très peu d'effort, RelativeLayout est ce dont vous avez besoin pour les quatre boutons du bas.
Remarque: RelativeLayout peut être un peu difficile pour ceux qui ont peu d'expérience en utilisant ils. Certains écueils incluent: les enfants se chevauchant, les enfants se déplaçant hors de l'écran, la taille et la largeur rendant mal appliquée. Si vous voulez un exemple, laissez-moi savoir et je vais éditer ma réponse.
Note Finale: Je suis tout à fait pour utiliser les objets de cadre actuels de manière unique, et préfère sincèrement fournir la solution demandée. La solution, cependant, n'est pas viable étant donné les contraintes de la question.
Solution (Révision) 1
après une réflexion approfondie la nuit dernière, cela peut être accompli avec une pure linéarisation. Bien que je n'aime pas cette solution, il devrait être multi-écran convivial et ne nécessite pas de tooling autour de moi. La prudence est de mise avec trop de LinearLayouts, car selon les développeurs de Google, cela peut entraîner un chargement lent de UIs en raison de la propriété layout_weight. Une deuxième solution utilisant RelativeLayout sera fourni lorsque je rentre à la maison. Maintenant Testé fournit les paramètres de mise en page désirés sur toutes les tailles d'écran et orientations.
<?xml version="1.0" encoding="utf-8"?>
<LinearLayout xmlns:android="http://schemas.android.com/apk/res/android"
    android:layout_width="match_parent"
    android:layout_height="match_parent"
    android:orientation="vertical" >
    <LinearLayout
        android:layout_width="match_parent"
        android:layout_height="0dp"
        android:layout_weight="1"
        android:orientation="vertical">
        <LinearLayout
            android:layout_width="match_parent"
            android:layout_height="0dp"
            android:layout_weight="1"
            android:orientation="horizontal">
            <Button
                android:id="@+id/Button01"
                android:layout_width="0"
                android:layout_height="match_parent"
                android:layout_weight="1"
                android:text="Button" />
            <Button
                android:id="@+id/Button02"
                android:layout_width="0"
                android:layout_height="match_parent"
                android:layout_weight="1"
                android:text="Button" />
        </LinearLayout>
        <Button
            android:id="@+id/button3"
            android:layout_width="match_parent"
            android:layout_height="0dp"
            android:layout_weight="1"
            android:text="Button" />
        <LinearLayout
            android:layout_width="match_parent"
            android:layout_height="0dp"
            android:layout_weight="1.00"
            android:orientation="horizontal">
            <Button
                android:id="@+id/button1"
                android:layout_width="0dp"
                android:layout_height="match_parent"
                android:layout_weight="1"
                android:text="Button" />
            <Button
                android:id="@+id/button2"
                android:layout_width="0dp"
                android:layout_height="match_parent"
                android:layout_weight="1"
                android:text="Button" />
        </LinearLayout>
    </LinearLayout>
    <LinearLayout
        android:layout_width="match_parent"
        android:layout_height="0dp"
        android:layout_weight="1"
        android:orientation="horizontal">
        <LinearLayout
            android:layout_width="0dp"
            android:layout_height="match_parent"
            android:layout_weight="1"
            android:orientation="vertical" >
            <Button
                android:id="@+id/button4"
                android:layout_width="match_parent"
                android:layout_height="0dp"
                android:layout_weight="1"
                android:text="Button" />
            <Button
                android:id="@+id/button5"
                android:layout_width="match_parent"
                android:layout_height="0dp"
                android:layout_weight="2"
                android:text="Button" />
        </LinearLayout>
        <LinearLayout
            android:layout_width="0dp"
            android:layout_height="match_parent"
            android:layout_weight="1"
            android:orientation="vertical" >
            <Button
                android:id="@+id/button6"
                android:layout_width="match_parent"
                android:layout_height="0dp"
                android:layout_weight="2"
                android:text="Button" />
            <Button
                android:id="@+id/button7"
                android:layout_width="match_parent"
                android:layout_height="0dp"
                android:layout_weight="1"
                android:text="Button" />
        </LinearLayout>
    </LinearLayout>
</LinearLayout>
Solution 1 Explication
la clé des essais en ligne est de définir vos impératifs comme des dispositions séparées et d'y intégrer les autres. À mesure que vous appliquez des contraintes à plus de dimensions, vous devez ajouter plus d'Essais linéaires pour encapsuler les autres. Pour les vôtres, il était crucial d'avoir deux parents de plus afin de maintenir la proportion. Un grand indicateur de quand vous devez ajouter un autre niveau, c'est quand vous pour utiliser layout_weight en utilisant rien d'autre qu'une valeur entière. Simplement, il devient difficile de calculer correctement. De là, il était relativement simple de le fractionner en colonnes.
Solution 2 (Failed)
bien que j'ai pu obtenir des résultats souhaitables en utilisant RelativeLayout et "struts", Je ne pouvais le faire qu'avec des mises en page qui étaient des multiples de 2 boutons dans la hauteur. Un tel truc serait génial car les niveaux de layout sont grandement réduits, donc je vais travailler sur une solution XML pure et poster la réponse ici si et quand je l'atteins. Dans l'intervalle, la linéarisation ci-dessus devrait convenir parfaitement à vos besoins.
j'Espère que cette aide,
FuzzicalLogic
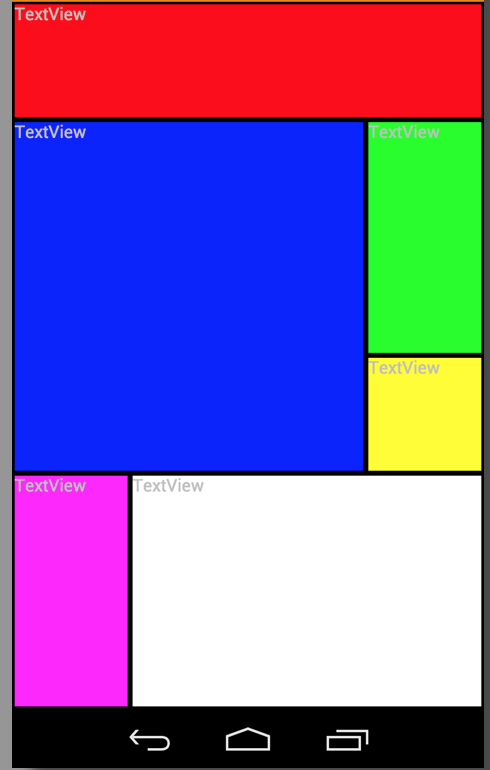
j'ai lu ce fil et j'ai réalisé que je voulais une solution plus plate que celles avec une disposition linéaire. Après quelques recherches, j'ai fini par faire ma propre mise en page. Il est inspiré par un GridLayout mais diffère un peu.
veuillez noter que si vous voulez copier-coller le code, vous devrez changer les noms de paquets à certains endroits.
cette mise en page a 4 paramètres que les enfants utilisent pour se positionner.Ce sont des layout_left, layout_top, layout_right, layout_bottom. L'ICGridLayout lui-même a deux attributs: layout_spacing et de colonnes.
Colonnes indique le nombre de colonnes que vous voulez qu'il contienne. Il calcule alors la taille d'une cellule avec la même hauteur que la largeur. Qui seront les dispositions largeur / colonnes.
espacement est la quantité d'espace que vous souhaitez entre chaque enfant.
Le layout_left|haut|droite|bas attributs sont la les coordonnées de chaque côté. La disposition ne fait aucun calcul afin d'éviter la collision ou quoi que ce soit. Ça met les enfants où ils veulent être.
si vous souhaitez avoir des carrés plus petits, vous avez juste à augmenter l'attribut colonnes.
gardez à l'esprit que c'est un prototype rapide, je vais continuer à travailler dessus et quand je sentirai que c'est prêt je vais le télécharger sur Github et mettre un commentaire ici.
tout mon code ci-dessous devrait produire ce qui suit: résultat:
* * * * * EDIT***** Ajouté l'appel à mesurer pour les enfants, oublié que la première fois autour. END EDIT ICGridLayout.java:
package com.risch.evertsson.iclib.layout;

import android.content.Context;
import android.content.res.TypedArray;
import android.util.AttributeSet;
import android.view.View;
import android.view.ViewGroup;

import com.risch.evertsson.iclib.R;

/**
 * Created by johanrisch on 6/13/13.
 */
public class ICGridLayout extends ViewGroup {
    private int mColumns = 4;
    private float mSpacing;

    public ICGridLayout(Context context) {
        super(context);
    }

    public ICGridLayout(Context context, AttributeSet attrs) {
        super(context, attrs);
        init(attrs);
    }

    public ICGridLayout(Context context, AttributeSet attrs, int defStyle) {
        super(context, attrs, defStyle);
        init(attrs);
    }

    private void init(AttributeSet attrs) {
        TypedArray a = getContext().obtainStyledAttributes(
                attrs,
                R.styleable.ICGridLayout_Layout);
        this.mColumns = a.getInt(R.styleable.ICGridLayout_Layout_columns, 3);
        this.mSpacing = a.getDimension(R.styleable.ICGridLayout_Layout_layout_spacing, 0);
        a.recycle();
    }

    @Override
    protected void onLayout(boolean changed, int l, int t, int r, int b) {
        if (changed) {
            int width = (int) (r - l);
            int side = width / mColumns;
            int children = getChildCount();
            View child = null;
            for (int i = 0; i < children; i++) {
                child = getChildAt(i);
                LayoutParams lp = (LayoutParams) child.getLayoutParams();
                int left = (int) (lp.left * side + mSpacing / 2);
                int right = (int) (lp.right * side - mSpacing / 2);
                int top = (int) (lp.top * side + mSpacing / 2);
                int bottom = (int) (lp.bottom * side - mSpacing / 2);
                child.layout(left, top, right, bottom);
            }
        }
    }

    @Override
    protected void onMeasure(int widthMeasureSpec, int heightMeasureSpec) {
        measureVertical(widthMeasureSpec, heightMeasureSpec);

    }

    private void measureVertical(int widthMeasureSpec, int heightMeasureSpec) {
        int widthMode = MeasureSpec.getMode(widthMeasureSpec);
        int heightMode = MeasureSpec.getMode(heightMeasureSpec);
        int width = 0;
        int height = 0;


        if (widthMode == MeasureSpec.AT_MOST || widthMode == MeasureSpec.EXACTLY) {
            width = MeasureSpec.getSize(widthMeasureSpec);
        } else {
            throw new RuntimeException("widthMeasureSpec must be AT_MOST or " +
                    "EXACTLY not UNSPECIFIED when orientation == VERTICAL");
        }


        View child = null;
        int row = 0;
        int side = width / mColumns;
        int childCount = getChildCount();
        for (int i = 0; i < childCount; i++) {
            child = getChildAt(i);

            LayoutParams lp = (LayoutParams) child.getLayoutParams();

            if (lp.bottom > row) {
                row = lp.bottom;
            }


            int childHeight = (lp.bottom - lp.top)*side;
            int childWidth = (lp.right-lp.left)*side;
            int heightSpec = MeasureSpec.makeMeasureSpec(childHeight, LayoutParams.MATCH_PARENT);
            int widthSpec = MeasureSpec.makeMeasureSpec(childWidth, LayoutParams.MATCH_PARENT);

            child.measure(widthSpec, heightSpec);
        }
        height = row * side;
        // TODO: Figure out a good way to use the heightMeasureSpec...

        setMeasuredDimension(width, height);
    }

    @Override
    public ViewGroup.LayoutParams generateLayoutParams(AttributeSet attrs) {
        return new ICGridLayout.LayoutParams(getContext(), attrs);
    }

    @Override
    protected boolean checkLayoutParams(ViewGroup.LayoutParams p) {
        return p instanceof ICGridLayout.LayoutParams;
    }

    @Override
    protected ViewGroup.LayoutParams
            generateLayoutParams(ViewGroup.LayoutParams p) {
        return new ICGridLayout.LayoutParams(p);
    }

    @Override
    protected ViewGroup.LayoutParams generateDefaultLayoutParams() {
        return new LayoutParams();
    }

    public static class LayoutParams extends ViewGroup.MarginLayoutParams {
        int right = 1;
        int bottom = 1;
        int top = 0;
        int left = 0;
        int width = -1;
        int height = -1;

        public LayoutParams() {
            super(MATCH_PARENT, MATCH_PARENT);
            top = 0;
            left = 1;
        }

        public LayoutParams(int width, int height) {
            super(width, height);
            top = 0;
            left = 1;
        }

        public LayoutParams(Context context, AttributeSet attrs) {
            super(context, attrs);
            TypedArray a = context.obtainStyledAttributes(
                    attrs,
                    R.styleable.ICGridLayout_Layout);
            left = a.getInt(R.styleable.ICGridLayout_Layout_layout_left, 0);
            top = a.getInt(R.styleable.ICGridLayout_Layout_layout_top, 0);
            right = a.getInt(R.styleable.ICGridLayout_Layout_layout_right, left + 1);
            bottom = a.getInt(R.styleable.ICGridLayout_Layout_layout_bottom, top + 1);
            height = a.getInt(R.styleable.ICGridLayout_Layout_layout_row_span, -1);
            width = a.getInt(R.styleable.ICGridLayout_Layout_layout_col_span, -1);
            if (height != -1) {
                bottom = top + height;
            }
            if (width != -1) {
                right = left + width;
            }

            a.recycle();
        }

        public LayoutParams(ViewGroup.LayoutParams params) {
            super(params);
        }

    }

}
ICGridLayout.java est assez simple. Il prend les valeurs fournies par les enfants et les dépose. attrs.xml:
<?xml version="1.0" encoding="utf-8"?>
<resources>
    <declare-styleable name="ICGridLayout_Layout">
        <attr name="columns" format="integer"/>
        <attr name="layout_left" format="integer"/>
        <attr name="layout_top" format="integer"/>
        <attr name="layout_right" format="integer"/>
        <attr name="layout_bottom" format="integer"/>
        <attr name="layout_col_span" format="integer"/>
        <attr name="layout_row_span" format="integer"/>
        <attr name="layout_spacing" format="dimension"/>
    </declare-styleable>

</resources>
example_layout.xml:
<?xml version="1.0" encoding="utf-8"?>
<ScrollView xmlns:android="http://schemas.android.com/apk/res/android"
    xmlns:app="http://schemas.android.com/apk/res/com.rischit.projectlogger"
    android:id="@+id/scroller"
    android:layout_width="match_parent"
    android:layout_height="match_parent" >

    <com.risch.evertsson.iclib.layout.ICGridLayout
        android:id="@+id/ICGridLayout1"
        android:layout_width="match_parent"
        android:layout_height="match_parent"
        app:layout_spacing="4dp"
        app:columns="4" >


        <TextView
            android:id="@+id/textView1"
            android:layout_width="match_parent"
            android:layout_height="match_parent"
            app:layout_bottom="1"
            app:layout_left="0"
            app:layout_right="4"
            app:layout_top="0"
            android:background="#ff0000"
            android:text="TextView" />

        <TextView
            android:id="@+id/textView1"
            android:layout_width="match_parent"
            android:layout_height="match_parent"
            app:layout_bottom="3"
            app:layout_left="3"
            app:layout_right="4"
            app:layout_top="1"
            android:background="#00ff00"
            android:text="TextView" />

        <TextView
            android:id="@+id/textView1"
            android:layout_width="match_parent"
            android:layout_height="match_parent"
            app:layout_bottom="4"
            app:layout_left="0"
            app:layout_right="3"
            app:layout_top="1"
            android:background="#0000ff"
            android:text="TextView" />

        <TextView
            android:id="@+id/textView1"
            android:layout_width="match_parent"
            android:layout_height="match_parent"
            app:layout_bottom="4"
            app:layout_left="3"
            app:layout_right="4"
            app:layout_top="3"
            android:background="#ffff00"
            android:text="TextView" />

        <TextView
            android:id="@+id/textView1"
            android:layout_width="match_parent"
            android:layout_height="match_parent"
            app:layout_bottom="6"
            app:layout_left="0"
            app:layout_right="1"
            app:layout_top="4"
            android:background="#ff00ff"
            android:text="TextView" />

        <TextView
            android:id="@+id/textView1"
            android:layout_width="match_parent"
            android:layout_height="match_parent"
            app:layout_bottom="6"
            app:layout_left="1"
            app:layout_right="4"
            app:layout_top="4"
            android:background="#ffffff"
            android:text="TextView" />
    </com.risch.evertsson.iclib.layout.ICGridLayout>

</ScrollView>
-- Johan Risch
P. S C'est ma première réponse, j'ai essayé de le faire d'une manière correcte. Si j'ai échoué, dites-le-moi sans m'enflammer. :) D. S
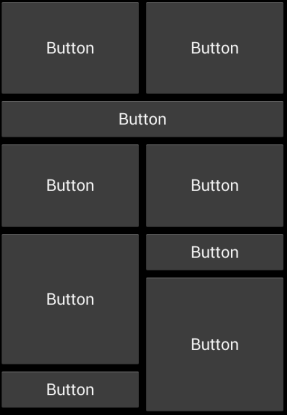
Comme ceci ?
<?xml version="1.0" encoding="utf-8"?>
<LinearLayout xmlns:android="http://schemas.android.com/apk/res/android"
    android:layout_width="match_parent"
    android:layout_height="match_parent"
    android:orientation="vertical" >
    <LinearLayout
        android:layout_width="match_parent"
        android:layout_height="0dp"
        android:layout_weight="0.54" >
        <Button
            android:id="@+id/Button01"
            android:layout_width="0dp"
            android:layout_height="match_parent"
            android:layout_weight="1.00"
            android:text="Button" />
        <Button
            android:id="@+id/Button02"
            android:layout_width="0dp"
            android:layout_height="match_parent"
            android:layout_weight="1.00"
            android:text="Button" />
    </LinearLayout>
    <Button
        android:id="@+id/button3"
        android:layout_width="match_parent"
        android:layout_height="wrap_content"
        android:text="Button" />
    <LinearLayout
        android:layout_width="match_parent"
        android:layout_height="99dp" >
        <Button
            android:id="@+id/button1"
            android:layout_width="0dp"
            android:layout_height="match_parent"
            android:layout_weight="1"
            android:text="Button" />
        <Button
            android:id="@+id/button2"
            android:layout_width="0dp"
            android:layout_height="match_parent"
            android:layout_weight="1"
            android:text="Button" />
    </LinearLayout>
    <LinearLayout
        android:layout_width="match_parent"
        android:layout_height="0dp"
        android:layout_weight="1" >
        <LinearLayout
            android:layout_width="0dp"
            android:layout_height="match_parent"
            android:layout_weight="1"
            android:orientation="vertical" >
            <Button
                android:id="@+id/button4"
                android:layout_width="match_parent"
                android:layout_height="152dp"
                android:text="Button" />
            <Button
                android:id="@+id/button5"
                android:layout_width="match_parent"
                android:layout_height="wrap_content"
                android:text="Button" />
        </LinearLayout>
        <LinearLayout
            android:layout_width="0dp"
            android:layout_height="match_parent"
            android:layout_weight="1"
            android:orientation="vertical" >
            <Button
                android:id="@+id/button6"
                android:layout_width="match_parent"
                android:layout_height="wrap_content"
                android:text="Button" />
            <Button
                android:id="@+id/button7"
                android:layout_width="match_parent"
                android:layout_height="match_parent"
                android:text="Button" />
        </LinearLayout>
    </LinearLayout>

</LinearLayout>
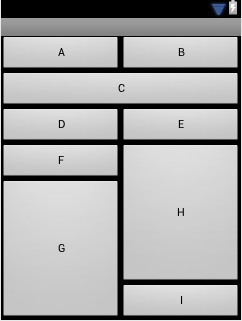
Comme beaucoup l'ont dit, imbriqués linéaire dispositions semblent le seul moyen de gagner ici. Certaines solutions n'ont pas utilisé les paramètres de mise en page de la manière la plus flexible. Code ci-dessous cherche à le faire, et d'une manière qui est robuste avec des changements de ratio d'aspect. Les détails se trouvent dans les commentaires.
<?xml version="1.0" encoding="utf-8"?>
<LinearLayout xmlns:android="http://schemas.android.com/apk/res/android"
    android:layout_width="match_parent"
    android:layout_height="match_parent"
    android:orientation="vertical" >

    <!-- First row. -->

    <LinearLayout
        android:layout_width="match_parent"
        android:layout_height="wrap_content" >

        <!-- Equal weights cause two columns of equal width. -->

        <Button
            android:layout_width="0dp"
            android:layout_height="wrap_content"
            android:layout_weight="1"
            android:text="A" />

        <Button
            android:layout_width="0dp"
            android:layout_height="wrap_content"
            android:layout_weight="1"
            android:text="B" />
    </LinearLayout>

    <!-- Second row. -->

    <Button
        android:layout_width="match_parent"
        android:layout_height="wrap_content"
        android:text="C" />

    <!-- Third row. -->

    <LinearLayout
        android:layout_width="match_parent"
        android:layout_height="wrap_content" >

        <!-- Equal weights cause two columns of equal width. -->

        <Button
            android:layout_width="0dp"
            android:layout_height="wrap_content"
            android:layout_weight="1"
            android:text="D" />

        <Button
            android:layout_width="0dp"
            android:layout_height="wrap_content"
            android:layout_weight="1"
            android:text="E" />
    </LinearLayout>

    <!-- Uneven fourth and fifth rows. -->

    <LinearLayout
        android:layout_width="match_parent"
        android:layout_height="0dp"
        android:layout_weight="1"
        android:baselineAligned="false" >

        <!-- Left column. Equal weight with right column gives them equal width. -->

        <LinearLayout
            android:layout_width="0dp"
            android:layout_height="match_parent"
            android:layout_weight="1"
            android:orientation="vertical" >

            <!--
                 The use of weights below assigns all extra space to G. There
                 are other choices. LinearLayout computes sizes along its
                     axis as given, then divides the remaining extra space using
                 weights.  If a component doesn't have a weight, it keeps
                 the specified size exactly.
            -->


            <!-- Fill width of layout and use wrap height (because there's no weight). -->

            <Button
                android:layout_width="match_parent"
                android:layout_height="wrap_content"
                android:text="F" />

            <!-- Fill width of layout and put all the extra space here. -->

            <Button
                android:layout_width="match_parent"
                android:layout_height="0dp"
                android:layout_weight="1"
                android:text="G" />
        </LinearLayout>

        <!-- Right column. Equal weight with left column gives them equal width. -->

        <LinearLayout
            android:layout_width="0dp"
            android:layout_height="match_parent"
            android:layout_weight="1"
            android:orientation="vertical" >

            <!-- Same as above except top button gets all the extra space. -->

            <Button
                android:layout_width="match_parent"
                android:layout_height="0dp"
                android:layout_weight="1"
                android:text="H" />

            <Button
                android:layout_width="match_parent"
                android:layout_height="wrap_content"
                android:text="I" />
        </LinearLayout>
    </LinearLayout>

</LinearLayout>
voici donc la solution que j'ai promise après un an =) Il utilise essentiellement le ViewTreeObserver pour obtenir les dimensions du layout parent et créer des vues personnalisées en conséquence. Puisque ce code est vieux D'un an ViewTreeObserver pourrait ne pas être le meilleur moyen d'obtenir les dimensions dynamiquement.
Vous pouvez trouver le code source complet ici: https://github.com/cdoger/Android_layout
j'ai divisé l'écran en 8 largeurs égales et 6 égales Heights. Voici un aperçu de la façon dont j'ai présenté les vues:
final RelativeLayout mainLayout = (RelativeLayout) findViewById(R.id.main_layout);
ViewTreeObserver vto = mainLayout.getViewTreeObserver();
vto.addOnGlobalLayoutListener(new OnGlobalLayoutListener() {
    @Override
    public void onGlobalLayout() {
        final int oneUnitWidth = mainLayout.getMeasuredWidth() / 8;
        final int oneUnitHeight = mainLayout.getMeasuredHeight() / 6;
        /**
         * 1
         ***************************************************************/
        final RelativeLayout.LayoutParams otelParams = new RelativeLayout.LayoutParams(
                oneUnitWidth * 4, oneUnitHeight);
        otelParams.addRule(RelativeLayout.ALIGN_PARENT_TOP);
        otelParams.addRule(RelativeLayout.ALIGN_PARENT_LEFT);
        // otelParams.setMargins(0, 0, 2, 0);
        View1.setLayoutParams(otelParams);
        /***************************************************************/

        /**
         * 2
         ***************************************************************/
        final RelativeLayout.LayoutParams otherParams = new RelativeLayout.LayoutParams(
                oneUnitWidth * 4, oneUnitHeight);
        otherParams.addRule(RelativeLayout.ALIGN_PARENT_TOP);
        otherParams.addRule(RelativeLayout.RIGHT_OF, View1.getId());
        otherParams.setMargins(2, 0, 0, 0);
        View2.setLayoutParams(otherParams);
        /***************************************************************/
//... goes on like this
Voici la capture d'écran finale:
j'ai essayer ceci tuto
je suis bloqué ici :
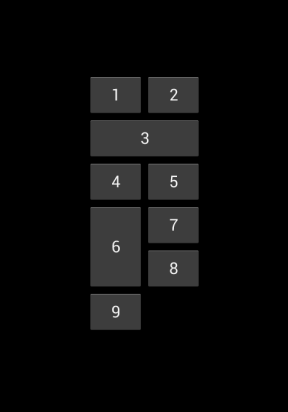
<?xml version="1.0" encoding="utf-8"?>
<GridLayout xmlns:android="http://schemas.android.com/apk/res/android"
    android:layout_width="wrap_content"
    android:layout_height="wrap_content"
    android:layout_gravity="center"
    android:columnCount="2"
    android:orientation="horizontal" >

    <Button android:text="1" />

    <Button android:text="2" />

    <Button
        android:layout_columnSpan="2"
        android:layout_gravity="fill"
        android:text="3" />

    <Button android:text="4" />

    <Button android:text="5" />

    <Button
        android:layout_gravity="fill"
        android:layout_rowSpan="2"
        android:text="6" />

    <Button android:text="7" />

    <Button android:text="8" />

    <Button android:text="9" />

</GridLayout>
Impossible pour moi d'élargir le 8ème bouton. : s
j'ai essayer
<Button android:text="8" android:layout_gravity="fill" android:layout_rowSpan="2"/>
Mais c'est ineffec. : s
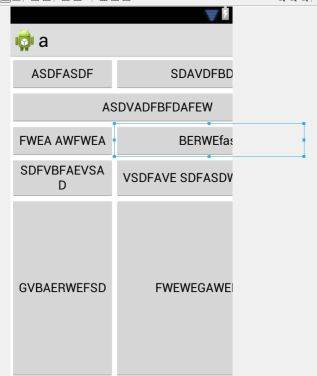
Incorporer votre GridLayout dans LinearLayout comme ci-dessous et essayez cela a fonctionné pour moi.
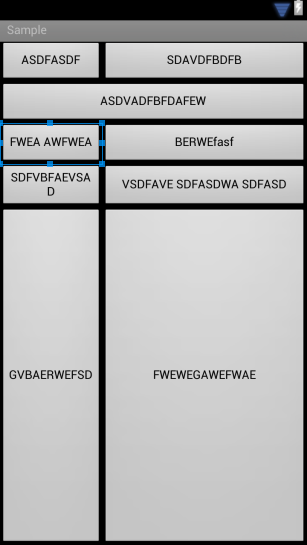
<?xml version="1.0" encoding="utf-8"?>
 <LinearLayout xmlns:android="http://schemas.android.com/apk/res/android"
     android:layout_width="match_parent"
     android:layout_height="match_parent"
     android:orientation="horizontal" >

<GridLayout
    xmlns:android="http://schemas.android.com/apk/res/android"
    android:layout_width="match_parent"
    android:layout_height="match_parent"
    android:columnCount="2" >

    <Button
        android:layout_column="0"
        android:layout_columnSpan="1"
        android:layout_gravity="start|end"
        android:layout_row="0"
        android:text="ASDFASDF" />

    <Button
        android:layout_column="1"
        android:layout_gravity="start|end"
        android:layout_row="0"
        android:text="SDAVDFBDFB" />

    <Button
        android:layout_column="0"
        android:layout_columnSpan="2"
        android:layout_gravity="fill|center"
        android:layout_row="1"
        android:text="ASDVADFBFDAFEW" />

    <Button
        android:layout_column="0"
        android:layout_columnSpan="1"
        android:layout_gravity="fill|center"
        android:layout_row="2"
        android:text="FWEA AWFWEA" />

    <Button
        android:layout_column="1"
        android:layout_columnSpan="1"
        android:layout_gravity="fill"
        android:layout_row="2"
        android:text="BERWEfasf" />

    <Button
        android:layout_width="94dp"
        android:layout_column="0"
        android:layout_columnSpan="1"
        android:layout_gravity="fill|center"
        android:layout_row="3"
        android:text="SDFVBFAEVSAD" />

    <Button
        android:layout_column="0"
        android:layout_columnSpan="1"
        android:layout_gravity="fill|center"
        android:layout_row="4"
        android:layout_rowSpan="2"
        android:text="GVBAERWEFSD" />

    <Button
        android:layout_column="1"
        android:layout_columnSpan="1"
        android:layout_gravity="fill|center"
        android:layout_row="3"
        android:layout_rowSpan="2"
        android:text="VSDFAVE SDFASDWA SDFASD" />

    <Button
        android:layout_column="1"
        android:layout_columnSpan="1"
        android:layout_gravity="fill|center"
        android:layout_row="5"
        android:text="FWEWEGAWEFWAE"/>
</GridLayout>

    </LinearLayout>