Visualisation de graphiques (comme yFiles) en JavaFX
quelque chose comme Graphviz mais plus spécifiquement, yFiles.
je veux un type de noeud/bord de visualisation de graphe.
je pense que le nœud Circle et le bord d'un Line. Le problème est ce qu'il faut utiliser pour la zone où les noeuds/bords apparaissent. Dois-je utiliser un ScrollPane, un Pane, un Canvas, etc...
j'ajouterai la fonctionnalité de défilement, de zoom, de sélection des noeuds et de déplacement des noeuds.
Merci pour votre aide.
4 réponses
j'avais 2 heures à tuer, donc j'ai pensé que j'allais tenter le coup. Il s'avère que c'est facile de venir avec un prototype.
voici ce dont vous avez besoin:
- une classe principale pour utiliser la librairie graphique que vous créez
- un graphique avec un modèle de données
- ajout et suppression facile des noeuds et des bords (il s'avère qu'il est préférable de nommer les cellules des noeuds afin d'éviter toute confusion avec les noeuds JavaFX pendant la programmation)
- un scrollpane zoomable
- un algorithme de mise en page pour le graphique
c'est vraiment trop demander, donc je vais juste ajouter le code avec quelques commentaires.
l'application instancie le graphe, ajoute des cellules et les connecte via des arêtes.
application / Main.java
package application;

import javafx.application.Application;
import javafx.scene.Scene;
import javafx.scene.layout.BorderPane;
import javafx.stage.Stage;

import com.fxgraph.graph.CellType;
import com.fxgraph.graph.Graph;
import com.fxgraph.graph.Model;
import com.fxgraph.layout.base.Layout;
import com.fxgraph.layout.random.RandomLayout;

public class Main extends Application {

    Graph graph = new Graph();

    @Override
    public void start(Stage primaryStage) {
        BorderPane root = new BorderPane();

        graph = new Graph();

        root.setCenter(graph.getScrollPane());

        Scene scene = new Scene(root, 1024, 768);
        scene.getStylesheets().add(getClass().getResource("application.css").toExternalForm());

        primaryStage.setScene(scene);
        primaryStage.show();

        addGraphComponents();

        Layout layout = new RandomLayout(graph);
        layout.execute();

    }

    private void addGraphComponents() {

        Model model = graph.getModel();

        graph.beginUpdate();

        model.addCell("Cell A", CellType.RECTANGLE);
        model.addCell("Cell B", CellType.RECTANGLE);
        model.addCell("Cell C", CellType.RECTANGLE);
        model.addCell("Cell D", CellType.TRIANGLE);
        model.addCell("Cell E", CellType.TRIANGLE);
        model.addCell("Cell F", CellType.RECTANGLE);
        model.addCell("Cell G", CellType.RECTANGLE);

        model.addEdge("Cell A", "Cell B");
        model.addEdge("Cell A", "Cell C");
        model.addEdge("Cell B", "Cell C");
        model.addEdge("Cell C", "Cell D");
        model.addEdge("Cell B", "Cell E");
        model.addEdge("Cell D", "Cell F");
        model.addEdge("Cell D", "Cell G");

        graph.endUpdate();

    }

    public static void main(String[] args) {
        launch(args);
    }
}
le scrollpane doit avoir un fond blanc.
application/de l'application.css
.scroll-pane > .viewport {
   -fx-background-color: white;
}
le scrollpane zoomable, j'ai le base de code de pixel duke:
ZoomableScrollPane.java
package com.fxgraph.graph;

import javafx.event.EventHandler;
import javafx.scene.Group;
import javafx.scene.Node;
import javafx.scene.control.ScrollPane;
import javafx.scene.input.ScrollEvent;
import javafx.scene.transform.Scale;

public class ZoomableScrollPane extends ScrollPane {
    Group zoomGroup;
    Scale scaleTransform;
    Node content;
    double scaleValue = 1.0;
    double delta = 0.1;

    public ZoomableScrollPane(Node content) {
        this.content = content;
        Group contentGroup = new Group();
        zoomGroup = new Group();
        contentGroup.getChildren().add(zoomGroup);
        zoomGroup.getChildren().add(content);
        setContent(contentGroup);
        scaleTransform = new Scale(scaleValue, scaleValue, 0, 0);
        zoomGroup.getTransforms().add(scaleTransform);

        zoomGroup.setOnScroll(new ZoomHandler());
    }

    public double getScaleValue() {
        return scaleValue;
    }

    public void zoomToActual() {
        zoomTo(1.0);
    }

    public void zoomTo(double scaleValue) {

        this.scaleValue = scaleValue;

        scaleTransform.setX(scaleValue);
        scaleTransform.setY(scaleValue);

    }

    public void zoomActual() {

        scaleValue = 1;
        zoomTo(scaleValue);

    }

    public void zoomOut() {
        scaleValue -= delta;

        if (Double.compare(scaleValue, 0.1) < 0) {
            scaleValue = 0.1;
        }

        zoomTo(scaleValue);
    }

    public void zoomIn() {

        scaleValue += delta;

        if (Double.compare(scaleValue, 10) > 0) {
            scaleValue = 10;
        }

        zoomTo(scaleValue);

    }

    /**
     *
     * @param minimizeOnly
     *            If the content fits already into the viewport, then we don't
     *            zoom if this parameter is true.
     */
    public void zoomToFit(boolean minimizeOnly) {

        double scaleX = getViewportBounds().getWidth() / getContent().getBoundsInLocal().getWidth();
        double scaleY = getViewportBounds().getHeight() / getContent().getBoundsInLocal().getHeight();

        // consider current scale (in content calculation)
        scaleX *= scaleValue;
        scaleY *= scaleValue;

        // distorted zoom: we don't want it => we search the minimum scale
        // factor and apply it
        double scale = Math.min(scaleX, scaleY);

        // check precondition
        if (minimizeOnly) {

            // check if zoom factor would be an enlargement and if so, just set
            // it to 1
            if (Double.compare(scale, 1) > 0) {
                scale = 1;
            }
        }

        // apply zoom
        zoomTo(scale);

    }

    private class ZoomHandler implements EventHandler<ScrollEvent> {

        @Override
        public void handle(ScrollEvent scrollEvent) {
            // if (scrollEvent.isControlDown())
            {

                if (scrollEvent.getDeltaY() < 0) {
                    scaleValue -= delta;
                } else {
                    scaleValue += delta;
                }

                zoomTo(scaleValue);

                scrollEvent.consume();
            }
        }
    }
}
chaque cellule est représentée comme une vitre dans laquelle vous pouvez placer n'importe quel noeud en vue (rectangle, étiquette, imageview, etc)
Cellule.java
package com.fxgraph.graph;

import java.util.ArrayList;
import java.util.List;

import javafx.scene.Node;
import javafx.scene.layout.Pane;

public class Cell extends Pane {

    String cellId;

    List<Cell> children = new ArrayList<>();
    List<Cell> parents = new ArrayList<>();

    Node view;

    public Cell(String cellId) {
        this.cellId = cellId;
    }

    public void addCellChild(Cell cell) {
        children.add(cell);
    }

    public List<Cell> getCellChildren() {
        return children;
    }

    public void addCellParent(Cell cell) {
        parents.add(cell);
    }

    public List<Cell> getCellParents() {
        return parents;
    }

    public void removeCellChild(Cell cell) {
        children.remove(cell);
    }

    public void setView(Node view) {

        this.view = view;
        getChildren().add(view);

    }

    public Node getView() {
        return this.view;
    }

    public String getCellId() {
        return cellId;
    }
}
les cellules doivent être créées par une sorte d'usine, donc elles sont classées par type:
CellType.java
package com.fxgraph.graph;

public enum CellType {

    RECTANGLE,
    TRIANGLE
    ;

}
les instancier est tout à fait facile:
RectangleCell.java
package com.fxgraph.cells;

import javafx.scene.paint.Color;
import javafx.scene.shape.Rectangle;

import com.fxgraph.graph.Cell;

public class RectangleCell extends Cell {

    public RectangleCell( String id) {
        super( id);

        Rectangle view = new Rectangle( 50,50);

        view.setStroke(Color.DODGERBLUE);
        view.setFill(Color.DODGERBLUE);

        setView( view);

    }

}
TriangleCell.java
package com.fxgraph.cells;

import javafx.scene.paint.Color;
import javafx.scene.shape.Polygon;

import com.fxgraph.graph.Cell;

public class TriangleCell extends Cell {

    public TriangleCell( String id) {
        super( id);

        double width = 50;
        double height = 50;

        Polygon view = new Polygon( width / 2, 0, width, height, 0, height);

        view.setStroke(Color.RED);
        view.setFill(Color.RED);

        setView( view);

    }

}
alors bien sûr vous avez besoin des bords. Vous pouvez utiliser n'importe quelle connexion que vous voulez, même les courbes cubiques. Par souci de simplicité, j'utilise une ligne:
Bord.java
package com.fxgraph.graph;

import javafx.scene.Group;
import javafx.scene.shape.Line;

public class Edge extends Group {

    protected Cell source;
    protected Cell target;

    Line line;

    public Edge(Cell source, Cell target) {

        this.source = source;
        this.target = target;

        source.addCellChild(target);
        target.addCellParent(source);

        line = new Line();

        line.startXProperty().bind( source.layoutXProperty().add(source.getBoundsInParent().getWidth() / 2.0));
        line.startYProperty().bind( source.layoutYProperty().add(source.getBoundsInParent().getHeight() / 2.0));

        line.endXProperty().bind( target.layoutXProperty().add( target.getBoundsInParent().getWidth() / 2.0));
        line.endYProperty().bind( target.layoutYProperty().add( target.getBoundsInParent().getHeight() / 2.0));

        getChildren().add( line);

    }

    public Cell getSource() {
        return source;
    }

    public Cell getTarget() {
        return target;
    }

}
une extension à cela serait de lier le bord aux ports (Nord/Sud/Est/Ouest) des cellules.
alors vous voulez faire glisser les noeuds, donc vous devez ajouter quelques gestes de la souris. La partie importante est de considérer un facteur de zoom dans le cas où la toile de graphe est zoomée
les gestes de souris.java
package com.fxgraph.graph;

import javafx.event.EventHandler;
import javafx.scene.Node;
import javafx.scene.input.MouseEvent;

public class MouseGestures {

    final DragContext dragContext = new DragContext();

    Graph graph;

    public MouseGestures( Graph graph) {
        this.graph = graph;
    }

    public void makeDraggable( final Node node) {


        node.setOnMousePressed(onMousePressedEventHandler);
        node.setOnMouseDragged(onMouseDraggedEventHandler);
        node.setOnMouseReleased(onMouseReleasedEventHandler);

    }

    EventHandler<MouseEvent> onMousePressedEventHandler = new EventHandler<MouseEvent>() {

        @Override
        public void handle(MouseEvent event) {

            Node node = (Node) event.getSource();

            double scale = graph.getScale();

            dragContext.x = node.getBoundsInParent().getMinX() * scale - event.getScreenX();
            dragContext.y = node.getBoundsInParent().getMinY()  * scale - event.getScreenY();

        }
    };

    EventHandler<MouseEvent> onMouseDraggedEventHandler = new EventHandler<MouseEvent>() {

        @Override
        public void handle(MouseEvent event) {

            Node node = (Node) event.getSource();

            double offsetX = event.getScreenX() + dragContext.x;
            double offsetY = event.getScreenY() + dragContext.y;

            // adjust the offset in case we are zoomed
            double scale = graph.getScale();

            offsetX /= scale;
            offsetY /= scale;

            node.relocate(offsetX, offsetY);

        }
    };

    EventHandler<MouseEvent> onMouseReleasedEventHandler = new EventHandler<MouseEvent>() {

        @Override
        public void handle(MouseEvent event) {

        }
    };

    class DragContext {

        double x;
        double y;

    }
}
Ensuite, vous avez besoin d'un modèle dans lequel vous stockez les cellules et les bords. Chaque fois que de nouvelles cellules peuvent être ajoutés et peuvent être supprimés. Vous devez les traiter séparément de ceux qui existent déjà (E. G. pour ajouter des gestes de souris, les animer quand vous les ajoutez, etc). Lorsque vous implémentez l'algorithme de mise en page, vous serez face à la détermination d'un nœud racine. Vous devez donc créer un noeud racine invisible (graphParent) qui ne sera pas ajouté au graphe lui-même, mais auquel tous les noeuds commencent qui n'ont pas de parent.
Modèle.java
package com.fxgraph.graph;

import java.util.ArrayList;
import java.util.HashMap;
import java.util.List;
import java.util.Map;

import com.fxgraph.cells.TriangleCell;
import com.fxgraph.cells.RectangleCell;

public class Model {

    Cell graphParent;

    List<Cell> allCells;
    List<Cell> addedCells;
    List<Cell> removedCells;

    List<Edge> allEdges;
    List<Edge> addedEdges;
    List<Edge> removedEdges;

    Map<String,Cell> cellMap; // <id,cell>

    public Model() {

         graphParent = new Cell( "_ROOT_");

         // clear model, create lists
         clear();
    }

    public void clear() {

        allCells = new ArrayList<>();
        addedCells = new ArrayList<>();
        removedCells = new ArrayList<>();

        allEdges = new ArrayList<>();
        addedEdges = new ArrayList<>();
        removedEdges = new ArrayList<>();

        cellMap = new HashMap<>(); // <id,cell>

    }

    public void clearAddedLists() {
        addedCells.clear();
        addedEdges.clear();
    }

    public List<Cell> getAddedCells() {
        return addedCells;
    }

    public List<Cell> getRemovedCells() {
        return removedCells;
    }

    public List<Cell> getAllCells() {
        return allCells;
    }

    public List<Edge> getAddedEdges() {
        return addedEdges;
    }

    public List<Edge> getRemovedEdges() {
        return removedEdges;
    }

    public List<Edge> getAllEdges() {
        return allEdges;
    }

    public void addCell(String id, CellType type) {

        switch (type) {

        case RECTANGLE:
            RectangleCell rectangleCell = new RectangleCell(id);
            addCell(rectangleCell);
            break;

        case TRIANGLE:
            TriangleCell circleCell = new TriangleCell(id);
            addCell(circleCell);
            break;

        default:
            throw new UnsupportedOperationException("Unsupported type: " + type);
        }
    }

    private void addCell( Cell cell) {

        addedCells.add(cell);

        cellMap.put( cell.getCellId(), cell);

    }

    public void addEdge( String sourceId, String targetId) {

        Cell sourceCell = cellMap.get( sourceId);
        Cell targetCell = cellMap.get( targetId);

        Edge edge = new Edge( sourceCell, targetCell);

        addedEdges.add( edge);

    }

    /**
     * Attach all cells which don't have a parent to graphParent
     * @param cellList
     */
    public void attachOrphansToGraphParent( List<Cell> cellList) {

        for( Cell cell: cellList) {
            if( cell.getCellParents().size() == 0) {
                graphParent.addCellChild( cell);
            }
        }

    }

    /**
     * Remove the graphParent reference if it is set
     * @param cellList
     */
    public void disconnectFromGraphParent( List<Cell> cellList) {

        for( Cell cell: cellList) {
            graphParent.removeCellChild( cell);
        }
    }

    public void merge() {

        // cells
        allCells.addAll( addedCells);
        allCells.removeAll( removedCells);

        addedCells.clear();
        removedCells.clear();

        // edges
        allEdges.addAll( addedEdges);
        allEdges.removeAll( removedEdges);

        addedEdges.clear();
        removedEdges.clear();

    }
}
Et puis il y a le graphe lui-même qui contient le scrollpane zoomable, le modèle, etc. Dans le graphique, les noeuds ajoutés et supprimés sont manipulés (gestes de la souris, cellules et bords ajoutés au scrollpane, etc.).
Graphique.java
package com.fxgraph.graph;

import javafx.scene.Group;
import javafx.scene.control.ScrollPane;
import javafx.scene.layout.Pane;

public class Graph {

    private Model model;

    private Group canvas;

    private ZoomableScrollPane scrollPane;

    MouseGestures mouseGestures;

    /**
     * the pane wrapper is necessary or else the scrollpane would always align
     * the top-most and left-most child to the top and left eg when you drag the
     * top child down, the entire scrollpane would move down
     */
    CellLayer cellLayer;

    public Graph() {

        this.model = new Model();

        canvas = new Group();
        cellLayer = new CellLayer();

        canvas.getChildren().add(cellLayer);

        mouseGestures = new MouseGestures(this);

        scrollPane = new ZoomableScrollPane(canvas);

        scrollPane.setFitToWidth(true);
        scrollPane.setFitToHeight(true);

    }

    public ScrollPane getScrollPane() {
        return this.scrollPane;
    }

    public Pane getCellLayer() {
        return this.cellLayer;
    }

    public Model getModel() {
        return model;
    }

    public void beginUpdate() {
    }

    public void endUpdate() {

        // add components to graph pane
        getCellLayer().getChildren().addAll(model.getAddedEdges());
        getCellLayer().getChildren().addAll(model.getAddedCells());

        // remove components from graph pane
        getCellLayer().getChildren().removeAll(model.getRemovedCells());
        getCellLayer().getChildren().removeAll(model.getRemovedEdges());

        // enable dragging of cells
        for (Cell cell : model.getAddedCells()) {
            mouseGestures.makeDraggable(cell);
        }

        // every cell must have a parent, if it doesn't, then the graphParent is
        // the parent
        getModel().attachOrphansToGraphParent(model.getAddedCells());

        // remove reference to graphParent
        getModel().disconnectFromGraphParent(model.getRemovedCells());

        // merge added & removed cells with all cells
        getModel().merge();

    }

    public double getScale() {
        return this.scrollPane.getScaleValue();
    }
}
Un enveloppe pour la couche de cellules. Vous voudrez probablement ajouter plusieurs couches (e. g. une couche de sélection qui met en évidence les cellules sélectionnées)
CellLayer.java
package com.fxgraph.graph;

import javafx.scene.layout.Pane;

public class CellLayer extends Pane {

}
Maintenant vous avez besoin d'une disposition pour les cellules. Je suggère de créer une classe abstraite qui sera étendu à mesure que vous développez le graphique.
package com.fxgraph.layout.base;

public abstract class Layout {

    public abstract void execute();

}
pour des raisons de simplicité, voici un algorithme de mise en page simple dans lequel des coordonnées aléatoires sont utilisées. Bien sûr, vous avez à faire des trucs plus complexe comme la disposition des arbres, etc.
RandomLayout.java
package com.fxgraph.layout.random;

import java.util.List;
import java.util.Random;

import com.fxgraph.graph.Cell;
import com.fxgraph.graph.Graph;
import com.fxgraph.layout.base.Layout;

public class RandomLayout extends Layout {

    Graph graph;

    Random rnd = new Random();

    public RandomLayout(Graph graph) {

        this.graph = graph;

    }

    public void execute() {

        List<Cell> cells = graph.getModel().getAllCells();

        for (Cell cell : cells) {

            double x = rnd.nextDouble() * 500;
            double y = rnd.nextDouble() * 500;

            cell.relocate(x, y);

        }

    }

}
L'exemple ressemble à ceci:
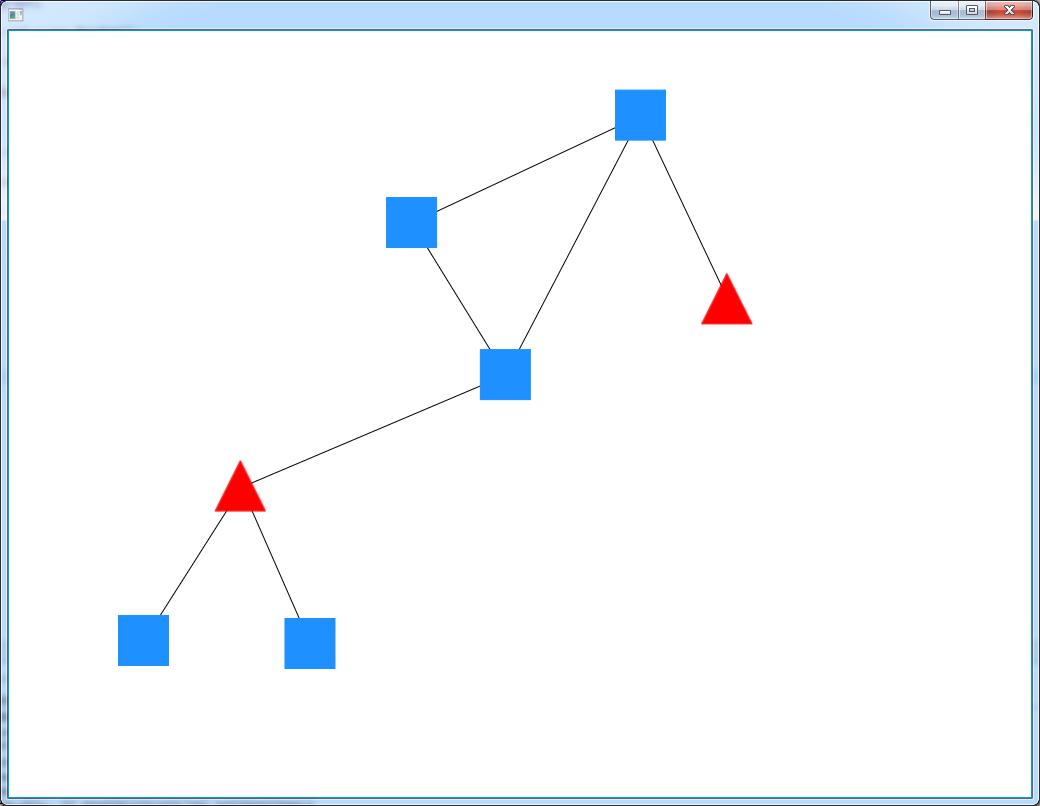
Vous pouvez faire glisser les cellules avec le bouton de la souris et zoomer avec la molette de la souris.
ajouter de nouveaux types de cellules est aussi facile que de créer des sous-classes de cellules:
package com.fxgraph.cells;

import javafx.scene.control.Button;

import com.fxgraph.graph.Cell;

public class ButtonCell extends Cell {

    public ButtonCell(String id) {
        super(id);

        Button view = new Button(id);

        setView(view);

    }

}

package com.fxgraph.cells;

import javafx.scene.image.ImageView;

import com.fxgraph.graph.Cell;

public class ImageCell extends Cell {

    public ImageCell(String id) {
        super(id);

        ImageView view = new ImageView("http://upload.wikimedia.org/wikipedia/commons/thumb/4/41/Siberischer_tiger_de_edit02.jpg/800px-Siberischer_tiger_de_edit02.jpg");
        view.setFitWidth(100);
        view.setFitHeight(80);

        setView(view);

    }

}


package com.fxgraph.cells;

import javafx.scene.control.Label;

import com.fxgraph.graph.Cell;

public class LabelCell extends Cell {

    public LabelCell(String id) {
        super(id);

        Label view = new Label(id);

        setView(view);

    }

}

package com.fxgraph.cells;

import javafx.scene.control.TitledPane;

import com.fxgraph.graph.Cell;

public class TitledPaneCell extends Cell {

    public TitledPaneCell(String id) {
        super(id);

        TitledPane view = new TitledPane();
        view.setPrefSize(100, 80);

        setView(view);

    }

}
et de créer les types
package com.fxgraph.graph;

public enum CellType {

    RECTANGLE,
    TRIANGLE,
    LABEL,
    IMAGE,
    BUTTON,
    TITLEDPANE
    ;

}
et la création d'instances en fonction de la type:
...
public void addCell(String id, CellType type) {

    switch (type) {

    case RECTANGLE:
        RectangleCell rectangleCell = new RectangleCell(id);
        addCell(rectangleCell);
        break;

    case TRIANGLE:
        TriangleCell circleCell = new TriangleCell(id);
        addCell(circleCell);
        break;

    case LABEL:
        LabelCell labelCell = new LabelCell(id);
        addCell(labelCell);
        break;

    case IMAGE:
        ImageCell imageCell = new ImageCell(id);
        addCell(imageCell);
        break;

    case BUTTON:
        ButtonCell buttonCell = new ButtonCell(id);
        addCell(buttonCell);
        break;

    case TITLEDPANE:
        TitledPaneCell titledPaneCell = new TitledPaneCell(id);
        addCell(titledPaneCell);
        break;

    default:
        throw new UnsupportedOperationException("Unsupported type: " + type);
    }
}
...
et vous obtiendrez ce

j'ai eu le même problème, j'ai réussi à utiliser le javascript vis.bibliothèque js avec JavaFX WebView.
Vous pouvez le vérifier sur github si c'est utile à quelqu'un: https://github.com/arocketman/VisFX
je donnerais Prefux un essai. C'est un fork de l' Prefuse projet. Le dépôt original est https://github.com/effrafax/Prefux, mais le plus maintenue fourche semble être https://github.com/jchildress/Prefux. https://github.com/gedeffe/Prefuse semble aussi être actif, mais pas connecté avec jchildress.
Vous pouvez utiliser jfreechart api pour générer le graphique de visualisation
Il fournit, une Ligne , une Tarte, des barres. et il est très eary à utiliser.