Toast personnalisé sur Android: un exemple simple
je suis nouveau dans la programmation Android. Quel est un exemple simple montrant un toast personnalisé notification sur Android?
13 réponses
utilisez le code ci-dessous d'un Toast personnalisé. Il peut vous aider.
toast.xml
<LinearLayout xmlns:android="http://schemas.android.com/apk/res/android"
    android:id="@+id/toast_layout_root"
    android:orientation="horizontal"
    android:layout_width="fill_parent"
    android:layout_height="fill_parent"
    android:padding="10dp"
    android:background="#DAAA" >

    <ImageView android:id="@+id/image"
        android:layout_width="wrap_content"
        android:layout_height="fill_parent"
        android:layout_marginRight="10dp" />

    <TextView android:id="@+id/text"
        android:layout_width="wrap_content"
        android:layout_height="fill_parent"
        android:textColor="#FFF" />

</LinearLayout>
activité principale.java
LayoutInflater inflater = getLayoutInflater();
View layout = inflater.inflate(R.layout.toast_layout,
                               (ViewGroup) findViewById(R.id.toast_layout_root));

ImageView image = (ImageView) layout.findViewById(R.id.image);
image.setImageResource(R.drawable.android);
TextView text = (TextView) layout.findViewById(R.id.text);
text.setText("Hello! This is a custom toast!");

Toast toast = new Toast(getApplicationContext());
toast.setGravity(Gravity.CENTER_VERTICAL, 0, 0);
toast.setDuration(Toast.LENGTH_LONG);
toast.setView(layout);
toast.show();
et vérifier les liens ci-dessous également pour un Toast personnalisé.
Toast personnalisé avec horloge analogique
YouTube: Création Toast personnalisé avec bouton dans Android Studio
Un toast est pour montrer les messages pour de courts intervalles de temps; Donc, selon ma compréhension, si vous souhaitez le personnaliser avec l'ajout d'une image et de changer la taille, la couleur du texte du message. Si c'est tout, vous voulez faire, alors il n'y a pas besoin de faire une mise en page séparée et de la gonfler à L'instance Toast.
la vue par défaut de Toast contient un TextView pour y afficher des messages. Donc, si nous avons la référence d'identification de Ressource de ce TextView , nous peut jouer avec elle. Voici donc ce que vous pouvez faire pour y parvenir:
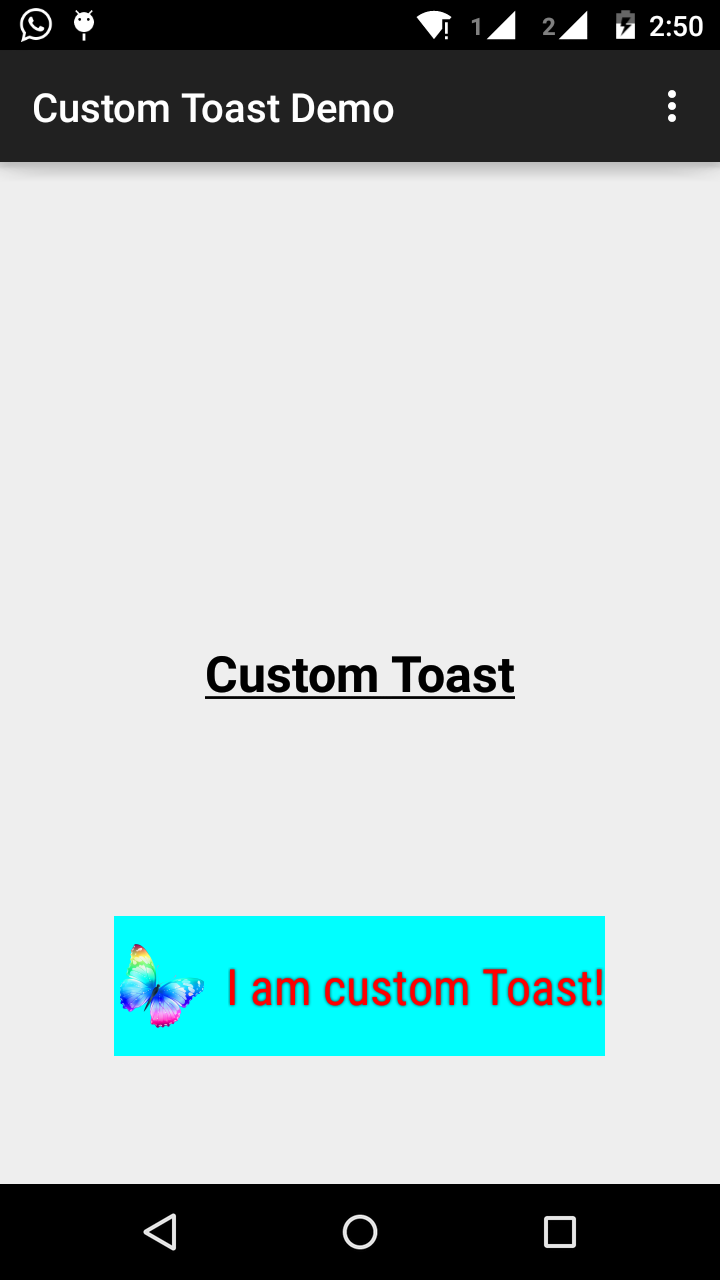
Toast toast = Toast.makeText(this, "I am custom Toast!", Toast.LENGTH_LONG);
View toastView = toast.getView(); // This'll return the default View of the Toast.

/* And now you can get the TextView of the default View of the Toast. */
TextView toastMessage = (TextView) toastView.findViewById(android.R.id.message);
toastMessage.setTextSize(25);
toastMessage.setTextColor(Color.RED);
toastMessage.setCompoundDrawablesWithIntrinsicBounds(R.mipmap.ic_fly, 0, 0, 0);
toastMessage.setGravity(Gravity.CENTER);
toastMessage.setCompoundDrawablePadding(16);
toastView.setBackgroundColor(Color.CYAN);
toast.show();
dans le code ci-dessus vous pouvez voir, vous pouvez ajouter une image à TextView via setCompoundDrawablesWithIntrinsicBounds(int left, int top, int right, int bottom) quelle que soit la position relative à TextView que vous voulez.
sortie:
étape 1:
créer D'abord une mise en page pour un toast personnalisé dans res/layout/custom_toast.xml :
<?xml version="1.0" encoding="utf-8"?>
<LinearLayout xmlns:android="http://schemas.android.com/apk/res/android"
    android:id="@+id/custom_toast_layout_id"
    android:layout_width="fill_parent"
    android:layout_height="fill_parent"
    android:background="#FFF"
    android:orientation="horizontal"
    android:padding="5dp" >

    <TextView
        android:id="@+id/text"
        android:layout_width="wrap_content"
        android:layout_height="fill_parent"
        android:textColor="#000" />

</LinearLayout>
étape 2: dans le code D'activité, obtenez la vue personnalisée ci-dessus et attachez à Toast:
// Get your custom_toast.xml ayout
LayoutInflater inflater = getLayoutInflater();

View layout = inflater.inflate(R.layout.custom_toast,
(ViewGroup) findViewById(R.id.custom_toast_layout_id));

// set a message
TextView text = (TextView) layout.findViewById(R.id.text);
text.setText("Button is clicked!");

// Toast...
Toast toast = new Toast(getApplicationContext());
toast.setGravity(Gravity.CENTER_VERTICAL, 0, 0);
toast.setDuration(Toast.LENGTH_LONG);
toast.setView(layout);
toast.show();
pour plus d'aide voir comment nous créons Toast personnalisé dans Android:
http://developer.android.com/guide/topics/ui/notifiers/toasts.html
voir lien ici . Tu trouves ta solution. Et essayez:
Créer un Toast Vue
si un simple message texte ne suffit pas, vous pouvez créer une mise en page personnalisée pour votre notification toast. Pour créer un layout personnalisé, définissez un layout de vue, en XML ou dans votre code d'application, et passez l'objet root View à la méthode setView (View).
par exemple, vous pouvez créer la disposition pour le toast visible dans la capture d'écran à droite avec le XML suivant (enregistré comme toast_layout.xml):
<LinearLayout xmlns:android="http://schemas.android.com/apk/res/android"
            android:id="@+id/toast_layout_root"
            android:orientation="horizontal"
            android:layout_width="fill_parent"
            android:layout_height="fill_parent"
            android:padding="10dp"
            android:background="#DAAA"
>

    <ImageView android:id="@+id/image"
               android:layout_width="wrap_content"
               android:layout_height="fill_parent"
               android:layout_marginRight="10dp"
    />

    <TextView android:id="@+id/text"
              android:layout_width="wrap_content"
              android:layout_height="fill_parent"
              android:textColor="#FFF"
    />
</LinearLayout>
notez que L'ID de L'élément LinearLayout est"toast_layout". Vous devez utiliser cet ID pour gonfler la mise en page à partir du XML, comme suit:
 LayoutInflater inflater = getLayoutInflater();
 View layout = inflater.inflate(R.layout.toast_layout,
                                (ViewGroup) findViewById(R.id.toast_layout_root));

 ImageView image = (ImageView) layout.findViewById(R.id.image);
 image.setImageResource(R.drawable.android);
 TextView text = (TextView) layout.findViewById(R.id.text);
 text.setText("Hello! This is a custom toast!");

 Toast toast = new Toast(getApplicationContext());
 toast.setGravity(Gravity.CENTER_VERTICAL, 0, 0);
 toast.setDuration(Toast.LENGTH_LONG);
 toast.setView(layout);
 toast.show();
tout d'abord, récupérez le LayoutInflater avec getLayoutInflater() (ou getSystemService ()), puis gonflez le layout à partir de XML en utilisant inflate(int, ViewGroup). Le premier paramètre est le layout resource ID et la seconde est la vue racine. Vous pouvez utiliser cette mise en page gonflée pour trouver plus d'objets de vue dans la mise en page, donc maintenant capturez et définissez le contenu pour les éléments ImageView et TextView. Enfin, créez un nouveau Toast avec Toast(contexte) et définissez certaines propriétés du toast, comme la gravité et la durée. Ensuite, appelez setView (View) et passez-lui la mise en page gonflée. Vous pouvez maintenant afficher le toast avec votre mise en page personnalisée en appelant show().
Note: Ne pas utiliser le constructeur public pour un Toast sauf si vous allez définir la disposition avec setView(View). Si vous n'avez pas de mise en page personnalisée à utiliser, vous devez utiliser makeText(Context, int, int) pour créer le Toast.
C'est ce que j'ai utilisé""
AllMethodsInOne.java
public static Toast displayCustomToast(FragmentActivity mAct, String toastText, String toastLength, String succTypeColor) {

    final Toast toast;

    if (toastLength.equals("short")) {
        toast = Toast.makeText(mAct, tText, Toast.LENGTH_SHORT);
    } else {
        toast = Toast.makeText(mAct, tText, Toast.LENGTH_LONG);
    }

    View tView = toast.getView();
    tView.setBackgroundColor(Color.parseColor("#053a4d"));
    TextView mText = (TextView) tView.findViewById(android.R.id.message);

    mText.setTypeface(applyFont(mAct));
    mText.setShadowLayer(0, 0, 0, 0);

    tView.setOnClickListener(new View.OnClickListener() {

        @Override
        public void onClick(View v) {
            toast.cancel();
        }
    });
    tView.invalidate();
    if (succTypeColor.equals("red")) {
        mText.setTextColor(Color.parseColor("#debe33"));
        tView.setBackground(mAct.getResources().getDrawable(R.drawable.toast_rounded_red));
        // this is to show error message
    }
    if (succTypeColor.equals("green")) {
        mText.setTextColor(Color.parseColor("#053a4d"));
        tView.setBackground(mAct.getResources().getDrawable(R.drawable.toast_rounded_green));
        // this is to show success message
    }


    return toast;
}
votre dossier.java
en appelant, écrivez juste ci-dessous.
AllMethodsInOne.displayCustomToast(act, "This is custom toast", "long", "red").show();
je pense que la plupart des exemples de xml customtoast à travers Internet sont basés sur la même source.
la documentation Android, qui est très dépassée à mon avis. fill_parent ne devrait plus être utilisé. Je préfère utiliser wrap_content en combinaison avec un xml.9.png. De cette façon, vous pouvez définir la taille minimale de toastbackground tout au long de la taille de la source fournie.
si des toasts plus complexes sont nécessaires, cadre ou disposition relative devrait être utilisé à la place de LL.
toast.xml
<?xml version="1.0" encoding="utf-8"?>
<LinearLayout xmlns:android="http://schemas.android.com/apk/res/android"
    android:id="@+id/points_layout"
    android:orientation="horizontal"
    android:layout_width="wrap_content"
    android:layout_height="wrap_content"
    android:background="@drawable/background"
    android:layout_gravity="center"
    android:gravity="center" >

 <TextView
    android:id="@+id/points_text"
    android:layout_width="wrap_content"
    android:layout_height="wrap_content"
    android:layout_gravity="center"
    android:gravity="center"
    android:layout_margin="15dp"
    android:text="@+string/points_text"
    android:textColor="@color/Green" />

</LinearLayout>
<?xml version="1.0" encoding="utf-8"?>
<nine-patch
   xmlns:android="http://schemas.android.com/apk/res/android"
   android:src="@drawable/background_96"
   android:dither="true"/>
background_96 est background_96.9.png.
ce n'est pas très bien testé, et les conseils sont appréciés:)
vous pouvez télécharger le code ici .
Étape 1:
<?xml version="1.0" encoding="utf-8"?>
<RelativeLayout xmlns:android="http://schemas.android.com/apk/res/android"
    xmlns:tools="http://schemas.android.com/tools"
    android:layout_width="match_parent"
    android:layout_height="match_parent"
    android:paddingBottom="@dimen/activity_vertical_margin"
    android:paddingLeft="@dimen/activity_horizontal_margin"
    android:paddingRight="@dimen/activity_horizontal_margin"
    android:paddingTop="@dimen/activity_vertical_margin"
    tools:context=".MainActivity">

    <Button
        android:id="@+id/btnCustomToast"
        android:layout_width="wrap_content"
        android:layout_height="wrap_content"
        android:text="Show Custom Toast" />
  </RelativeLayout>
Étape 2:
<?xml version="1.0" encoding="utf-8"?>
<LinearLayout xmlns:android="http://schemas.android.com/apk/res/android"
    android:orientation="horizontal"
    android:gravity="center"
    android:layout_width="match_parent"
    android:layout_height="wrap_content">

        <ImageView
            android:id="@+id/custom_toast_image"
            android:layout_width="wrap_content"
            android:layout_height="wrap_content"
            android:src="@mipmap/ic_launcher"/>

        <TextView
            android:id="@+id/custom_toast_message"
            android:layout_width="wrap_content"
            android:layout_height="wrap_content"
            android:text="My custom Toast Example Text" />

</LinearLayout>
Étape 3:
import android.support.v7.app.AppCompatActivity;
import android.os.Bundle;
import android.view.Gravity;
import android.view.LayoutInflater;
import android.view.View;
import android.view.ViewGroup;
import android.widget.Button;
import android.widget.Toast;

public class MainActivity extends AppCompatActivity {


    private Button btnCustomToast;

    @Override
    protected void onCreate(Bundle savedInstanceState) {
        super.onCreate(savedInstanceState);
        setContentView(R.layout.activity_main);
        btnCustomToast= (Button) findViewById(R.id.btnCustomToast);
        btnCustomToast.setOnClickListener(new View.OnClickListener() {
            @Override
            public void onClick(View v) {

                // Find custom toast example layout file
                View layoutValue = LayoutInflater.from(MainActivity.this).inflate(R.layout.android_custom_toast_example, null);
                // Creating the Toast object
                Toast toast = new Toast(getApplicationContext());
                toast.setDuration(Toast.LENGTH_SHORT);

                // gravity, xOffset, yOffset
                toast.setGravity(Gravity.CENTER_VERTICAL, 0, 0);
                toast.setView(layoutValue);//setting the view of custom toast layout
                toast.show();
            }
        });
    }
}
Code pour activité principale.fichier java.
package com.android_examples.com.toastbackgroundcolorchange;

import android.app.Activity;
import android.os.Bundle;
import android.view.View;
import android.widget.Button;
import android.widget.Toast;
public class MainActivity extends Activity {

 Button BT;
 @Override
 protected void onCreate(Bundle savedInstanceState) {
 super.onCreate(savedInstanceState);
 setContentView(R.layout.activity_main);

 BT = (Button)findViewById(R.id.button1);
 BT.setOnClickListener(new View.OnClickListener() {

 @Override
 public void onClick(View v) {

 Toast ToastMessage = Toast.makeText(getApplicationContext(),"Change Toast Background color",Toast.LENGTH_SHORT);
 View toastView = ToastMessage.getView();
 toastView.setBackgroundResource(R.layout.toast_background_color);
 ToastMessage.show();

 }
 });
 }
}
Code pour activity_main.fichier de mise en page xml.
<RelativeLayout xmlns:android="http://schemas.android.com/apk/res/android"
 xmlns:tools="http://schemas.android.com/tools"
 android:layout_width="match_parent"
 android:layout_height="match_parent"
 android:paddingBottom="@dimen/activity_vertical_margin"
 android:paddingLeft="@dimen/activity_horizontal_margin"
 android:paddingRight="@dimen/activity_horizontal_margin"
 android:paddingTop="@dimen/activity_vertical_margin"
 tools:context="com.android_examples.com.toastbackgroundcolorchange.MainActivity" >

 <Button
 android:id="@+id/button1"
 android:layout_width="wrap_content"
 android:layout_height="wrap_content"
 android:layout_centerHorizontal="true"
 android:layout_centerVertical="true"
 android:text="CLICK HERE TO SHOW TOAST MESSAGE WITH DIFFERENT BACKGROUND COLOR INCLUDING BORDER" />

</RelativeLayout>
Code pour toast_background_color.fichier de mise en page xml créé dans le dossier de mise en page res ->.
<?xml version="1.0" encoding="utf-8"?>
<shape xmlns:android="http://schemas.android.com/apk/res/android" >

 <stroke
    android:width="3dp"
    android:color="#ffffff" ></stroke>
<padding android:left="20dp" android:top="20dp"
    android:right="20dp" android:bottom="20dp" />
<corners android:radius="10dp" />
<gradient android:startColor="#ff000f"
    android:endColor="#ff0000"
    android:angle="-90"/>

</shape>
mise en page Personnalisée pour le toast, custom_toast.xml :
<LinearLayout
    xmlns:android="http://schemas.android.com/apk/res/android"
    android:orientation="vertical" android:layout_width="match_parent"
    android:layout_height="match_parent">
    <TextView
        android:layout_width="match_parent"
        android:layout_height="wrap_content"
        android:text="Custom Toast"
        android:gravity="center"
        android:id="@+id/custom_toast_text"
        android:typeface="serif"
        android:textStyle="bold"
        />
</LinearLayout>
Et la méthode en Java (il suffit de passer au toast message à cette méthode):
public void toast(String message)
{
    Toast toast = new Toast(context);
    View view = LayoutInflater.from(context).inflate(R.layout.image_custom, null);
    TextView textView = (TextView) view.findViewById(R.id.custom_toast_text);
    textView.setText(message);
    toast.setView(view);
    toast.setGravity(Gravity.BOTTOM|Gravity.CENTER, 0, 0);
    toast.setDuration(Toast.LENGTH_LONG);
    toast.show();
}
//personnalisé toast de classe où vous pouvez montrer la coutume ou par défaut toast comme souhaité)
public class ToastMessage {
    private Context context;
    private static ToastMessage instance;

    /**
     * @param context
     */
    private ToastMessage(Context context) {
        this.context = context;
    }

    /**
     * @param context
     * @return
     */
    public synchronized static ToastMessage getInstance(Context context) {
        if (instance == null) {
            instance = new ToastMessage(context);
        }
        return instance;
    }

    /**
     * @param message
     */
    public void showLongMessage(String message) {
        Toast.makeText(context, message, Toast.LENGTH_SHORT).show();
    }

    /**
     * @param message
     */
    public void showSmallMessage(String message) {
        Toast.makeText(context, message, Toast.LENGTH_LONG).show();
    }

    /**
     * The Toast displayed via this method will display it for short period of time
     *
     * @param message
     */
    public void showLongCustomToast(String message) {
        LayoutInflater inflater = ((Activity) context).getLayoutInflater();
        View layout = inflater.inflate(R.layout.layout_custom_toast, (ViewGroup) ((Activity) context).findViewById(R.id.ll_toast));
        TextView msgTv = (TextView) layout.findViewById(R.id.tv_msg);
        msgTv.setText(message);
        Toast toast = new Toast(context);
        toast.setGravity(Gravity.FILL_HORIZONTAL | Gravity.BOTTOM, 0, 0);
        toast.setDuration(Toast.LENGTH_LONG);
        toast.setView(layout);
        toast.show();


    }

    /**
     * The toast displayed by this class will display it for long period of time
     *
     * @param message
     */
    public void showSmallCustomToast(String message) {

        LayoutInflater inflater = ((Activity) context).getLayoutInflater();
        View layout = inflater.inflate(R.layout.layout_custom_toast, (ViewGroup) ((Activity) context).findViewById(R.id.ll_toast));
        TextView msgTv = (TextView) layout.findViewById(R.id.tv_msg);
        msgTv.setText(message);
        Toast toast = new Toast(context);
        toast.setGravity(Gravity.FILL_HORIZONTAL | Gravity.BOTTOM, 0, 0);
        toast.setDuration(Toast.LENGTH_SHORT);
        toast.setView(layout);
        toast.show();
    }

}
façon Simple de personnaliser le Toast,
private void MsgDisplay(String Msg, int Size, int Grav){
    Toast toast = Toast.makeText(this, Msg, Toast.LENGTH_LONG);
    TextView v = (TextView) toast.getView().findViewById(android.R.id.message);
    v.setTextColor(Color.rgb(241, 196, 15));
    v.setTextSize(Size);
    v.setGravity(Gravity.CENTER);
    v.setShadowLayer(1.5f, -1, 1, Color.BLACK);
    if(Grav == 1){
        toast.setGravity(Gravity.BOTTOM, 0, 120);
    }else{
        toast.setGravity(Gravity.BOTTOM, 0, 10);
    }
    toast.show();
}
pour éviter les problèmes avec layout_* params n'étant pas correctement utilisé, vous devez vous assurer que lorsque vous gonflez votre disposition personnalisée que vous spécifiez un groupe de vue correct comme un parent.
de nombreux exemples passent null ici, mais à la place vous pouvez passer le Toast ViewGroup existant comme votre parent.
val toast = Toast.makeText(this, "", Toast.LENGTH_LONG)
val layout = LayoutInflater.from(this).inflate(R.layout.view_custom_toast, toast.view.parent as? ViewGroup?)
toast.view = layout
toast.show()
ici, nous remplaçons la vue Toast existante par notre vue personnalisée. Une fois que vous avez une référence à votre layout "layout" , vous pouvez mettre à jour images/texte qu'il peut contenir.
cette solution empêche également toute panne de" View not attached to window manager " d'utiliser null comme parent.
aussi, évitez D'utiliser ConstraintLayout comme votre root de layout personnalisé, cela ne semble pas fonctionner lorsqu'il est utilisé à l'intérieur d'un Toast.
val inflater = layoutInflater
val container: ViewGroup = findViewById(R.id.custom_toast_container)
val layout: ViewGroup = inflater.inflate(R.layout.custom_toast, container)
val text: TextView = layout.findViewById(R.id.text)
text.text = "This is a custom toast"
with (Toast(applicationContext)) {
    setGravity(Gravity.CENTER_VERTICAL, 0, 0)
    duration = Toast.LENGTH_LONG
    view = layout
    show()
}

<LinearLayout xmlns:android="http://schemas.android.com/apk/res/android"
              android:id="@+id/custom_toast_container"
              android:orientation="horizontal"
              android:layout_width="fill_parent"
              android:layout_height="fill_parent"
              android:padding="8dp"
              android:background="#DAAA"
              >
    <ImageView android:src="@drawable/droid"
               android:layout_width="wrap_content"
               android:layout_height="wrap_content"
               android:layout_marginRight="8dp"
               />
    <TextView android:id="@+id/text"
              android:layout_width="wrap_content"
              android:layout_height="wrap_content"
              android:textColor="#FFF"
              />
</LinearLayout>
référence: https://developer.android.com/guide/topics/ui/notifiers/toasts