Création de lignes pointillées horizontales et verticales dans android
je veux dessiner des lignes horizontales et verticales pointillées dans android en utilisant des formes.
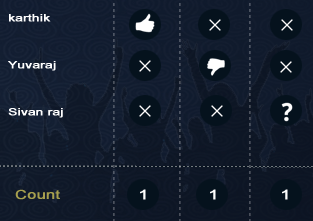
je veux dessiner comme ceci

Pour la ligne Horizontale
<shape xmlns:android="http://schemas.android.com/apk/res/android"
    android:shape="line" >

    <stroke
        android:dashGap="6px"
        android:dashWidth="6px"
        android:color="#C7B299" />

</shape>
Pour la ligne verticale
<shape xmlns:android="http://schemas.android.com/apk/res/android"
    android:shape="line" >
<size
     android:height="400dp"/>
    <stroke
        android:dashGap="6px"
        android:dashWidth="6px"
        android:color="#C7B299" />

</shape>
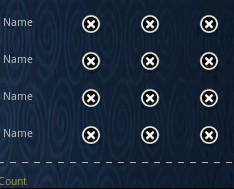
mais la ligne pointillée verticale n'affichant pas ma sortie montre comme ceci

comment tracer la ligne verticale.
5 réponses
j'ai trouvé la solution
<rotate xmlns:android="http://schemas.android.com/apk/res/android"
    android:fromDegrees="90"
    android:toDegrees="90" >

    <shape android:shape="line" >
        <stroke
            android:dashGap="6px"
            android:dashWidth="6px"
            android:color="#C7B299" />
    </shape>

</rotate>
OU
<rotate xmlns:android="http://schemas.android.com/apk/res/android"
    android:fromDegrees="90"
    android:toDegrees="90"
    android:drawable="@drawable/horizontal_line"/>
je pense que j'ai trouvé une solution "plus propre" pour ce problème en créant une vue personnalisée contenant du code spécifique pour dessiner les lignes pointillées (dans les orientations verticales et horizontales), et un tas d'attributs pour le rendre très facile à utiliser à partir de mises en page XML. Le principal avantage de cette approche par rapport à la méthode "rotated line" est que vous pouvez définir la taille de la vue en ligne pointillée comme vous le feriez normalement, sans avoir à vous soucier de la façon dont la vue va se comporter après la rotation (une fois que la rotation s'applique à l'ensemble de la vue ligne tiretée et pas seulement à la ligne tracée).
voici donc la solution étape par étape:
Créer le fichier "/res/values/attrs.xml" avec le contenu suivant:
<?xml version="1.0" encoding="utf-8"?>
<resources>

<declare-styleable name="DividerView">
    <attr name="color" format="color" />
    <attr name="dashLength" format="dimension" />
    <attr name="dashGap" format="dimension" />
    <attr name="dashThickness" format="dimension" />
    <attr name="orientation" format="enum">
        <enum name="horizontal" value="0" />
        <enum name="vertical" value="1" />
    </attr>
</declare-styleable>

</resources>
crée les attributs pour contrôler la vue personnalisée. Note: si le fichier ci-dessus existe déjà dans votre projet, il suffit de copier / coller le bloc "declare-stylable" à l'intérieur des "ressources existantes"" bloc.
créer la classe DividerView et coller le contenu ci-dessous:
public class DividerView extends View {
static public int ORIENTATION_HORIZONTAL = 0;
static public int ORIENTATION_VERTICAL = 1;
private Paint mPaint;
private int orientation;

public DividerView(Context context, AttributeSet attrs) {
    super(context, attrs);
    int dashGap, dashLength, dashThickness;
    int color;

    TypedArray a = context.getTheme().obtainStyledAttributes(attrs, R.styleable.DividerView, 0, 0);

    try {
        dashGap = a.getDimensionPixelSize(R.styleable.DividerView_dashGap, 5);
        dashLength = a.getDimensionPixelSize(R.styleable.DividerView_dashLength, 5);
        dashThickness = a.getDimensionPixelSize(R.styleable.DividerView_dashThickness, 3);
        color = a.getColor(R.styleable.DividerView_color, 0xff000000);
        orientation = a.getInt(R.styleable.DividerView_orientation, ORIENTATION_HORIZONTAL);
    } finally {
        a.recycle();
    }

    mPaint = new Paint();
    mPaint.setAntiAlias(true);
    mPaint.setColor(color);
    mPaint.setStyle(Paint.Style.STROKE);
    mPaint.setStrokeWidth(dashThickness);
    mPaint.setPathEffect(new DashPathEffect(new float[] { dashLength, dashGap, }, 0));
}

public DividerView(Context context) {
    this(context, null);
}

@Override
protected void onDraw(Canvas canvas) {
    if (orientation == ORIENTATION_HORIZONTAL) {
        float center = getHeight() * .5f;
        canvas.drawLine(0, center, getWidth(), center, mPaint);
    } else {
        float center = getWidth() * .5f;
        canvas.drawLine(center, 0, center, getHeight(), mPaint);
    }
}
}
pour utiliser auto-complete des attributs sur vos fichiers de mise en page, ajoutez le nom suivant définition de l'espace sur le conteneur supérieur:
xmlns:custom="http://schemas.android.com/apk/res/com.example"
Remplacer com.example par le nom de votre package. Vous pouvez aussi changer custom par un préfixe qui convient le mieux à vos besoins.
Note: vous pouvez avoir besoin de redémarrer Eclipse pour obtenir le travail automatique après modifications sur les attrs.fichier xml.
Et enfin créer vos lignes en pointillés par l'insertion, element sur votre mise en page, comme toute autre vue:
<com.example.DividerView
    android:layout_width="1dp"
    android:layout_height="fill_parent"
    android:layerType="software"
    custom:color="@color/grey"
    custom:orientation="vertical"
    custom:dashLength="1dp"
    custom:dashGap="1dp"
    custom:dashThickness="1dp" />
j'espère que cela aide!
si la vue a une largeur de 1dp alors juste tourner votre ligne horizontale n'est pas suffisant. La longueur de la ligne verticale sera de 1dp car elle est dessinée horizontalement d'abord, puis tournée. Voici une astuce pour résoudre ce problème:
<layer-list xmlns:android="http://schemas.android.com/apk/res/android">
    <item
        android:left="-300dp"
        android:right="-300dp">
        <rotate
            android:drawable="@drawable/dash_line_divider_horizontal"
            android:fromDegrees="90"
            android:toDegrees="90"/>
    </item>
</layer-list>
Cela fonctionne pour moi:
vertical_line.xml
<shape xmlns:android="http://schemas.android.com/apk/res/android" android:shape="rectangle">
    <solid android:color="@android:color/transparent"/>
    <stroke
        android:width="1px"
        android:color="#60000000"
        android:dashGap="5px"
        android:dashWidth="5px" />
</shape>
Dans La Mise En Page:
<View
        android:layout_width="1dp"
        android:layout_height="match_parent"
        android:layout_centerHorizontal="true"
        android:background="@drawable/vertical_line" />
Pour la ligne verticale:
<rotate xmlns:android="http://schemas.android.com/apk/res/android"
    android:fromDegrees="90"
    android:toDegrees="90">
    <shape
        android:shape="line">
        <stroke
            android:width="2dp"
            android:color="#ff00ff"
            android:dashWidth="8dp"
            android:dashGap="5dp" />
        <size android:width="120dp" />
    </shape>
</rotate>
Pour la ligne horizontale:
<?xml version="1.0" encoding="utf-8"?>
<rotate xmlns:android="http://schemas.android.com/apk/res/android">
    <shape
        android:shape="line">
        <stroke
            android:width="2dp"
            android:color="@color/accent_color"
            android:dashWidth="3dp"
            android:dashGap="2dp" />
    </shape>
</rotate>