CALayer avec trou transparent en elle
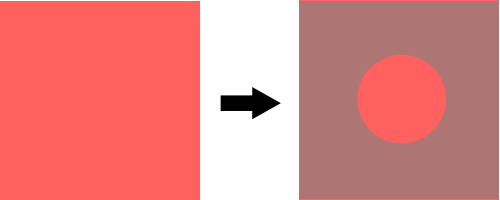
J'ai une vue simple (côté gauche de l'image) et j'ai besoin de créer une sorte de superposition (côté droit de l'image) à cette vue. Cette superposition devrait avoir une certaine opacité, de sorte que la vue ci-dessous est encore partiellement visible. Plus important encore, cette superposition devrait avoir un trou circulaire au milieu de celle-ci afin qu'elle ne recouvre pas le centre de la vue (voir image ci-dessous).
Je peux facilement créer un cercle comme ceci :
int radius = 20; //whatever
CAShapeLayer *circle = [CAShapeLayer layer];

circle.path = [UIBezierPath bezierPathWithRoundedRect:CGRectMake(0, 0,radius,radius) cornerRadius:radius].CGPath;
circle.position = CGPointMake(CGRectGetMidX(view.frame)-radius,
                              CGRectGetMidY(view.frame)-radius);
circle.fillColor = [UIColor clearColor].CGColor;
Et une superposition rectangulaire "complète" comme ceci :
CAShapeLayer *shadow = [CAShapeLayer layer];
shadow.path = [UIBezierPath bezierPathWithRoundedRect:CGRectMake(0, 0, view.bounds.size.width, view.bounds.size.height) cornerRadius:0].CGPath;
shadow.position = CGPointMake(0, 0);
shadow.fillColor = [UIColor grayColor].CGColor;
shadow.lineWidth = 0;
shadow.opacity = 0.5;
[view.layer addSublayer:shadow];
Mais je n'ai aucune idée de Comment puis-je combiner ces deux couches afin qu'elles créent l'effet que je veux. N'importe qui? J'ai essayé, vraiment tout... Merci beaucoup pour l'aide!
5 réponses
J'ai pu résoudre cela avec la suggestion de Jon Steinmetz. Si quelqu'un s'en soucie, voici la solution finale:
int radius = myRect.size.width;
UIBezierPath *path = [UIBezierPath bezierPathWithRoundedRect:CGRectMake(0, 0, self.mapView.bounds.size.width, self.mapView.bounds.size.height) cornerRadius:0];
UIBezierPath *circlePath = [UIBezierPath bezierPathWithRoundedRect:CGRectMake(0, 0, 2.0*radius, 2.0*radius) cornerRadius:radius];
[path appendPath:circlePath];
[path setUsesEvenOddFillRule:YES];

CAShapeLayer *fillLayer = [CAShapeLayer layer];
fillLayer.path = path.CGPath;
fillLayer.fillRule = kCAFillRuleEvenOdd;
fillLayer.fillColor = [UIColor grayColor].CGColor;
fillLayer.opacity = 0.5;
[view.layer addSublayer:fillLayer];
Pour Swift 3.x:
let radius = myRect.size.width
let path = UIBezierPath(roundedRect: CGRect(x: 0, y: 0, width: self.mapView.bounds.size.width, height: self.mapView.bounds.size.height), cornerRadius: 0)
let circlePath = UIBezierPath(roundedRect: CGRect(x: 0, y: 0, width: 2 * radius, height: 2 * radius), cornerRadius: radius)
path.append(circlePath)
path.usesEvenOddFillRule = true

let fillLayer = CAShapeLayer()
fillLayer.path = path.cgPath
fillLayer.fillRule = kCAFillRuleEvenOdd
fillLayer.fillColor = Color.background.cgColor
fillLayer.opacity = 0.5
view.layer.addSublayer(fillLayer)
Pour créer cet effet, j'ai trouvé plus facile de créer une vue entière superposant l'écran, puis en soustrayant des parties de l'écran en utilisant des calques et des UIBezierPaths. Pour une implémentation rapide:
// Create a view filling the screen.
let overlay = UIView(frame: CGRectMake(0, 0,
    UIScreen.mainScreen().bounds.width,
    UIScreen.mainScreen().bounds.height))

// Set a semi-transparent, black background.
overlay.backgroundColor = UIColor(red: 0, green: 0, blue: 0, alpha: 0.85)

// Create the initial layer from the view bounds.
let maskLayer = CAShapeLayer()
maskLayer.frame = overlay.bounds
maskLayer.fillColor = UIColor.blackColor().CGColor

// Create the frame for the circle.
let radius: CGFloat = 50.0
let rect = CGRectMake(
        CGRectGetMidX(overlay.frame) - radius,
        CGRectGetMidY(overlay.frame) - radius,
        2 * radius,
        2 * radius)

// Create the path.
let path = UIBezierPath(rect: overlay.bounds)
maskLayer.fillRule = kCAFillRuleEvenOdd

// Append the circle to the path so that it is subtracted.
path.appendPath(UIBezierPath(ovalInRect: rect))
maskLayer.path = path.CGPath

// Set the mask of the view.
overlay.layer.mask = maskLayer

// Add the view so it is visible.
self.view.addSubview(overlay)
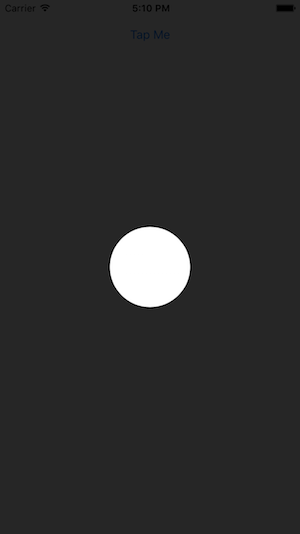
J'ai testé le code ci-dessus, et voici le résultat:
J'ai ajouté une bibliothèque à CocoaPods qui extrait beaucoup du code ci-dessus et vous permet de créer facilement des superpositions avec des trous rectangulaires/circulaires, permettant à l'utilisateur d'interagir avec les vues derrière la superposition. Je l'ai utilisé pour créer ce tutoriel pour l'une de nos applications:
La bibliothèque est appelée TAOverlayView, et est open source sous Apache 2.0. J'espère qu'elle vous sera utile!
J'ai adopté une approche similaire à animal_chin, mais je suis plus visuel, donc je l'ai mis en place dans Interface Builder en utilisant outlets et Auto layout.
Voici ma solution dans Swift
    //shadowView is a UIView of what I want to be "solid"
    var outerPath = UIBezierPath(rect: shadowView.frame)

    //croppingView is a subview of shadowView that is laid out in interface builder using auto layout
    //croppingView is hidden.
    var circlePath = UIBezierPath(ovalInRect: croppingView.frame)
    outerPath.usesEvenOddFillRule = true
    outerPath.appendPath(circlePath)

    var maskLayer = CAShapeLayer()
    maskLayer.path = outerPath.CGPath
    maskLayer.fillRule = kCAFillRuleEvenOdd
    maskLayer.fillColor = UIColor.whiteColor().CGColor

    shadowView.layer.mask = maskLayer
Solution acceptée Swift 3.0 compatible
let radius = myRect.size.width
let path = UIBezierPath(roundedRect: CGRect(x: 0.0, y: 0.0, width: self.mapView.bounds.size.width, height: self.mapView.bounds.size.height), cornerRadius: 0)
let circlePath = UIBezierPath(roundedRect: CGRect(x: 0.0, y: 0.0, width: 2.0*radius, height: 2.0*radius), cornerRadius: radius)
path.append(circlePath)
path.usesEvenOddFillRule = true

let fillLayer = CAShapeLayer()
fillLayer.path = path.cgPath
fillLayer.fillRule = kCAFillRuleEvenOdd
fillLayer.fillColor = UIColor.gray.cgColor
fillLayer.opacity = 0.5
view.layer.addSublayer(fillLayer)
Code Swift 2.0 compatible
À partir de la réponse @ animal_inch, JE code une petite classe d'utilité, j'espère qu'elle appréciera:
import Foundation
import UIKit
import CoreGraphics

/// Apply a circle mask on a target view. You can customize radius, color and opacity of the mask.
class CircleMaskView {

    private var fillLayer = CAShapeLayer()
    var target: UIView?

    var fillColor: UIColor = UIColor.grayColor() {
        didSet {
            self.fillLayer.fillColor = self.fillColor.CGColor
        }
    }

    var radius: CGFloat? {
        didSet {
            self.draw()
        }
    }

    var opacity: Float = 0.5 {
        didSet {
           self.fillLayer.opacity = self.opacity
        }
    }

    /**
    Constructor

    - parameter drawIn: target view

    - returns: object instance
    */
    init(drawIn: UIView) {
        self.target = drawIn
    }

    /**
    Draw a circle mask on target view
    */
    func draw() {
        guard (let target = target) else {
            print("target is nil")
            return
        }

        var rad: CGFloat = 0
        let size = target.frame.size
        if let r = self.radius {
            rad = r
        } else {
            rad = min(size.height, size.width)
        }

        let path = UIBezierPath(roundedRect: CGRectMake(0, 0, size.width, size.height), cornerRadius: 0.0)
        let circlePath = UIBezierPath(roundedRect: CGRectMake(size.width / 2.0 - rad / 2.0, 0, rad, rad), cornerRadius: rad)
        path.appendPath(circlePath)
        path.usesEvenOddFillRule = true

        fillLayer.path = path.CGPath
        fillLayer.fillRule = kCAFillRuleEvenOdd
        fillLayer.fillColor = self.fillColor.CGColor
        fillLayer.opacity = self.opacity
        self.target.layer.addSublayer(fillLayer)
    }

    /**
    Remove circle mask
    */


  func remove() {
        self.fillLayer.removeFromSuperlayer()
    }

}
Ensuite, où dans votre code:
let circle = CircleMaskView(drawIn: <target_view>)
circle.opacity = 0.7
circle.draw()