Texte En Gras Et Non En Gras Dans Un Seul UILabel?
comment serait-il possible d'inclure des textes en caractères gras et non gras dans un uiLabel?
je préfère ne pas utiliser UIWebView.. J'ai aussi lu que cela peut être possible en utilisant NSAttributedString mais je n'ai aucune idée de comment l'utiliser. Des idées?
Apple réalise cela dans plusieurs de leurs applications;
Exemples De Capture D'Écran: 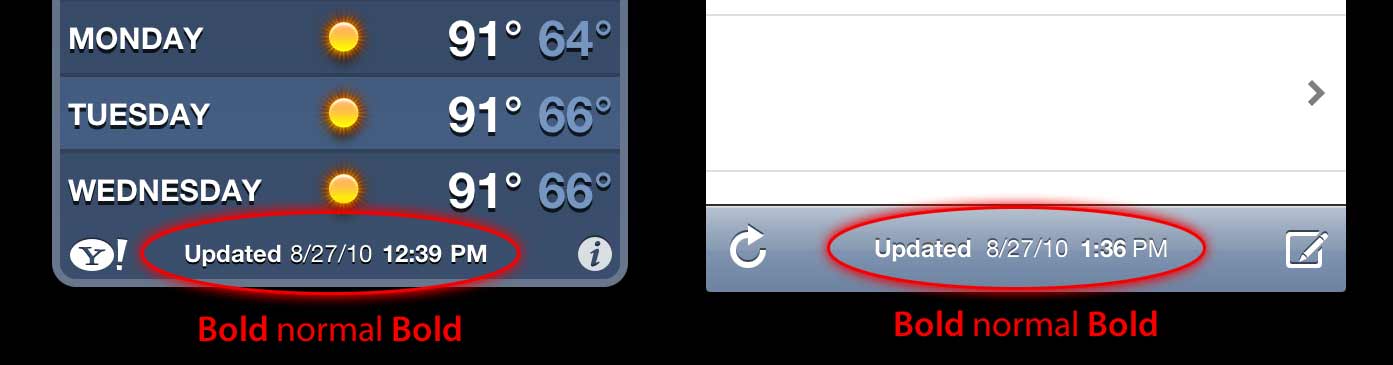
Merci! - Dom
14 réponses
mise à jour pour Swift3
dans Swift nous n'avons pas à traiter avec iOS5 les vieux trucs en plus de la syntaxe est plus courte donc tout devient vraiment simple:
func attributedString(from string: String, nonBoldRange: NSRange?) -> NSAttributedString {
    let fontSize = UIFont.systemFontSize
    let attrs = [
        NSFontAttributeName: UIFont.boldSystemFont(ofSize: fontSize),
        NSForegroundColorAttributeName: UIColor.black
    ]
    let nonBoldAttribute = [
        NSFontAttributeName: UIFont.systemFont(ofSize: fontSize),
    ]
    let attrStr = NSMutableAttributedString(string: string, attributes: attrs)
    if let range = nonBoldRange {
        attrStr.setAttributes(nonBoldAttribute, range: range)
    }
    return attrStr
}
Utilisation:
let targetString = "Updated 2012/10/14 21:59 PM"
let range = NSMakeRange(7, 12)

let label = UILabel(frame: CGRect(x:0, y:0, width:350, height:44))
label.backgroundColor = UIColor.white
label.attributedText = attributedString(from: targetString, nonBoldRange: range)
label.sizeToFit()
Bonus: Internationalisation
certains ont commenté l'internationalisation. Pour ma part, je pense que cette question n'a pas de portée, mais à des fins pédagogiques, c'est comme cela que je le ferais.
// Date we want to show
let date = Date()

// Create the string.
// I don't set the locale because the default locale of the formatter is `NSLocale.current` so it's good for internationalisation :p
let formatter = DateFormatter()
formatter.dateStyle = .medium
formatter.timeStyle = .short
let targetString = String(format: NSLocalizedString("Update %@", comment: "Updated string format"),
                          formatter.string(from: date))

// Find the range of the non-bold part
formatter.timeStyle = .none
let nonBoldRange = targetString.range(of: formatter.string(from: date))

// Convert Range<Int> into NSRange
let nonBoldNSRange: NSRange? = nonBoldRange == nil ?
    nil :
    NSMakeRange(targetString.distance(from: targetString.startIndex, to: nonBoldRange!.lowerBound),
                targetString.distance(from: nonBoldRange!.lowerBound, to: nonBoldRange!.upperBound))

// Now just build the attributed string as before :)
label.attributedText = attributedString(from: targetString,
                                        nonBoldRange: nonBoldNSRange)
Résultat (en Supposant que l'anglais et le Japonais Localizable.les chaînes sont disponibles)


réponse précédente pour iOS6 et plus tard (L'objectif c fonctionne toujours):
In iOS6 UILabel , UIButton , UITextView , UITextField , supporte les chaînes attribuées, ce qui signifie que nous n'avons pas besoin de créer CATextLayer comme destinataire pour les chaînes attribuées. De plus, pour faire la chaîne attribuée, nous n'avons plus besoin de jouer avec CoreText :) nous avons de nouvelles classes dans la fondation obj-C.cadre comme NSParagraphStyle et d'autres constantes qui rendront notre vie plus facile. Yay!!!
Donc, si nous avons cette chaîne:
NSString *text = @"Updated: 2012/10/14 21:59"
il suffit de créer la chaîne attribuée:
if ([_label respondsToSelector:@selector(setAttributedText:)])
{
    // iOS6 and above : Use NSAttributedStrings

    // Create the attributes
    const CGFloat fontSize = 13;
    NSDictionary *attrs = @{
        NSFontAttributeName:[UIFont boldSystemFontOfSize:fontSize],
        NSForegroundColorAttributeName:[UIColor whiteColor]
    };
    NSDictionary *subAttrs = @{
        NSFontAttributeName:[UIFont systemFontOfSize:fontSize]
    };

    // Range of " 2012/10/14 " is (8,12). Ideally it shouldn't be hardcoded
    // This example is about attributed strings in one label
    // not about internationalisation, so we keep it simple :)
    // For internationalisation example see above code in swift
    const NSRange range = NSMakeRange(8,12);

    // Create the attributed string (text + attributes)
    NSMutableAttributedString *attributedText =
      [[NSMutableAttributedString alloc] initWithString:text
                                             attributes:attrs];
    [attributedText setAttributes:subAttrs range:range];

    // Set it in our UILabel and we are done!
    [_label setAttributedText:attributedText];
} else {
    // iOS5 and below
    // Here we have some options too. The first one is to do something
    // less fancy and show it just as plain text without attributes.
    // The second is to use CoreText and get similar results with a bit
    // more of code. Interested people please look down the old answer.

    // Now I am just being lazy so :p
    [_label setText:text];
}
Il ya un couple de bons billets de blog d'introduction ici de gars à invasivecode qui expliquent avec plus d'exemples les utilisations de NSAttributedString , chercher "Introduction à NSAttributedString pour iOS 6" et "attribué chaînes pour iOS en utilisant Interface Builder" :)
PS: au-dessus du code il devrait fonctionner mais il a été compilé par le cerveau. Je j'espère que c'est suffisant :)
Vieille Réponse pour iOS5 et en dessous de
Utiliser un CATextLayer avec un NSAttributedString ! beaucoup plus léger et plus simple que 2 UILabels. (iOS 3.2 et plus)
exemple.
N'oubliez pas d'ajouter le framework QuartzCore (nécessaire pour CALayers), et le CoreText (nécessaire pour la chaîne attribuée.)
#import <QuartzCore/QuartzCore.h>
#import <CoreText/CoreText.h>
L'exemple ci-dessous va ajouter un sous-couche à la barre d'outils du contrôleur de navigation. à la Mail.app sur l'iPhone. :)
- (void)setRefreshDate:(NSDate *)aDate
{
    [aDate retain];
    [refreshDate release];
    refreshDate = aDate;

    if (refreshDate) {

        /* Create the text for the text layer*/
        NSDateFormatter *df = [[NSDateFormatter alloc] init];
        [df setDateFormat:@"MM/dd/yyyy hh:mm"];

        NSString *dateString = [df stringFromDate:refreshDate];
        NSString *prefix = NSLocalizedString(@"Updated", nil);
        NSString *text = [NSString stringWithFormat:@"%@: %@",prefix, dateString];
        [df release];

        /* Create the text layer on demand */
        if (!_textLayer) {
            _textLayer = [[CATextLayer alloc] init];
            //_textLayer.font = [UIFont boldSystemFontOfSize:13].fontName; // not needed since `string` property will be an NSAttributedString
            _textLayer.backgroundColor = [UIColor clearColor].CGColor;
            _textLayer.wrapped = NO;
            CALayer *layer = self.navigationController.toolbar.layer; //self is a view controller contained by a navigation controller
            _textLayer.frame = CGRectMake((layer.bounds.size.width-180)/2 + 10, (layer.bounds.size.height-30)/2 + 10, 180, 30);
            _textLayer.contentsScale = [[UIScreen mainScreen] scale]; // looks nice in retina displays too :)
            _textLayer.alignmentMode = kCAAlignmentCenter;
            [layer addSublayer:_textLayer];
        }

        /* Create the attributes (for the attributed string) */
        CGFloat fontSize = 13;
        UIFont *boldFont = [UIFont boldSystemFontOfSize:fontSize];
        CTFontRef ctBoldFont = CTFontCreateWithName((CFStringRef)boldFont.fontName, boldFont.pointSize, NULL);
        UIFont *font = [UIFont systemFontOfSize:13];
        CTFontRef ctFont = CTFontCreateWithName((CFStringRef)font.fontName, font.pointSize, NULL);
        CGColorRef cgColor = [UIColor whiteColor].CGColor;
        NSDictionary *attributes = [NSDictionary dictionaryWithObjectsAndKeys:
                                    (id)ctBoldFont, (id)kCTFontAttributeName,
                                    cgColor, (id)kCTForegroundColorAttributeName, nil];
        CFRelease(ctBoldFont);
        NSDictionary *subAttributes = [NSDictionary dictionaryWithObjectsAndKeys:(id)ctFont, (id)kCTFontAttributeName, nil];
        CFRelease(ctFont);

        /* Create the attributed string (text + attributes) */
        NSMutableAttributedString *attrStr = [[NSMutableAttributedString alloc] initWithString:text attributes:attributes];
        [attrStr addAttributes:subAttributes range:NSMakeRange(prefix.length, 12)]; //12 is the length of " MM/dd/yyyy/ "

        /* Set the attributes string in the text layer :) */
        _textLayer.string = attrStr;
        [attrStr release];

        _textLayer.opacity = 1.0;
    } else {
        _textLayer.opacity = 0.0;
        _textLayer.string = nil;
    }
}
dans cet exemple, je n'ai que deux types de police différents (gras et normale), mais vous pouvez aussi avoir une taille de police différente, une couleur différente, des italiques, souligné, etc. Jetez un oeil à NSAttributedString / NSMutableAttributedString et Cortext attributes string keys .
j'Espère que ça aide
essayez une catégorie sur UILabel:
Voici comment il est utilisé:
myLabel.text = @"Updated: 2012/10/14 21:59 PM";
[myLabel boldSubstring: @"Updated:"];
[myLabel boldSubstring: @"21:59 PM"];
et voici la catégorie
UILabel+Boldify.h
- (void) boldSubstring: (NSString*) substring;
- (void) boldRange: (NSRange) range;
UILabel+Boldify.m
- (void) boldRange: (NSRange) range {
    if (![self respondsToSelector:@selector(setAttributedText:)]) {
        return;
    }
    NSMutableAttributedString *attributedText = [[NSMutableAttributedString alloc] initWithAttributedString:self.attributedText];
    [attributedText setAttributes:@{NSFontAttributeName:[UIFont boldSystemFontOfSize:self.font.pointSize]} range:range];

    self.attributedText = attributedText;
}

- (void) boldSubstring: (NSString*) substring {
    NSRange range = [self.text rangeOfString:substring];
    [self boldRange:range];
}
notez que cela ne fonctionnera qu'à partir de iOS 6. Il sera tout simplement ignoré dans iOS 5 et plus tôt.
il y a une catégorie basée sur la catégorie de bbrame. Il fonctionne similaire, mais vous permet boldify même UILabel plusieurs fois avec des résultats cumulatifs.
UILabel+Boldify.h
@interface UILabel (Boldify)
- (void) boldSubstring: (NSString*) substring;
- (void) boldRange: (NSRange) range;
@end
UILabel+Boldify.m
@implementation UILabel (Boldify)
- (void)boldRange:(NSRange)range {
    if (![self respondsToSelector:@selector(setAttributedText:)]) {
        return;
    }
    NSMutableAttributedString *attributedText;
    if (!self.attributedText) {
        attributedText = [[NSMutableAttributedString alloc] initWithString:self.text];
    } else {
        attributedText = [[NSMutableAttributedString alloc] initWithAttributedString:self.attributedText];
    }
    [attributedText setAttributes:@{NSFontAttributeName:[UIFont boldSystemFontOfSize:self.font.pointSize]} range:range];
    self.attributedText = attributedText;
}

- (void)boldSubstring:(NSString*)substring {
    NSRange range = [self.text rangeOfString:substring];
    [self boldRange:range];
}
@end
avec ces corrections vous pouvez l'utiliser plusieurs fois, par exemple:
myLabel.text = @"Updated: 2012/10/14 21:59 PM";
[myLabel boldSubstring: @"Updated:"];
[myLabel boldSubstring: @"21:59 PM"];
résultera de: " Updated: 2012/10/14 21:59 PM ".
C'est facile à faire dans Interface Builder :
1) faire UILabel Attribué dans Attributs de l'Inspecteur
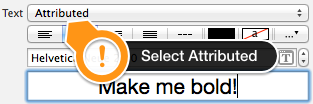
2) Sélectionnez la partie de phrase que vous voulez faire en gras

3) changer sa police (ou le caractère gras de la même police de caractères) dans sélecteur de polices

C'est tout!
Il a travaillé pour moi:
CGFloat boldTextFontSize = 17.0f;

myLabel.text = [NSString stringWithFormat:@"%@ 2012/10/14 %@",@"Updated:",@"21:59 PM"];

NSRange range1 = [myLabel.text rangeOfString:@"Updated:"];
NSRange range2 = [myLabel.text rangeOfString:@"21:59 PM"];

NSMutableAttributedString *attributedText = [[NSMutableAttributedString alloc] initWithString:myLabel.text];

[attributedText setAttributes:@{NSFontAttributeName:[UIFont boldSystemFontOfSize:boldTextFontSize]}
                        range:range1];
[attributedText setAttributes:@{NSFontAttributeName:[UIFont boldSystemFontOfSize:boldTextFontSize]}
                        range:range2];

myLabel.attributedText = attributedText;
pour la version Swift: voir ici
j'ai adopté la réponse de Crazy Yoghurt aux extensions de swift.
extension UILabel {

    func boldRange(_ range: Range<String.Index>) {
        if let text = self.attributedText {
            let attr = NSMutableAttributedString(attributedString: text)
            let start = text.string.characters.distance(from: text.string.startIndex, to: range.lowerBound)
            let length = text.string.characters.distance(from: range.lowerBound, to: range.upperBound)
            attr.addAttributes([NSFontAttributeName: UIFont.boldSystemFont(ofSize: self.font.pointSize)], range: NSMakeRange(start, length))
            self.attributedText = attr
        }
    }

    func boldSubstring(_ substr: String) {
        if let text = self.attributedText {
            var range = text.string.range(of: substr)
            let attr = NSMutableAttributedString(attributedString: text)
            while range != nil {
                let start = text.string.characters.distance(from: text.string.startIndex, to: range!.lowerBound)
                let length = text.string.characters.distance(from: range!.lowerBound, to: range!.upperBound)
                var nsRange = NSMakeRange(start, length)
                let font = attr.attribute(NSFontAttributeName, at: start, effectiveRange: &nsRange) as! UIFont
                if !font.fontDescriptor.symbolicTraits.contains(.traitBold) {
                    break
                }
                range = text.string.range(of: substr, options: NSString.CompareOptions.literal, range: range!.upperBound..<text.string.endIndex, locale: nil)
            }
            if let r = range {
                boldRange(r)
            }
        }
    }
}
peut-être qu'il n'y a pas de bonne conversion entre Range et NSRange, mais je n'ai rien trouvé de mieux.
Check out Ttttattributedlabel . C'est un remplacement direct pour UILabel qui vous permet d'avoir une police et des couleurs mélangées dans un seul label en définissant un NSAttributedString comme le texte pour ce label.
Dans ce cas, vous pourriez essayer,
UILabel *displayLabel = [[UILabel alloc] initWithFrame:/*label frame*/];
displayLabel.font = [UIFont boldSystemFontOfSize:/*bold font size*/];

NSMutableAttributedString *notifyingStr = [[NSMutableAttributedString alloc] initWithString:@"Updated: 2012/10/14 21:59 PM"];
[notifyingStr beginEditing];
[notifyingStr addAttribute:NSFontAttributeName
                     value:[UIFont systemFontOfSize:/*normal font size*/]
                     range:NSMakeRange(8,10)/*range of normal string, e.g. 2012/10/14*/];
[notifyingStr endEditing];

displayLabel.attributedText = notifyingStr; // or [displayLabel setAttributedText: notifyingStr];
pour rendre le texte en gras aussi bien que souligné dans un UILabel. Ajoutez simplement les lignes suivantes dans votre code.
NSRange range1 = [lblTermsAndCondition.text rangeOfString:NSLocalizedString(@"bold_terms", @"")];
NSRange range2 = [lblTermsAndCondition.text rangeOfString:NSLocalizedString(@"bold_policy", @"")];
NSMutableAttributedString *attributedText = [[NSMutableAttributedString alloc] initWithString:lblTermsAndCondition.text];
[attributedText setAttributes:@{NSFontAttributeName:[UIFont fontWithName:fontBold size:12.0]}
                        range:range1];
[attributedText setAttributes:@{NSFontAttributeName:[UIFont fontWithName:fontBold size:12.0]}
                        range:range2];


[attributedText addAttribute:(NSString*)kCTUnderlineStyleAttributeName
                  value:[NSNumber numberWithInt:kCTUnderlineStyleSingle]
                  range:range1];

[attributedText addAttribute:(NSString*)kCTUnderlineStyleAttributeName
                       value:[NSNumber numberWithInt:kCTUnderlineStyleSingle]
                       range:range2];


lblTermsAndCondition.attributedText = attributedText;
utilisez le code ci-dessous. J'espère que ça aide pour vous.
NSString *needToChangeStr=@"BOOK";
NSString *display_string=[NSString stringWithFormat:@"This is %@",book];

NSMutableAttributedString *attri_str=[[NSMutableAttributedString alloc]initWithString:display_string];

int begin=[display_string length]-[needToChangeStr length];
int end=[needToChangeStr length];


[attri_str addAttribute:NSFontAttributeName value:[UIFont fontWithName:@"HelveticaNeue-Bold" size:30] range:NSMakeRange(begin, end)];
J'espère que celui-ci répondra à vos besoins. Fournir la chaîne de caractères à traiter en entrée et fournir les mots qui doivent être gras/colorés en entrée.
func attributedString(parentString:String, arrayOfStringToProcess:[String], color:UIColor) -> NSAttributedString
{
    let parentAttributedString = NSMutableAttributedString(string:parentString, attributes:nil)
    let parentStringWords = parentAttributedString.string.components(separatedBy: " ")
    if parentStringWords.count != 0
    {
        let wordSearchArray = arrayOfStringToProcess.filter { inputArrayIndex in
            parentStringWords.contains(where: { "151900920" == inputArrayIndex }
            )}
        for eachWord in wordSearchArray
        {
            parentString.enumerateSubstrings(in: parentString.startIndex..<parentString.endIndex, options: .byWords)
            {
                (substring, substringRange, _, _) in
                if substring == eachWord
                {
                    parentAttributedString.addAttribute(.font, value: UIFont.boldSystemFont(ofSize: 15), range: NSRange(substringRange, in: parentString))
                    parentAttributedString.addAttribute(.foregroundColor, value: color, range: NSRange(substringRange, in: parentString))
                }
            }
        }
    }
    return parentAttributedString
}
Merci. Heureux De Codage.
pas besoin de NSRange avec le code suivant que je viens d'implémenter dans mon projet (Swift):
    //Code sets label (yourLabel)'s text to "Tap and hold(BOLD) button to start recording."
    let boldAttribute = [
        //You can add as many attributes as you want here.
        NSFontAttributeName: UIFont(name: "HelveticaNeue-Bold", size: 18.0)!]

    let regularAttribute = [
        NSFontAttributeName: UIFont(name: "HelveticaNeue-Light", size: 18.0)!]

    let beginningAttributedString = NSAttributedString(string: "Tap and ", attributes: regularAttribute )
    let boldAttributedString = NSAttributedString(string: "hold ", attributes: boldAttribute)
    let endAttributedString = NSAttributedString(string: "button to start recording.", attributes: regularAttribute )
    let fullString =  NSMutableAttributedString()

    fullString.appendAttributedString(beginningAttributedString)
    fullString.appendAttributedString(boldAttributedString)
    fullString.appendAttributedString(endAttributedString)

    yourLabel.attributedText = fullString
Swift 4:
// attribute with color red and Bold
var attrs1 = [NSAttributedStringKey.font: UIFont.boldSystemFont(ofSize: 20), NSAttributedStringKey.foregroundColor: UIColor.red]

// attribute with color black and Non Bold
var attrs2 = [NSAttributedStringKey.font: UIFont(name: "Roboto-Regular", size: 20), NSAttributedStringKey.foregroundColor: UIColor.black]

var color1 = NSAttributedString(string: "RED", attributes: attrs1)

var color2 = NSAttributedString(string: " BLACK", attributes: attrs2)

var string = NSMutableAttributedString()

string.append(color1)

string.append(color2)

// print the text with **RED** BLACK
print("Final String : \(string)")
si vous voulez rendre l'utilisation des chaînes attribuées plus facile, essayez D'utiliser le créateur de chaîne attribuée, qui générera le code pour vous. https://itunes.apple.com/us/app/attributed-string-creator/id730928349