Android nouvelle barre de Navigation de fond ou BottomNavigationView
vu la nouvelle ligne directrice est sorti, et utilisé dans google photos dernière application.
N'avez aucune idée de la façon d'utiliser la nouvelle barre de Navigation du bas.
Voir à travers le nouveau soutien lib, n'a pas trouvé de piste.

ne trouve aucun échantillon officiel.
Comment utiliser la nouvelle barre du Bas? Ne voulez pas faire tout personnaliser.
13 réponses
je pense que vous pourriez chercher ceci.
voici un extrait rapide pour commencer:
public class MainActivity extends AppCompatActivity {
    private BottomBar mBottomBar;

    @Override
    protected void onCreate(Bundle savedInstanceState) {
        super.onCreate(savedInstanceState);

        // Notice how you don't use the setContentView method here! Just
        // pass your layout to bottom bar, it will be taken care of.
        // Everything will be just like you're used to.
        mBottomBar = BottomBar.bind(this, R.layout.activity_main,
                savedInstanceState);

        mBottomBar.setItems(
                new BottomBarTab(R.drawable.ic_recents, "Recents"),
                new BottomBarTab(R.drawable.ic_favorites, "Favorites"),
                new BottomBarTab(R.drawable.ic_nearby, "Nearby"),
                new BottomBarTab(R.drawable.ic_friends, "Friends")
        );

        mBottomBar.setOnItemSelectedListener(new OnTabSelectedListener() {
            @Override
            public void onItemSelected(final int position) {
                // the user selected a new tab
            }
        });
    }

    @Override
    protected void onSaveInstanceState(Bundle outState) {
        super.onSaveInstanceState(outState);
        mBottomBar.onSaveInstanceState(outState);
    }
}
voici le lien de référence.
https://github.com/roughike/BottomBar
MODIFIER les Nouvelles Versions.
la vue de Navigation en bas a été dans le directives de conception du matériel depuis un certain temps, mais il n'a pas été facile pour nous de l'implémenter dans nos applications. Certaines applications ont construit leurs propres solutions, tandis que d'autres ont compté sur des bibliothèques open-source tierces pour faire le travail. Maintenant la bibliothèque de soutien de conception voit l'ajout de cette barre de navigation de fond, nous allons plonger dans la façon dont nous pouvons l'utiliser!
comment utiliser ?
pour commencer, nous devons mettre à jour notre dépendance!
compile ‘com.android.support:design:25.0.0’
la Conception de xml.
<?xml version="1.0" encoding="utf-8"?>
<RelativeLayout xmlns:android="http://schemas.android.com/apk/res/android"
    xmlns:app="http://schemas.android.com/apk/res-auto"
    android:layout_width="match_parent"
    android:layout_height="match_parent">

    <!-- Content Container -->

    <android.support.design.widget.BottomNavigationView
        android:id="@+id/bottom_navigation"
        android:layout_width="match_parent"
        android:layout_height="wrap_content"
        android:layout_alignParentBottom="true"
        app:itemBackground="@color/colorPrimary"
        app:itemIconTint="@color/white"
        app:itemTextColor="@color/white"
        app:menu="@menu/bottom_navigation_main" />

</RelativeLayout>
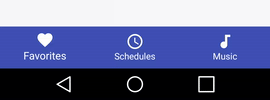
Créer menu selon votre exigence.
<?xml version="1.0" encoding="utf-8"?>
<menu xmlns:android="http://schemas.android.com/apk/res/android"
    xmlns:app="http://schemas.android.com/apk/res-auto">
    <item
        android:id="@+id/action_favorites"
        android:enabled="true"
        android:icon="@drawable/ic_favorite_white_24dp"
        android:title="@string/text_favorites"
        app:showAsAction="ifRoom" />
    <item
        android:id="@+id/action_schedules"
        android:enabled="true"
        android:icon="@drawable/ic_access_time_white_24dp"
        android:title="@string/text_schedules"
        app:showAsAction="ifRoom" />
    <item
        android:id="@+id/action_music"
        android:enabled="true"
        android:icon="@drawable/ic_audiotrack_white_24dp"
        android:title="@string/text_music"
        app:showAsAction="ifRoom" />
</menu>
Manipulation Activé / Désactivé. Faire le sélecteur de fichier.
<?xml version="1.0" encoding="utf-8"?>
<selector xmlns:android="http://schemas.android.com/apk/res/android">
  <item
      android:state_checked="true"
      android:color="@color/colorPrimary" />
  <item
      android:state_checked="false"
      android:color="@color/grey" />
 </selector>
Gérer les évènements de clics.
BottomNavigationView bottomNavigationView = (BottomNavigationView)
                findViewById(R.id.bottom_navigation);

bottomNavigationView.setOnNavigationItemSelectedListener(
        new BottomNavigationView.OnNavigationItemSelectedListener() {
            @Override
            public boolean onNavigationItemSelected(@NonNull MenuItem item) {
                switch (item.getItemId()) {
                    case R.id.action_favorites:

                        break;
                    case R.id.action_schedules:

                        break;
                    case R.id.action_music:

                        break;
                }
                return false;
            }
});
Si vous voulez en savoir plus sur ses méthodes et comment il fonctionne lire ceci.
ça vous aidera sûrement.
vous devez utiliser BottomNavigationView à partir de V25 Android Support Library. Il représente une barre de navigation de fond standard pour l'application.
voici un message sur le médium qui a un guide étape par étape: https://medium.com/@hitherejoe/exploring-the-android-design-support-library-bottom-navigation-drawer-548de699e8e0#.9vmiekxze
vous pouvez également utiliser la mise en page D'onglet avec la vue d'onglet personnalisée pour réaliser ceci.
custom_tab.xml
<?xml version="1.0" encoding="utf-8"?>
<LinearLayout xmlns:android="http://schemas.android.com/apk/res/android"
    xmlns:tools="http://schemas.android.com/tools"
    android:layout_width="wrap_content"
    android:layout_height="wrap_content"
    android:background="?attr/selectableItemBackground"
    android:gravity="center"
    android:orientation="vertical"
    android:paddingBottom="10dp"
    android:paddingTop="8dp">

    <ImageView
        android:id="@+id/icon"
        android:layout_width="24dp"
        android:layout_height="24dp"
        android:scaleType="centerInside"
        android:src="@drawable/ic_recents_selector" />

    <TextView
        android:id="@+id/title"
        android:layout_width="wrap_content"
        android:layout_height="wrap_content"
        android:ellipsize="end"
        android:maxLines="1"
        android:textAllCaps="false"
        android:textColor="@color/tab_color"
        android:textSize="12sp"/>
</LinearLayout>
activity_main.xml
<?xml version="1.0" encoding="utf-8"?>
<LinearLayout xmlns:android="http://schemas.android.com/apk/res/android"
    android:layout_width="match_parent"
    android:layout_height="match_parent"
    android:orientation="vertical">

    <android.support.v4.view.ViewPager

        android:id="@+id/view_pager"
        android:layout_width="match_parent"
        android:layout_height="0dp"
        android:layout_weight="1" />

    <android.support.design.widget.TabLayout
        android:id="@+id/tab_layout"
        style="@style/AppTabLayout"
        android:layout_width="match_parent"
        android:layout_height="56dp"
        android:background="?attr/colorPrimary" />

</LinearLayout>
activité principale.java
public class MainActivity extends AppCompatActivity {
    private TabLayout mTabLayout;

    private int[] mTabsIcons = {
            R.drawable.ic_recents_selector,
            R.drawable.ic_favorite_selector,
            R.drawable.ic_place_selector};


    @Override
    protected void onCreate(Bundle savedInstanceState) {
        super.onCreate(savedInstanceState);
        setContentView(R.layout.activity_main);

        // Setup the viewPager
        ViewPager viewPager = (ViewPager) findViewById(R.id.view_pager);
        MyPagerAdapter pagerAdapter = new MyPagerAdapter(getSupportFragmentManager());
        viewPager.setAdapter(pagerAdapter);

        mTabLayout = (TabLayout) findViewById(R.id.tab_layout);
        mTabLayout.setupWithViewPager(viewPager);

        for (int i = 0; i < mTabLayout.getTabCount(); i++) {
            TabLayout.Tab tab = mTabLayout.getTabAt(i);
            tab.setCustomView(pagerAdapter.getTabView(i));
        }

        mTabLayout.getTabAt(0).getCustomView().setSelected(true);
    }


    private class MyPagerAdapter extends FragmentPagerAdapter {

        public final int PAGE_COUNT = 3;

        private final String[] mTabsTitle = {"Recents", "Favorites", "Nearby"};

        public MyPagerAdapter(FragmentManager fm) {
            super(fm);
        }

        public View getTabView(int position) {
            // Given you have a custom layout in `res/layout/custom_tab.xml` with a TextView and ImageView
            View view = LayoutInflater.from(MainActivity.this).inflate(R.layout.custom_tab, null);
            TextView title = (TextView) view.findViewById(R.id.title);
            title.setText(mTabsTitle[position]);
            ImageView icon = (ImageView) view.findViewById(R.id.icon);
            icon.setImageResource(mTabsIcons[position]);
            return view;
        }

        @Override
        public Fragment getItem(int pos) {
            switch (pos) {

                case 0:
                    return PageFragment.newInstance(1);

                case 1:
                    return PageFragment.newInstance(2);
                case 2:
                    return PageFragment.newInstance(3);

            }
            return null;
        }

        @Override
        public int getCount() {
            return PAGE_COUNT;
        }

        @Override
        public CharSequence getPageTitle(int position) {
            return mTabsTitle[position];
        }
    }

}
Google a lancé le BottomNavigationView après la version 25.0.0 de la bibliothèque de soutien de conception. Mais il est venu avec les limitations suivantes:
- vous ne pouvez pas supprimer les titres et l'icône du centre.
- vous ne pouvez pas changer la taille du texte des titres.
- vous ne pouvez pas changer la couleur de fond il est toujours le colorprimaire.
- il n'a pas un comportement de navigation de fond: donc pas d'intégration avec FAB ou SnackBar à travers CordinatorLayout.
- chaque menuItem est une extension pure de FrameLayout donc il n'a pas de joli cercle effet de révélation
ainsi le max que vous pouvez faire avec cette version poing de BottomNavigationView est: (sans aucune réflexion ou la mise en œuvre de la lib par vous-même).
donc, si vous en voulez. Vous pouvez utiliser une bibliothèque de troisième partie comme roughike/BottomBar ou mettre en œuvre la lib par vous-même.
comme Sanf0rd mentionné, Google a lancé le BottomNavigationView comme partie de la bibliothèque de soutien de conception version 25.0.0 . Les limitations qu'il a mentionnées sont pour la plupart vraies, sauf que vous pouvez changer la couleur de fond de la vue et même la couleur du texte et la teinte de l'icône. Il a également une animation lorsque vous ajoutez plus de 4 éléments (malheureusement, il ne peut pas être activé ou désactivé manuellement).
j'ai écrit un tutoriel détaillé à ce sujet avec des exemples et un dépôt d'accompagnement, que vous pouvez lire ici: https://blog.autsoft.hu/now-you-can-use-the-bottom-navigation-view-in-the-design-support-library/
L'essentiel, c'
vous devez les ajouter dans votre niveau app build.gradle :
compile 'com.android.support:appcompat-v7:25.0.0'
compile 'com.android.support:design:25.0.0'
Vous pouvez l'inclure dans votre mise en page comme ceci:
<android.support.design.widget.BottomNavigationView
        xmlns:app="http://schemas.android.com/apk/res-auto"
        android:id="@+id/bottom_navigation_view"
        android:layout_width="match_parent"
        android:layout_height="wrap_content"
        app:itemBackground="@color/darkGrey"
        app:itemIconTint="@color/bottom_navigation_item_background_colors"
        app:itemTextColor="@color/bottom_navigation_item_background_colors"
        app:menu="@menu/menu_bottom_navigation" />
vous pouvez spécifier les éléments via une ressource de menu comme ceci:
<?xml version="1.0" encoding="utf-8"?>
<menu
    xmlns:android="http://schemas.android.com/apk/res/android">
    <item
        android:id="@+id/action_one"
        android:icon="@android:drawable/ic_dialog_map"
        android:title="One"/>
    <item
        android:id="@+id/action_two"
        android:icon="@android:drawable/ic_dialog_info"
        android:title="Two"/>
    <item
        android:id="@+id/action_three"
        android:icon="@android:drawable/ic_dialog_email"
        android:title="Three"/>
    <item
        android:id="@+id/action_four"
        android:icon="@android:drawable/ic_popup_reminder"
        android:title="Four"/>
</menu>
et vous pouvez définir la teinte et la couleur du texte comme une liste de couleurs, de sorte que l'élément actuellement sélectionné est mis en évidence:
<?xml version="1.0" encoding="utf-8"?>
<selector xmlns:android="http://schemas.android.com/apk/res/android">

    <item
        android:color="@color/colorAccent"
        android:state_checked="false"/>
    <item
        android:color="@android:color/white"
        android:state_checked="true"/>

</selector>
enfin, vous pouvez gérer la sélection des articles avec un OnNavigationItemSelectedListener:
bottomNavigationView.setOnNavigationItemSelectedListener(new BottomNavigationView.OnNavigationItemSelectedListener() {
    @Override
    public boolean onNavigationItemSelected(@NonNull MenuItem item) {
        Fragment fragment = null;
        switch (item.getItemId()) {
            case R.id.action_one:
                // Switch to page one
                break;
            case R.id.action_two:
                // Switch to page two
                break;
            case R.id.action_three:
                // Switch to page three
                break;
        }
        return true;
    }
});
autre bibliothèque alternative vous pouvez essayer: - https://github.com/Ashok-Varma/BottomNavigation
<com.ashokvarma.bottomnavigation.BottomNavigationBar
    android:layout_gravity="bottom"
    android:id="@+id/bottom_navigation_bar"
    android:layout_width="match_parent"
    android:layout_height="wrap_content"/>

BottomNavigationBar bottomNavigationBar = (BottomNavigationBar) findViewById(R.id.bottom_navigation_bar);

bottomNavigationBar
                .addItem(new BottomNavigationItem(R.drawable.ic_home_white_24dp, "Home"))
                .addItem(new BottomNavigationItem(R.drawable.ic_book_white_24dp, "Books"))
                .addItem(new BottomNavigationItem(R.drawable.ic_music_note_white_24dp, "Music"))
                .addItem(new BottomNavigationItem(R.drawable.ic_tv_white_24dp, "Movies & TV"))
                .addItem(new BottomNavigationItem(R.drawable.ic_videogame_asset_white_24dp, "Games"))
                .initialise();
comment ajouter une barre de Navigation de fond
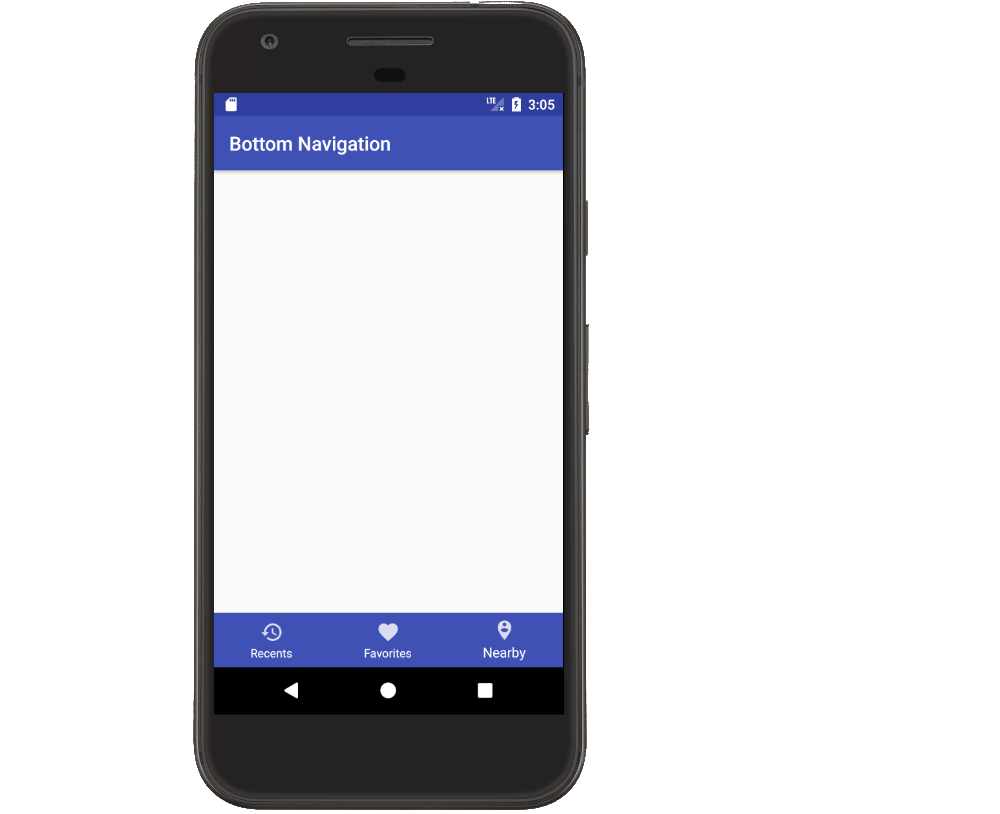
La accepté réponse est bonne mais j'ai trouvé l'organisation un peu dur à suivre, et une partie du contenu inutile. L'exemple complet suivant montre comment faire une barre de Navigation inférieure semblable à l'image dans la question.
Ajouter le support à la conception de la bibliothèque
Ajouter cette ligne la version de votre application.classe fichier à côté des autres choses de bibliothèque de soutien.
implementation 'com.android.support:design:26.1.0'
remplacer le numéro de version par ce qui est à jour. Utilisez compile au lieu de implementation si vous utilisez toujours Android Studio 2.x.
créer la mise en page de L'activité
la seule chose spéciale que nous avons ajoutée à la disposition est le BottomNavigationView . Pour modifier la couleur de l'icône et du texte lorsqu'il est cliqué, vous pouvez utiliser un selector au lieu de spécifier la couleur directement. Ceci est omis pour des raisons de simplicité ici.
activity_main.xml
<?xml version="1.0" encoding="utf-8"?>
<RelativeLayout
    xmlns:android="http://schemas.android.com/apk/res/android"
    xmlns:app="http://schemas.android.com/apk/res-auto"
    android:layout_width="match_parent"
    android:layout_height="match_parent">

    <android.support.design.widget.BottomNavigationView
        android:id="@+id/bottom_navigation"
        android:layout_width="match_parent"
        android:layout_height="wrap_content"
        android:layout_alignParentBottom="true"
        app:menu="@menu/bottom_nav_menu"
        app:itemBackground="@color/colorPrimary"
        app:itemIconTint="@android:color/white"
        app:itemTextColor="@android:color/white" />

</RelativeLayout>
remarquez que nous avons utilisé layout_alignParentBottom pour le mettre en bas.
définir les éléments du menu
Le code xml ci-dessus pour le Fond de Navigation visés à bottom_nav_menu . C'est ce qui définit chaque élément à notre avis. Nous allons le faire maintenant. Tout ce que vous avez à faire est d'ajouter une ressource de menu tout comme vous le feriez pour une barre d'Action ou une barre d'outils.
bottom_nav_menu.xml
<?xml version="1.0" encoding="utf-8"?>
<menu xmlns:android="http://schemas.android.com/apk/res/android"
      xmlns:app="http://schemas.android.com/apk/res-auto">

    <item
        android:id="@+id/action_recents"
        android:enabled="true"
        android:icon="@drawable/ic_action_recents"
        android:title="Recents"
        app:showAsAction="ifRoom" />

    <item
        android:id="@+id/action_favorites"
        android:enabled="true"
        android:icon="@drawable/ic_action_favorites"
        android:title="Favorites"
        app:showAsAction="ifRoom" />

    <item
        android:id="@+id/action_nearby"
        android:enabled="true"
        android:icon="@drawable/ic_action_nearby"
        android:title="Nearby"
        app:showAsAction="ifRoom" />
</menu>
, Vous devrez ajouter les icônes appropriées à votre projet. Ce n'est pas très difficile si vous allez à Fichier > Nouveau > image et choisissez barre d'Action et les icônes de L'onglet comme le Type D'icône.
ajouter un élément est sélectionné listener
il ne se passe rien de spécial ici. Nous n'avons qu'à ajouter un auditeur à la barre de Navigation du bas dans la méthode onCreate de notre activité.
public class MainActivity extends AppCompatActivity {

    @Override
    protected void onCreate(Bundle savedInstanceState) {
        super.onCreate(savedInstanceState);
        setContentView(R.layout.activity_main);

        BottomNavigationView bottomNavigationView = (BottomNavigationView) findViewById(R.id.bottom_navigation);
        bottomNavigationView.setOnNavigationItemSelectedListener(new BottomNavigationView.OnNavigationItemSelectedListener() {
            @Override
            public boolean onNavigationItemSelected(@NonNull MenuItem item) {
                switch (item.getItemId()) {
                    case R.id.action_recents:
                        Toast.makeText(MainActivity.this, "Recents", Toast.LENGTH_SHORT).show();
                        break;
                    case R.id.action_favorites:
                        Toast.makeText(MainActivity.this, "Favorites", Toast.LENGTH_SHORT).show();
                        break;
                    case R.id.action_nearby:
                        Toast.makeText(MainActivity.this, "Nearby", Toast.LENGTH_SHORT).show();
                        break;

                }
                return true;
            }
        });
    }
}
besoin d'aide?
j'ai appris comment faire cela en regardant la vidéo suivante sur YouTube. La voix de l'ordinateur est un peu étrange, mais la démonstration est très claire.
j'ai fait une classe privée qui utilise un gridview et une ressource de menu:
private class BottomBar {

    private GridView mGridView;
    private Menu     mMenu;
    private BottomBarAdapter mBottomBarAdapter;
    private View.OnClickListener mOnClickListener;

    public BottomBar (@IdRes int gridviewId, @MenuRes int menuRes,View.OnClickListener onClickListener) {
        this.mGridView = (GridView) findViewById(gridviewId);
        this.mMenu = getMenu(menuRes);
        this.mOnClickListener = onClickListener;

        this.mBottomBarAdapter = new BottomBarAdapter();
        this.mGridView.setAdapter(mBottomBarAdapter);
    }

    private Menu getMenu(@MenuRes int menuId) {
        PopupMenu p = new PopupMenu(MainActivity.this,null);
        Menu menu = p.getMenu();
        getMenuInflater().inflate(menuId,menu);
        return menu;
    }

    public GridView getGridView(){
        return mGridView;
    }

    public void show() {
        mGridView.setVisibility(View.VISIBLE);
        mGridView.animate().translationY(0);
    }

    public void hide() {
        mGridView.animate().translationY(mGridView.getHeight());
    }


    private class BottomBarAdapter extends BaseAdapter {

        private LayoutInflater    mInflater;

        public BottomBarAdapter(){
            this.mInflater = LayoutInflater.from(MainActivity.this);
        }

        @Override
        public int getCount() {
            return mMenu.size();
        }

        @Override
        public Object getItem(int i) {
            return mMenu.getItem(i);
        }

        @Override
        public long getItemId(int i) {
            return 0;
        }

        @Override
        public View getView(int i, View view, ViewGroup viewGroup) {

            MenuItem item = (MenuItem) getItem(i);

            if (view==null){
                view = mInflater.inflate(R.layout.your_item_layout,null);
                view.setId(item.getItemId());
            }

            view.setOnClickListener(mOnClickListener);
            view.findViewById(R.id.bottomnav_icon).setBackground(item.getIcon());
            ((TextView) view.findViewById(R.id.bottomnav_label)).setText(item.getTitle());

            return view;
        }
    }
your_menu.xml:
<?xml version="1.0" encoding="utf-8"?>
<menu xmlns:android="http://schemas.android.com/apk/res/android">
    <item android:id="@+id/item1_id"
        android:icon="@drawable/ic_item1"
        android:title="@string/title_item1"/>
    <item android:id="@+id/item2_id"
        android:icon="@drawable/ic_item2"
        android:title="@string/title_item2"/>
    ...
</menu>
et un article de mise en page personnalisé your_item_layout.xml
<?xml version="1.0" encoding="utf-8"?>
<LinearLayout xmlns:android="http://schemas.android.com/apk/res/android"
    android:layout_width="wrap_content" android:layout_height="wrap_content"
    android:orientation="vertical"
    android:layout_margin="16dp">
    <ImageButton android:id="@+id/bottomnav_icon"
        android:layout_width="24dp"
        android:layout_height="24dp"
        android:layout_gravity="top|center_horizontal"
        android:layout_marginTop="8dp"
        android:layout_marginBottom="4dp"/>
    <TextView android:id="@+id/bottomnav_label"
        android:layout_width="wrap_content"
        android:layout_height="wrap_content"
        android:layout_gravity="bottom|center_horizontal"
        android:layout_marginBottom="8dp"
        android:layout_marginTop="4dp"
        style="@style/mystyle_label" />
</LinearLayout>
usage dans votre activité principale:
BottomBar bottomBar = new BottomBar(R.id.YourGridView,R.menu.your_menu, mOnClickListener);
et
private View.OnClickListener mOnClickListener = new View.OnClickListener() {
    @Override
    public void onClick(View view) {
        switch (view.getId()) {
            case R.id.item1_id:
                //todo item1
                break;
            case R.id.item2_id:
                //todo item2
                break;
            ...
        }
    }
}
et dans layout_activity.xml
<?xml version="1.0" encoding="utf-8"?>
<android.support.design.widget.CoordinatorLayout
    xmlns:android="http://schemas.android.com/apk/res/android"
    xmlns:app="http://schemas.android.com/apk/res-auto"
    xmlns:tools="http://schemas.android.com/tools"
    android:layout_width="match_parent"
    android:layout_height="match_parent"
    android:fitsSystemWindows="true">
    ...
    <FrameLayout android:id="@+id/fragment_container"
        android:layout_width="match_parent"
        android:layout_height="match_parent"
        app:layout_behavior="@string/appbar_scrolling_view_behavior"/>

    <GridView android:id="@+id/bottomNav"
        android:layout_width="match_parent"
        android:layout_height="wrap_content"
        android:background="@color/your_background_color"
        android:verticalSpacing="0dp"
        android:horizontalSpacing="0dp"
        android:numColumns="4"
        android:stretchMode="columnWidth"
        app:layout_anchor="@id/fragment_container"
        app:layout_anchorGravity="bottom"/>
</android.support.design.widget.CoordinatorLayout>
je pense que c'est également utile.
Extrait de
public class MainActivity : AppCompatActivity, BottomNavigationBar.Listeners.IOnTabSelectedListener
{
    private BottomBar _bottomBar;

    protected override void OnCreate(Bundle bundle)
    {
        base.OnCreate(bundle);

        SetContentView(Resource.Layout.MainActivity);

        _bottomBar = BottomBar.Attach(this, bundle);
        _bottomBar.SetItems(
            new BottomBarTab(Resource.Drawable.ic_recents, "Recents"),
            new BottomBarTab(Resource.Drawable.ic_favorites, "Favorites"),
            new BottomBarTab(Resource.Drawable.ic_nearby, "Nearby")
        );
        _bottomBar.SetOnItemSelectedListener(this);
        _bottomBar.HideShadow();
        _bottomBar.UseDarkTheme(true);
        _bottomBar.SetTypeFace("Roboto-Regular.ttf");

        var badge = _bottomBar.MakeBadgeForTabAt(1, Color.ParseColor("#f02d4c"), 1);
        badge.AutoShowAfterUnSelection = true;
    }

    public void OnItemSelected(int position)
    {

    }

    protected override void OnSaveInstanceState(Bundle outState)
    {
        base.OnSaveInstanceState(outState);

        // Necessary to restore the BottomBar's state, otherwise we would
        // lose the current tab on orientation change.
        _bottomBar.OnSaveInstanceState(outState);
    }
}
Liens
https://github.com/pocheshire/BottomNavigationBar
c'est https://github.com/roughike/BottomBar porté en C# pour les développeurs Xamarin
il y a un nouveau officiel BottomNavigationView dans la version 25 de la bibliothèque de soutien de conception
https://developer.android.com/reference/android/support/design/widget/BottomNavigationView.html
ajouter dans gradle
compile 'com.android.support:design:25.0.0'
XML
<android.support.design.widget.BottomNavigationView
    xmlns:android="http://schemas.android.com/apk/res/android"
    xmlns:design="http://schema.android.com/apk/res/android.support.design"
    android:id="@+id/navigation"
    android:layout_width="wrap_content"
    android:layout_height="match_parent"
    android:layout_gravity="start"
    design:menu="@menu/my_navigation_items" />
j'ai référé à ce GitHub post et j'ai mis le three layouts pour three fragment pages dans la barre de tabulation inférieure.
FourButtonsActivity.java:
bottomBar.setFragmentItems(getSupportFragmentManager(), R.id.fragmentContainer,
            new BottomBarFragment(LibraryFragment.newInstance(R.layout.library_fragment_layout), R.drawable.ic_update_white_24dp, "Recents"),
            new BottomBarFragment(PhotoEffectFragment.newInstance(R.layout.photo_effect_fragment), R.drawable.ic_local_dining_white_24dp, "Food"),
            new BottomBarFragment(VideoFragment.newInstance(R.layout.video_layout), R.drawable.ic_favorite_white_24dp, "Favorites")

    );
pour déterminer le numéro d'insigne:
  BottomBarBadge unreadMessages = bottomBar.makeBadgeForTabAt(1, "#E91E63", 4);
  unreadMessages.show();
  unreadMessages.setCount(4);
  unreadMessages.setAnimationDuration(200);
  unreadMessages.setAutoShowAfterUnSelection(true);
LibraryFragment.java:
import android.os.Bundle;
import android.support.annotation.Nullable;
import android.support.v4.app.Fragment;
import android.view.LayoutInflater;
import android.view.View;
import android.view.ViewGroup;

public class LibraryFragment extends Fragment {
    private static final String STARTING_TEXT = "Four Buttons Bottom Navigation";

    public LibraryFragment() {
    }

    public static LibraryFragment newInstance(int resource) {
        Bundle args = new Bundle();
        args.putInt(STARTING_TEXT, resource);

        LibraryFragment sampleFragment = new LibraryFragment();
        sampleFragment.setArguments(args);

        return sampleFragment;
    }

    @Nullable
    @Override
    public View onCreateView(LayoutInflater inflater, ViewGroup container, Bundle savedInstanceState) {


        View view = LayoutInflater.from(getActivity()).inflate(
                getArguments().getInt(STARTING_TEXT), null);
        return view;


    }
<android.support.design.widget.BottomNavigationView
    android:id="@+id/navigation"
    android:layout_width="match_parent"
    android:layout_height="wrap_content"
    android:layout_gravity="bottom"
    android:background="?android:attr/windowBackground"
    app:menu="@menu/navigation" />
de navigation.xml (menu intérieur)
<?xml version="1.0" encoding="utf-8"?>
<menu xmlns:android="http://schemas.android.com/apk/res/android"
    xmlns:app="http://schemas.android.com/apk/res-auto">

    <item
        android:id="@+id/navigation_home"
        android:icon="@drawable/ic_home_black_24dp"
        android:title="@string/title_home"
        app:showAsAction="always|withText"
        android:enabled="true"/>
à l'Intérieur onCreate() la méthode,
BottomNavigationView navigation = (BottomNavigationView)findViewById(R.id.navigation);
//Dont forgot this line
BottomNavigationViewHelper.disableShiftMode(navigation);
et créer la classe comme ci-dessous.
public class BottomNavigationViewHelper {
    public static void disableShiftMode(BottomNavigationView view) {
        BottomNavigationMenuView menuView = (BottomNavigationMenuView) view.getChildAt(0);
        try {
            Field shiftingMode = menuView.getClass().getDeclaredField("mShiftingMode");
            shiftingMode.setAccessible(true);
            shiftingMode.setBoolean(menuView, false);
            shiftingMode.setAccessible(false);
            for (int i = 0; i < menuView.getChildCount(); i++) {
                BottomNavigationItemView item = (BottomNavigationItemView) menuView.getChildAt(i);
                //noinspection RestrictedApi
                item.setShiftingMode(false);
                // set once again checked value, so view will be updated
                //noinspection RestrictedApi
                item.setChecked(item.getItemData().isChecked());
            }
        } catch (NoSuchFieldException e) {
            Log.e("BNVHelper", "Unable to get shift mode field", e);
        } catch (IllegalAccessException e) {
            Log.e("BNVHelper", "Unable to change value of shift mode", e);
        }
    }
}
cette bibliothèque, BottomNavigationViewEx , étend BottomNavigationView de Google. Vous pouvez facilement personnaliser la bibliothèque de Google pour avoir la barre de navigation du bas comme vous le souhaitez. Vous pouvez désactiver le mode de déplacement, changer la visibilité des icônes et des textes et bien plus encore. Certainement essayer.