Navigation Android Jetpack, BottomNavigationView avec Youtube ou Instagram comme la bonne navigation de retour (pile de retour de fragment)?
Navigation Android Jetpack, BottomNavigationView avec la pile de retour de fragment automatique sur le bouton de retour de clic?
ce que je voulais, après avoir choisi plusieurs onglets l'un après l'autre par utilisateur et utilisateur cliquez sur le bouton Précédent l'application doit rediriger vers la dernière page qu'il/elle a ouverte.
j'ai réalisé la même chose en utilisant Android ViewPager, en sauvegardant l'élément actuellement sélectionné dans un ArrayList. Y a-t-il une pile de retour automatique après la sortie de Navigation du Jetpack Android? Je veux le réaliser en utilisant graphique de navigation
activity_main.xml
<?xml version="1.0" encoding="utf-8"?>
<android.support.constraint.ConstraintLayout xmlns:android="http://schemas.android.com/apk/res/android"
    xmlns:app="http://schemas.android.com/apk/res-auto"
    xmlns:tools="http://schemas.android.com/tools"
    android:id="@+id/container"
    android:layout_width="match_parent"
    android:layout_height="match_parent"
    tools:context=".main.MainActivity">

    <fragment
        android:id="@+id/my_nav_host_fragment"
        android:name="androidx.navigation.fragment.NavHostFragment"
        android:layout_width="match_parent"
        android:layout_height="0dp"
        app:defaultNavHost="true"
        app:layout_constraintBottom_toTopOf="@+id/navigation"
        app:layout_constraintEnd_toEndOf="parent"
        app:layout_constraintStart_toStartOf="parent"
        app:layout_constraintTop_toTopOf="parent"
        app:navGraph="@navigation/nav_graph" />

    <android.support.design.widget.BottomNavigationView
        android:id="@+id/navigation"
        android:layout_width="0dp"
        android:layout_height="wrap_content"
        android:layout_marginStart="0dp"
        android:layout_marginEnd="0dp"
        android:background="?android:attr/windowBackground"
        app:layout_constraintBottom_toBottomOf="parent"
        app:layout_constraintLeft_toLeftOf="parent"
        app:layout_constraintRight_toRightOf="parent"
        app:menu="@menu/navigation" />

</android.support.constraint.ConstraintLayout>
navigation.xml
<?xml version="1.0" encoding="utf-8"?>
<menu xmlns:android="http://schemas.android.com/apk/res/android">

    <item
        android:id="@+id/navigation_home"
        android:icon="@drawable/ic_home"
        android:title="@string/title_home" />

    <item
        android:id="@+id/navigation_people"
        android:icon="@drawable/ic_group"
        android:title="@string/title_people" />

    <item
        android:id="@+id/navigation_organization"
        android:icon="@drawable/ic_organization"
        android:title="@string/title_organization" />

    <item
        android:id="@+id/navigation_business"
        android:icon="@drawable/ic_business"
        android:title="@string/title_business" />

    <item
        android:id="@+id/navigation_tasks"
        android:icon="@drawable/ic_dashboard"
        android:title="@string/title_tasks" />

</menu>
également ajouté
bottomNavigation.setupWithNavController(Navigation.findNavController(this, R.id.my_nav_host_fragment))
j'ai eu une réponse de Levi Moreira, comme suit
navigation.setOnNavigationItemSelectedListener {item ->

            onNavDestinationSelected(item, Navigation.findNavController(this, R.id.my_nav_host_fragment))

        }
mais en faisant cela, ce n'est qu'en se produisant que l'instance du dernier fragment ouvert se crée à nouveau.
fournir une Navigation arrière appropriée pour BottomNavigationView
5 réponses
Vous n'avez pas vraiment besoin d'un ViewPagerBottomNavigation et la nouvelle composante de L'architecture de Navigation. J'ai travaillé dans un exemple d'application qui utilise exactement les deux, voir ici.
le concept de base est celui - ci, vous avez l'activité principale qui hébergera le BottomNavigationView et c'est l'hôte de Navigation de votre graphique de navigation, voici à quoi ressemble le xml pour cela:
activity_main.xml
<?xml version="1.0" encoding="utf-8"?>
<android.support.constraint.ConstraintLayout xmlns:android="http://schemas.android.com/apk/res/android"
    xmlns:app="http://schemas.android.com/apk/res-auto"
    xmlns:tools="http://schemas.android.com/tools"
    android:id="@+id/container"
    android:layout_width="match_parent"
    android:layout_height="match_parent"
    tools:context=".main.MainActivity">

    <fragment
        android:id="@+id/my_nav_host_fragment"
        android:name="androidx.navigation.fragment.NavHostFragment"
        android:layout_width="match_parent"
        android:layout_height="0dp"
        app:defaultNavHost="true"
        app:layout_constraintBottom_toTopOf="@+id/navigation"
        app:layout_constraintEnd_toEndOf="parent"
        app:layout_constraintStart_toStartOf="parent"
        app:layout_constraintTop_toTopOf="parent"
        app:navGraph="@navigation/nav_graph" />

    <android.support.design.widget.BottomNavigationView
        android:id="@+id/navigation"
        android:layout_width="0dp"
        android:layout_height="wrap_content"
        android:layout_marginStart="0dp"
        android:layout_marginEnd="0dp"
        android:background="?android:attr/windowBackground"
        app:layout_constraintBottom_toBottomOf="parent"
        app:layout_constraintLeft_toLeftOf="parent"
        app:layout_constraintRight_toRightOf="parent"
        app:menu="@menu/navigation" />

</android.support.constraint.ConstraintLayout>
le Menu de navigation (menu des onglets) pour le BottomNavigationView ressemble à ceci:
navigation.xml
<?xml version="1.0" encoding="utf-8"?>
<menu xmlns:android="http://schemas.android.com/apk/res/android">

    <item
        android:id="@+id/navigation_home"
        android:icon="@drawable/ic_home"
        android:title="@string/title_home" />

    <item
        android:id="@+id/navigation_people"
        android:icon="@drawable/ic_group"
        android:title="@string/title_people" />

    <item
        android:id="@+id/navigation_organization"
        android:icon="@drawable/ic_organization"
        android:title="@string/title_organization" />

    <item
        android:id="@+id/navigation_business"
        android:icon="@drawable/ic_business"
        android:title="@string/title_business" />

    <item
        android:id="@+id/navigation_tasks"
        android:icon="@drawable/ic_dashboard"
        android:title="@string/title_tasks" />

</menu>
tout cela est juste le BottomNavigationView le programme d'installation. Maintenant, pour que cela fonctionne avec le composant Navigation Arch, vous devez aller dans l'éditeur de graphiques de navigation, ajouter toutes vos destinations fragment (dans mon cas j'en ai 5, une pour chaque onglet) et définir l'id de la destination avec le même nom que celui de la destination navigation.xml fichier:
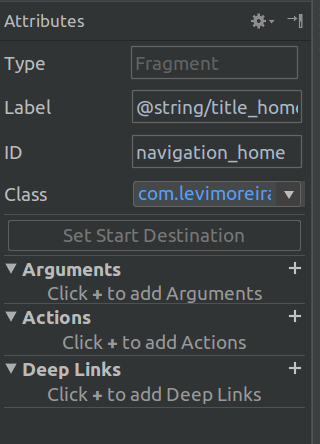
cela indiquera à android de faire un lien entre l'onglet et le fragment, maintenant chaque fois que l'utilisateur clique sur l'onglet "Home" android s'occupera de charger le fragment correct.
Il y a aussi un morceau de code kotlin qui doit être ajouté à votre NavHost (l'activité principale) pour relier les choses avec le BottomNavigationView:
Vous devez ajouter dans votre onCreate:
bottomNavigation.setupWithNavController(Navigation.findNavController(this, R.id.my_nav_host_fragment))
cela dit à android de faire le câblage entre la composante de L'architecture de Navigation et la vue de navigation de fond. Voir plus dans l' docs.
Pour obtenir le même beahvior vous avez lorsque vous utilisez youtube, il suffit d'ajouter ceci:
navigation.setOnNavigationItemSelectedListener {item ->

            onNavDestinationSelected(item, Navigation.findNavController(this, R.id.my_nav_host_fragment))

        }
cela fera entrer les destinations dans les coulisses de sorte que lorsque vous appuyez sur le bouton arrière, la dernière destination visitée apparaîtra.
Vous devez définir la navigation de l'hôte comme ci-dessous xml:
<LinearLayout xmlns:android="http://schemas.android.com/apk/res/android"
    xmlns:app="http://schemas.android.com/apk/res-auto"
    android:layout_width="match_parent"
    android:layout_height="match_parent"
    android:orientation="vertical">

    <android.support.v7.widget.Toolbar
        android:id="@+id/toolbar"
        android:layout_width="match_parent"
        android:layout_height="wrap_content"
        android:background="@color/colorPrimary" />

    <fragment
        android:id="@+id/navigation_host_fragment"
        android:name="androidx.navigation.fragment.NavHostFragment"
        android:layout_width="match_parent"
        android:layout_height="0dp"
        android:layout_weight="1"
        app:defaultNavHost="true"
        app:navGraph="@navigation/nav_graph" />

    <android.support.design.widget.BottomNavigationView
        android:id="@+id/bottom_navigation_view"
        android:layout_width="match_parent"
        android:layout_height="wrap_content"
        app:itemIconTint="@drawable/color_state_list"
        app:itemTextColor="@drawable/color_state_list"
        app:menu="@menu/menu_bottom_navigation" />
</LinearLayout>
Le Programme D'Installation Avec Manette De Navigation :
NavHostFragment navHostFragment = (NavHostFragment) getSupportFragmentManager().findFragmentById(R.id.navigation_host_fragment);
NavigationUI.setupWithNavController(bottomNavigationView, navHostFragment.getNavController());
menu_bottom_navigation.xml:
<?xml version="1.0" encoding="utf-8"?>
<menu xmlns:android="http://schemas.android.com/apk/res/android">
    <item
        android:id="@id/tab1"  // Id of navigation graph
        android:icon="@mipmap/ic_launcher"
        android:title="@string/tab1" />
    <item
        android:id="@id/tab2" // Id of navigation graph
        android:icon="@mipmap/ic_launcher"
        android:title="@string/tab2" />

    <item
        android:id="@id/tab3" // Id of navigation graph
        android:icon="@mipmap/ic_launcher"
        android:title="@string/tab3" />
</menu>
nav_graph.xml:
<navigation xmlns:android="http://schemas.android.com/apk/res/android"
    xmlns:app="http://schemas.android.com/apk/res-auto"
    xmlns:tools="http://schemas.android.com/tools"
    android:id="@+id/nav_graph"
    app:startDestination="@id/tab1">
    <fragment
        android:id="@+id/tab1"
        android:name="com.navigationsample.Tab1Fragment"
        android:label="@string/tab1"
        tools:layout="@layout/fragment_tab_1" />

    <fragment
        android:id="@+id/tab2"
        android:name="com.navigationsample.Tab2Fragment"
        android:label="@string/tab2"
        tools:layout="@layout/fragment_tab_2"/>

    <fragment
        android:id="@+id/tab3"
        android:name="com.simform.navigationsample.Tab3Fragment"
        android:label="@string/tab3"
        tools:layout="@layout/fragment_tab_3"/>
</navigation>
en mettant en place le même id de "nav_graph" à "menu_bottom_navigation" gérera le clic de la navigation de fond.
vous pouvez gérer l'action de retour en utilisant popUpTo propriété action balise.
vous pouvez avoir une configuration de viewpager avec vue de navigation en bas. Chaque fragment dans le viewpager sera un fragment de conteneur, il aura des fragments d'enfant avec son propre dos. Vous pouvez maintenir backstack pour chaque onglet dans viewpager de cette façon
j'ai fait une application comme celle-ci (toujours pas publiée sur PlayStore) qui a la même navigation, peut-être que son implémentation est différente de ce que Google fait dans leurs applications, mais la fonctionnalité est la même.
la structure implique que j'ai L'activité principale que je change le contenu de celui-ci en montrant/cachant des fragments en utilisant:
public void switchTo(final Fragment fragment, final String tag /*Each fragment should have a different Tag*/) {

// We compare if the current stack is the current fragment we try to show
if (fragment == getSupportFragmentManager().getPrimaryNavigationFragment()) {
  return;
}

// We need to hide the current showing fragment (primary fragment)
final Fragment currentShowingFragment = getSupportFragmentManager().getPrimaryNavigationFragment();

final FragmentTransaction fragmentTransaction = getSupportFragmentManager().beginTransaction();
if (currentShowingFragment != null) {
  fragmentTransaction.hide(currentShowingFragment);
}

// We try to find that fragment if it was already added before
final Fragment alreadyAddedFragment = getSupportFragmentManager().findFragmentByTag(tag);
if (alreadyAddedFragment != null) {
  // Since its already added before we just set it as primary navigation and show it again
  fragmentTransaction.setPrimaryNavigationFragment(alreadyAddedFragment);
  fragmentTransaction.show(alreadyAddedFragment);
} else {
  // We add the new fragment and then show it
  fragmentTransaction.add(containerId, fragment, tag);
  fragmentTransaction.show(fragment);
  // We set it as the primary navigation to support back stack and back navigation
  fragmentTransaction.setPrimaryNavigationFragment(fragment);
}

fragmentTransaction.commit();
}
Si vous avez un bottomNavigationView avec 3 éléments correspondant à 3 Fragment s: FragmentA, FragmentB et FragmentC où FragmentA est le startDestination dans votre graphique de navigation, puis quand vous êtes sur FragmentB ou FragmentC et vous cliquez sur, vous allez être redirigé vers FragmentA, c'est le comportement recommandé par Google et qui est implémenté par défaut.
si toutefois vous souhaitez modifier ce comportement, vous devrez utiliser un ViewPager tel que suggéré par certaines des autres réponses, ou manipulez manuellement les fragments des transactions backStack et back-ce qui, d'une certaine manière, saperait l'utilisation de la composante de Navigation-.