Android AlertDialog avec des coins arrondis
j'ai essayé de faire mon dialogue Alerte avec des coins arrondis, mais je ne suis pas en mesure de le faire. J'ai essayé et j'ai échoué. J'ai essayé de suivre ce blog http://blog.stylingandroid.com/archives/271 et fait mon style.
Btw, pour ajouter à ma question maintenant. Certaines de mes nouvelles découvertes. Le code dans le lien ci-dessus fonctionne très bien sur 2.3.3 (GB) mais ne fonctionne pas du tout dans ICS . Certains changements ont fait du code briser.
je veux éviter de créer 9 images patch et donc j'utilise des formes. 9 patch de l'image est la dernière chose que je vais essayer.Je sais que le style de dialogue Alerte android utilise 9 patch image. J'ai déjà regardé qu'avant de lancer ce question.
/res/values/thèmes.xml
<?xml version="1.0" encoding="utf-8"?>
<resources>

    <style name="MyTheme" parent="@android:style/Theme.Dialog">
        <item name="android:alertDialogStyle">@style/dialog</item>
    </style>


</resources>
/res/valeurs/les styles.xml
<resources xmlns:android="http://schemas.android.com/apk/res/android">

    <style name="AppTheme" parent="android:Theme.Light" />

    <style name="myImageView">

        <!-- 3dp so the background border to be visible -->
        <item name="android:padding">3dp</item>
        <item name="android:background">@drawable/image_drawable</item>
        <item name="android:scaleType">fitCenter</item>
    </style>

    <style name="dialog">
        <item name="android:fullDark">@drawable/dialog_body</item>
        <item name="android:topDark">@drawable/dialog_title</item>
        <item name="android:centerDark">@drawable/dialog_body</item>
        <item name="android:bottomDark">@drawable/dialog_footer</item>
        <item name="android:fullBright">@drawable/dialog_body</item>
        <item name="android:centerBright">@drawable/dialog_body</item>
        <item name="android:topBright">@drawable/dialog_title</item>
        <item name="android:bottomBright">@drawable/dialog_footer</item>
        <item name="android:bottomMedium">@drawable/dialog_footer</item>
        <item name="android:centerMedium">@drawable/dialog_body</item>
    </style>

</resources>
/ res/drawable / dialog_title.xml
<inset xmlns:android="http://schemas.android.com/apk/res/android"
    android:insetBottom="-1dp">
    <shape android:shape="rectangle">
        <solid android:color="#FFFFFF" />
        <corners android:topLeftRadius="5dp" android:topRightRadius="5dp" />
        <stroke android:color="#FFFFFF" android:width="1dp" />
    </shape>
</inset>
/ res/drawable / dialog_body.xml
<?xml version="1.0" encoding="utf-8"?>
<shape xmlns:android="http://schemas.android.com/apk/res/android"
    android:shape="rectangle">
    <gradient android:startColor="#FFFFFFFF" android:endColor="#FFFFFFFF"
        android:angle="270" />
</shape>
/ res/drawable / dialog_footer.xml
<?xml version="1.0" encoding="utf-8"?>
<shape xmlns:android="http://schemas.android.com/apk/res/android"
    android:shape="rectangle" >

    <solid android:color="#FFFFFF" />

    <corners
        android:bottomLeftRadius="5dp"
        android:bottomRightRadius="5dp" />

    <stroke
        android:width="1dp"
        android:color="#FFFFFF" />

</shape>
res/layout / dialog_layout.xml
<?xml version="1.0" encoding="utf-8"?>
<RelativeLayout xmlns:android="http://schemas.android.com/apk/res/android"
    android:layout_width="match_parent"
    android:layout_height="match_parent"
    >

    <TextView
        android:id="@+id/textView1"
        android:layout_width="wrap_content"
        android:layout_height="wrap_content"
        android:layout_alignParentTop="true"
        android:layout_centerHorizontal="true"
        android:layout_marginTop="45dp"
        android:text="Large Text"
        android:textAppearance="?android:attr/textAppearanceLarge" />

    <Button
        android:id="@+id/button1"
        style="?android:attr/buttonStyleSmall"
        android:layout_width="wrap_content"
        android:layout_height="wrap_content"
        android:layout_below="@+id/textView1"
        android:layout_marginTop="90dp"
        android:layout_toLeftOf="@+id/textView1"
        android:background="@drawable/button_selector"
        android:text="Ok"
        android:textColor="@android:color/white"
        android:textStyle="bold" />

    <Button
        android:id="@+id/button2"
        style="?android:attr/buttonStyleSmall"
        android:layout_width="wrap_content"
        android:layout_height="wrap_content"
        android:layout_alignParentRight="true"
        android:layout_alignTop="@+id/button1"
        android:layout_marginRight="48dp"
        android:background="@drawable/button_selector"
        android:text="More"
        android:textColor="@android:color/white"
        android:textStyle="bold" />

    <LinearLayout
        android:layout_width="fill_parent"
        android:layout_height="wrap_content"
        android:layout_alignParentLeft="true"
        android:layout_below="@+id/button1"
        android:layout_marginTop="41dp"
        android:orientation="vertical" >
    </LinearLayout>

</RelativeLayout>
mon code pour AlertDialog:
public static void createYesNoDialog(final Context context, String positivebuttonname,
            String negativebuttonname, String message, int messagedrawable, String headermessage,
            final DialogResponse dr) {
        final DialogResponse dialogResponse = dr;
        ContextThemeWrapper ctw = new ContextThemeWrapper(context,
                com.gp4ever.worldlogo.quiz.R.style.MyTheme);

        AlertDialog.Builder builder = new AlertDialog.Builder(ctw);
        LayoutInflater inflater = (LayoutInflater)context
                .getSystemService(Context.LAYOUT_INFLATER_SERVICE);
        View layout = inflater.inflate(com.gp4ever.worldlogo.quiz.R.layout.dialog_layout, null);
        TextView text = (TextView)layout.findViewById(com.gp4ever.worldlogo.quiz.R.id.textView1);
        Button buttonOk = (Button)layout.findViewById(com.gp4ever.worldlogo.quiz.R.id.button1);
        Button buttonMore = (Button)layout.findViewById(com.gp4ever.worldlogo.quiz.R.id.button2);
        text.setText(message);
        if (messagedrawable > 0) {
            text.setCompoundDrawablesWithIntrinsicBounds(messagedrawable, 0, 0, 0);
        } else if (messagedrawable == 0)
            text.setCompoundDrawablesWithIntrinsicBounds(0, 0, 0, 0);
        builder.setView(layout);
        builder.setCancelable(false);
        builder.setTitle(headermessage);
        builder.setIcon(android.R.drawable.ic_dialog_alert);
        final AlertDialog dialog = builder.create();

        buttonOk.setOnClickListener(new OnClickListener() {

            @Override
            public void onClick(View v) {
                // TODO Auto-generated method stub
                dialog.cancel();
            }
        });
        buttonMore.setOnClickListener(new OnClickListener() {

            @Override
            public void onClick(View v) {
                // TODO Auto-generated method stub
                dialog.cancel();
            }
        });
}
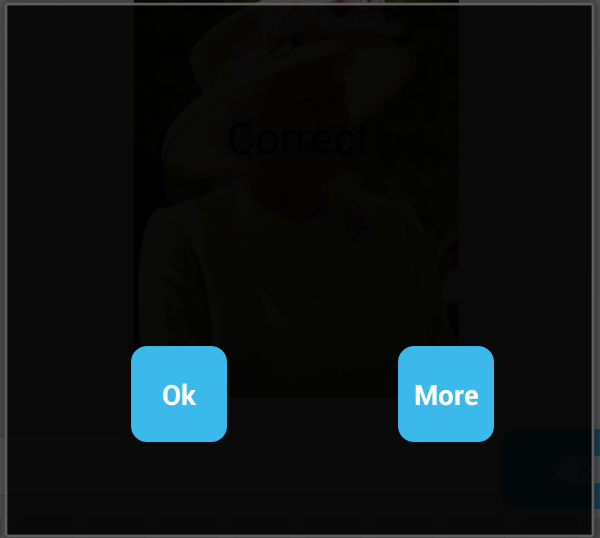
ma sortie actuelle:
je ne reçois pas tout les coins arrondis. Je peux voir que c'est différent du style habituel. Même si je change de rayon sur mon tiroir, les coins ne reflètent pas ces changements.
5 réponses
Vous pouvez le faire en utilisant le code suivant:
CustomDialog.java:
public class MainActivity extends Activity{

    private static final int ALERT_DIALOG = 1;

    @Override
    public void onCreate( Bundle savedInstanceState )
    {
        super.onCreate( savedInstanceState );
        setContentView( R.layout.main );

        ( (Button) findViewById( R.id.button1 ) )
            .setOnClickListener( new OnClickListener()
                {
                    public void onClick( View v )
                    {
                        showDialog( ALERT_DIALOG );
                    }
                }
            );
    }

    @Override
    protected Dialog onCreateDialog( int id ){
        Dialog dialog = null;
        if ( id == ALERT_DIALOG )
        {
            ContextThemeWrapper ctw = new ContextThemeWrapper( this, R.style.MyTheme );
            AlertDialog.Builder builder = new AlertDialog.Builder( ctw );
            builder.setMessage( "Hello World" )
                .setTitle( "Alert Dialog" )
                .setIcon( android.R.drawable.ic_dialog_alert )
                .setCancelable( false )
                .setPositiveButton( "Close", new DialogInterface.OnClickListener()
                    {
                        public void onClick( DialogInterface dialog, int which )
                           {
                                dialog.dismiss();
                           }
                        }
                    );
            dialog = builder.create();
        }
        if ( dialog == null )
        {
            dialog = super.onCreateDialog( id );
        }
        return dialog;
     }
 }
dialog_title.xml
<?xml version="1.0" encoding="utf-8"?>
<inset xmlns:android="http://schemas.android.com/apk/res/android" android:insetBottom="-1dp">
    <shape android:shape="rectangle">
        <solid android:color="#000000" />
        <corners android:topLeftRadius="20dp" android:topRightRadius="20dp" />
        <stroke android:color="#7F7F7F" android:width="1dp" />
    </shape>
</inset>
dialog_footer.xml
<?xml version="1.0" encoding="utf-8"?>
<shape xmlns:android="http://schemas.android.com/apk/res/android"
    android:shape="rectangle">
    <solid android:color="#7F7F7F" />
    <corners android:bottomLeftRadius="20dp" android:bottomRightRadius="20dp" />
    <stroke android:color="#7F7F7F" android:width="1dp" />
</shape>
il suffit de changer le rayon dans:
dialog_title.xml
et
dialog_footer.xml
et qui va générer le résultat suivant:
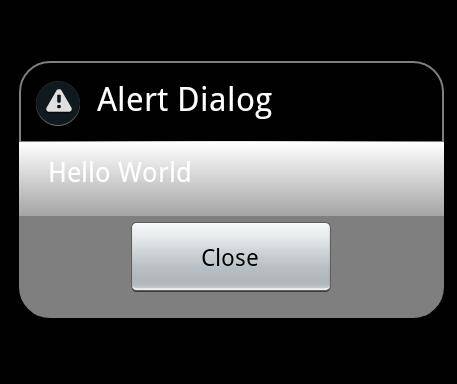
espérons que cela aidera vous.
mise à jour:
Je ne suis pas un expert mais c'est ce que j'ai trouvé. Il peut être de bonne ou de mauvaise.
Après de nombreuses tentatives, je me suis retrouvé avec ce qui suit:
1 -ContextThemeWrapper ne s'applique pas à L'API 14, Il fonctionne bien sur le pain d'épice et les versions plus anciennes, mais avec L'API > 10 il ne fonctionne pas.
2 - pour résoudre le problème ci-dessus et le faire fonctionner sur API > 10 comme demandé, je remplace ce ligne:
ContextThemeWrapper ctw = new ContextThemeWrapper( this, R.style.MyTheme );
AlertDialog.Builder builder= new AlertDialog.Builder( ctw );
avec ceci:
AlertDialog.Builder builder= new AlertDialog.Builder( this,R.style.MyTheme );
mais vous devez changer:
android:minSdkVersion="8"
android:minSdkVersion="11"
le résultat sera comme illustré dans l'image suivante sur ICS (API 14):
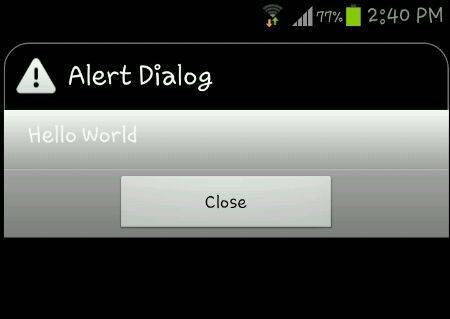
cette image provient d'un Samsung Galaxy S3 tournant ICS.
Remarque: la modification du projet initié avec l'API 14 DONC manifeste sdk sera:
<uses-sdk
  android:minSdkVersion="11"
  android:targetSdkVersion="15" />
FINAL MOT: Comme mon peu de connaissances dans le développement Android (Je ne suis pas un expert),
1-la boîte de dialogue custom alert fonctionne bien dans API < 10 mais pas > 10 avec le même code Java,
si nous voulons exécuter dans ICS avec le même effet que paru dans l'API < 10, nous devons modifier le code, donc il fonctionnera sur ICS mais ne fonctionnera dans aucune version de L'API 11.
2-même si le résultat du SCI n'est pas satisfaisant, le coin rond ne s'applique qu'au le titre mais pas le pied de page.
SECOND UPDATE: Enfin j'ai tous les coins rond,
il suffit d'appliquer paddingdialog_footer.xml comme suit:
<?xml version="1.0" encoding="utf-8"?>
<shape xmlns:android="http://schemas.android.com/apk/res/android"
android:shape="rectangle">
    <solid android:color="#7F7F7F" />
    <corners android:bottomLeftRadius="20dp" android:bottomRightRadius="20dp" />
    <stroke android:color="#7F7F7F" android:width="1dp" />
    <padding android:left="10dp" android:top="10dp" android:right="10dp"
android:bottom="10dp" />
</shape>
image de sortie:
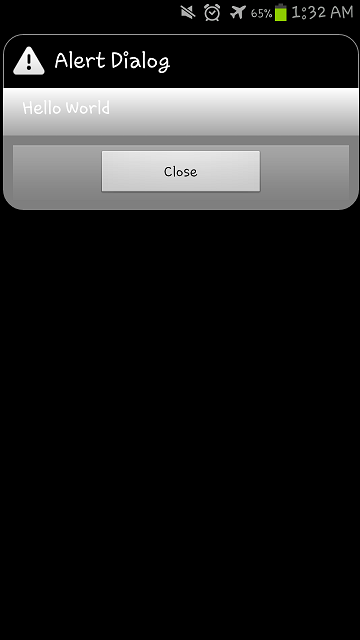
cette image est d'un Samsung Galaxy S3 tournant ICS.
Un Pas de plus de la réponse de @iDroid Explorer
ajouter cette ligne lorsque vous générez la boîte de dialogue
dialog.getWindow().setBackgroundDrawable(new ColorDrawable(android.graphics.Color.TRANSPARENT));
et cela va faire disparaître le rectangle (qui est en fait transparent) et obtenir une boîte de dialogue parfaitement arrondie.
j'ai essayé le même problème avec ci-dessous un et il fonctionne pour moi. même pour ICS aussi.
1. D'abord j'ai mis le thème à mon AlertDialog.
final Dialog  nag = new Dialog(this,android.R.style.Theme_Translucent_NoTitleBar_Fullscreen);
        nag.requestWindowFeature(Window.FEATURE_NO_TITLE);
        nag.setCancelable(true);
        nag.setContentView(R.layout.pop_exit);
        Button btnNO = (Button)nag.findViewById(R.id.btn_popup_NO);
        Button btnYES = (Button)nag.findViewById(R.id.btn_popup_YES);


        btnNO.setOnClickListener(new OnClickListener() {

            @Override
            public void onClick(View v) {

            nag.cancel();


            }
        });

        btnYES.setOnClickListener(new OnClickListener() {

            @Override
            public void onClick(View v) {

                System.exit(0);

            }
        });

        nag.show();
2. Puis ont mis en œuvre la disposition personnalisée pour la vue de dialogue
pop_exit.xml
    <?xml version="1.0" encoding="utf-8"?>
<LinearLayout xmlns:android="http://schemas.android.com/apk/res/android"
    android:orientation="vertical" android:layout_width="fill_parent"
    android:gravity="center" android:layout_height="fill_parent">

    <!-- <LinearLayout android:orientation="vertical" android:layout_marginLeft="20dp"
        android:layout_marginRight="20dp" android:background="#95000056" android:layout_width="fill_parent"
        android:layout_height="wrap_content"> -->

    <LinearLayout android:orientation="vertical"
        android:layout_marginLeft="20dp" android:layout_marginRight="20dp"
        android:background="@drawable/round" android:layout_width="fill_parent"
        android:layout_height="wrap_content">


        <TextView android:text="Exit Application"
            android:layout_width="wrap_content" android:layout_height="wrap_content"
            android:layout_gravity="center_horizontal" android:textStyle="bold"
            android:textColor="#fff" android:textSize="20dp"
            android:layout_marginTop="5dp" />


        <LinearLayout android:layout_width="fill_parent"
            android:layout_height="wrap_content" android:orientation="horizontal"
            android:layout_marginTop="5dp" android:weightSum="2"
            android:layout_marginLeft="10dp" android:layout_marginRight="10dp"
            android:gravity="center">

            <Button android:text="No" android:layout_weight="1"
                android:gravity="center" android:layout_width="wrap_content"
                android:layout_height="wrap_content" android:id="@+id/btn_popup_NO" />

            <Button android:text="Ok" android:layout_weight="1"
                android:layout_width="wrap_content" android:layout_height="wrap_content"
                android:id="@+id/btn_popup_YES" />
        </LinearLayout>


    </LinearLayout>

</LinearLayout>
3. Ajoutez maintenant la forme à l'arrière-plan du layout parent de pop_exit.xml
ronde.xml / forme/ le fichier
    <?xml version="1.0" encoding="utf-8"?>
<shape xmlns:android="http://schemas.android.com/apk/res/android">
    <solid android:color="#99000056" />
    <corners android:radius="35px" />
    <padding android:left="0dp" android:top="0dp" android:right="0dp"
        android:bottom="0dp" />
</shape>
je viens de le faire. Ça fonctionne pour vous aussi pour ICS.
j'Espère qu'il vous aidera. Si non, alors laissez-moi savoir.
Profitez De Codage...
:)
comme vous le dites, vous ne voulez pas utiliser une image 9 patch, jetez un oeil ici.
https://stackoverflow.com/a/1683195/940834
le principe est exactement le même, sauf que vous assignez l'arrière-plan à votre layout où cet exemple est à un layout linéaire.
créer xml dans un dossier dessinable avec dialog_corner.
<?xml version="1.0" encoding="utf-8"?>
 <shape xmlns:android="http://schemas.android.com/apk/res/android">
  <solid android:color="@color/main_background"/>
<corners
    android:topLeftRadius="@dimen/margin_10" android:topRightRadius="@dimen/margin_10"
    android:bottomRightRadius="@dimen/margin_10" android:bottomLeftRadius="@dimen/margin_10" />
</shape>
2.mettre à disposition
android: background= "@drawable/dialog_corner"
3.dans votre fichier java, gardez le code ci-dessous
View mView=LayoutInflater.à partir de(mContext).inflate(R. layout.layout_pob, null); alertDialog.getWindow ().setbackground drawable (new ColorDrawable (Color.TRANSPARENT));