Ajouter de l'espace/du rembourrage à un UILabel
j'ai un UILabel où je veux ajouter de l'espace en haut et en bas.
Avec la hauteur minimun dans les contraintes, je l'ai modifié en:

EDIT: Pour ce faire, j'ai utilisé:
  override func drawTextInRect(rect: CGRect) {
        var insets: UIEdgeInsets = UIEdgeInsets(top: 0.0, left: 10.0, bottom: 0.0, right: 10.0)
        super.drawTextInRect(UIEdgeInsetsInsetRect(rect, insets))

    }
mais je dois trouver une méthode différente parce que si j'écris plus de deux lignes le problème est le même:

25 réponses
si vous voulez vous en tenir à UILabel, sans la subclasser, Mundi vous a donné une solution claire.
si vous êtes disposé à éviter d'envelopper L'UILabel avec un uivi, vous pouvez utiliser UITextView pour permettre l'utilisation de UIEdgeInsets (rembourrage) ou la sous-classe UILabel pour soutenir UIEdgeInsets.
en utilisant un UITextView vous auriez seulement besoin de fournir les insets (OBJ-C):
textView.textContainerInset = UIEdgeInsetsMake(10, 0, 10, 0);
Alternative, si vous sous-classe UILabel , un exemple de cette approche serait de passer outre le drawTextInRect méthode
(OBJ-C)
- (void)drawTextInRect:(CGRect)uiLabelRect {
    UIEdgeInsets myLabelInsets = {10, 0, 10, 0};
    [super drawTextInRect:UIEdgeInsetsInsetRect(uiLabelRect, myLabelInsets)];
}
vous pouvez en outre fournir votre nouvelle sous-classe UILabel avec une variable insets pour haut, gauche, bas et droite.
un exemple de code pourrait être:
In .h (OBJ-C)
float topInset, leftInset,bottomInset, rightInset;
In .m (OBJ-C)
- (void)drawTextInRect:(CGRect)uiLabelRect {
    [super drawTextInRect:UIEdgeInsetsInsetRect(uiLabelRect, UIEdgeInsetsMake(topInset,leftInset,bottomInset,rightInset))];
}
EDIT #1:
D'après ce que j'ai vu, il semble que vous ayez à outrepasser la taille intrinsèque de l'UILabel lors de son sous-titrage.
donc vous devez outrepasser intrinsicContentSize like:
- (CGSize) intrinsicContentSize {
    CGSize intrinsicSuperViewContentSize = [super intrinsicContentSize] ;
    intrinsicSuperViewContentSize.height += topInset + bottomInset ;
    intrinsicSuperViewContentSize.width += leftInset + rightInset ;
    return intrinsicSuperViewContentSize ;
}
et ajouter la méthode suivante pour modifier votre insets, au lieu de les éditer individuellement:
- (void) setContentEdgeInsets:(UIEdgeInsets)edgeInsets {
    topInset = edgeInsets.top;
    leftInset = edgeInsets.left;
    rightInset = edgeInsets.right;
    bottomInset = edgeInsets.bottom;
    [self invalidateIntrinsicContentSize] ;
}
il mettra à jour la taille de votre UILabel pour correspondre aux inserts de bord et couvrir multiline necessity que vous avez mentionné.
Edit #2
après avoir cherché un peu, j'ai trouvé ce Gist avec un IPInsetLabel. Si aucune de ces solutions ne fonctionne, vous pouvez essayer.
Edit #3
il y avait une question similaire (double) à ce sujet.
Pour une liste complète des solutions disponibles, voir la réponse suivante: UILabel text margin
j'ai essayé avec elle sur Swift 4 , j'espère que cela fonctionne pour vous!
@IBDesignable class PaddingLabel: UILabel {

    @IBInspectable var topInset: CGFloat = 5.0
    @IBInspectable var bottomInset: CGFloat = 5.0
    @IBInspectable var leftInset: CGFloat = 7.0
    @IBInspectable var rightInset: CGFloat = 7.0

    override func drawText(in rect: CGRect) {
        let insets = UIEdgeInsets.init(top: topInset, left: leftInset, bottom: bottomInset, right: rightInset)
        super.drawText(in: UIEdgeInsetsInsetRect(rect, insets))
    }

    override var intrinsicContentSize: CGSize {
        let size = super.intrinsicContentSize
        return CGSize(width: size.width + leftInset + rightInset,
                      height: size.height + topInset + bottomInset)
    }
}
Swift 3
import UIKit

class PaddingLabel: UILabel {

   @IBInspectable var topInset: CGFloat = 5.0
   @IBInspectable var bottomInset: CGFloat = 5.0
   @IBInspectable var leftInset: CGFloat = 5.0
   @IBInspectable var rightInset: CGFloat = 5.0

   override func drawText(in rect: CGRect) {
      let insets = UIEdgeInsets(top: topInset, left: leftInset, bottom: bottomInset, right: rightInset)
      super.drawText(in: UIEdgeInsetsInsetRect(rect, insets))
   }

   override var intrinsicContentSize: CGSize {
      get {
         var contentSize = super.intrinsicContentSize
         contentSize.height += topInset + bottomInset
         contentSize.width += leftInset + rightInset
         return contentSize
      }
   }
}
Vous pouvez le faire correctement à partir de l'IB :
- remplacer le texte par "
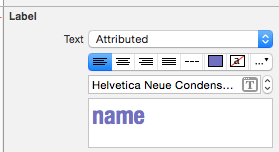
- aller à la liste déroulante "..."
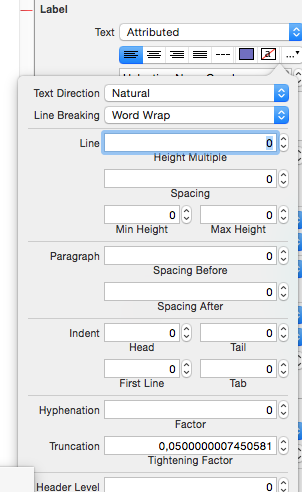
- vous pourrez voir quelques propriétés padding pour les lignes et les paragraphes de texte modifier la première ligne ou tout ce que vous voulez

- vérifier le résultat
SWIFT 3/4
solution facile à utiliser, Disponible pour tous les enfants UILabel dans le projet.
exemple:
let label = UILabel()
    label.<Do something>
    label.padding = UIEdgeInsets(top: 0, left: 16, bottom: 0, right: 0)
UILabel Extension
import UIKit

extension UILabel {
    private struct AssociatedKeys {
        static var padding = UIEdgeInsets()
    }

    public var padding: UIEdgeInsets? {
        get {
            return objc_getAssociatedObject(self, &AssociatedKeys.padding) as? UIEdgeInsets
        }
        set {
            if let newValue = newValue {
                objc_setAssociatedObject(self, &AssociatedKeys.padding, newValue as UIEdgeInsets!, objc_AssociationPolicy.OBJC_ASSOCIATION_RETAIN_NONATOMIC)
            }
        }
    }

    override open func draw(_ rect: CGRect) {
        if let insets = padding {
            self.drawText(in: UIEdgeInsetsInsetRect(rect, insets))
        } else {
            self.drawText(in: rect)
        }
    }

    override open var intrinsicContentSize: CGSize {
        guard let text = self.text else { return super.intrinsicContentSize }

        var contentSize = super.intrinsicContentSize
        var textWidth: CGFloat = frame.size.width
        var insetsHeight: CGFloat = 0.0

        if let insets = padding {
            textWidth -= insets.left + insets.right
            insetsHeight += insets.top + insets.bottom
        }

        let newSize = text.boundingRect(with: CGSize(width: textWidth, height: CGFloat.greatestFiniteMagnitude),
                                        options: NSStringDrawingOptions.usesLineFragmentOrigin,
                                        attributes: [NSAttributedStringKey.font: self.font], context: nil)

        contentSize.height = ceil(newSize.size.height) + insetsHeight

        return contentSize
    }
}
il suffit d'utiliser un UIView comme une vue d'ensemble et de définir une marge fixe à l'étiquette avec la disposition automatique.
il suffit d'utiliser un UIButton, son déjà construit. Éteignez tous les extra bouton et vous avez une étiquette que vous pouvez définir à bord instets.
let button = UIButton()
button.contentEdgeInsets = UIEdgeInsets(top: 5, left: 5, bottom: 5, right: 5)
button.setTitle("title", for: .normal)
button.tintColor = .white // this will be the textColor
button.isUserInteractionEnabled = false
Sans Story-Board:
class PaddingLabel: UILabel {

    var topInset: CGFloat
    var bottomInset: CGFloat
    var leftInset: CGFloat
    var rightInset: CGFloat

    required init(withInsets top: CGFloat, _ bottom: CGFloat,_ left: CGFloat,_ right: CGFloat) {
        self.topInset = top
        self.bottomInset = bottom
        self.leftInset = left
        self.rightInset = right
        super.init(frame: CGRect.zero)
    }

    required init?(coder aDecoder: NSCoder) {
        fatalError("init(coder:) has not been implemented")
    }

    override func drawText(in rect: CGRect) {
        let insets = UIEdgeInsets(top: topInset, left: leftInset, bottom: bottomInset, right: rightInset)
        super.drawText(in: UIEdgeInsetsInsetRect(rect, insets))
    }

    override var intrinsicContentSize: CGSize {
        get {
            var contentSize = super.intrinsicContentSize
            contentSize.height += topInset + bottomInset
            contentSize.width += leftInset + rightInset
            return contentSize
        }
    }
}
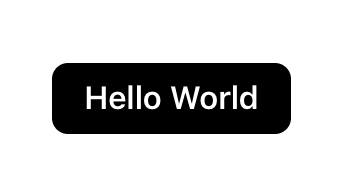
Utilisation:
let label = PaddingLabel(8, 8, 16, 16)
label.font = .boldSystemFont(ofSize: 16)
label.text = "Hello World"
label.backgroundColor = .black
label.textColor = .white
label.textAlignment = .center
label.layer.cornerRadius = 8
label.clipsToBounds = true
label.sizeToFit()

view.addSubview(label)
résultat:
Code Swift 3 Avec exemple de mise en œuvre
class UIMarginLabel: UILabel {

    var topInset:       CGFloat = 0
    var rightInset:     CGFloat = 0
    var bottomInset:    CGFloat = 0
    var leftInset:      CGFloat = 0

    override func drawText(in rect: CGRect) {
        let insets: UIEdgeInsets = UIEdgeInsets(top: self.topInset, left: self.leftInset, bottom: self.bottomInset, right: self.rightInset)
        self.setNeedsLayout()
        return super.drawText(in: UIEdgeInsetsInsetRect(rect, insets))
    }
}

class LabelVC: UIViewController {

    //Outlets
    @IBOutlet weak var labelWithMargin: UIMarginLabel!

    override func viewDidLoad() {
        super.viewDidLoad()

        //Label settings.
        labelWithMargin.leftInset = 10
        view.layoutIfNeeded()
    }
}
N'oubliez pas d'ajouter le nom de classe UIMarginLabel dans storyboard label object. Amusez-Vous Bien!
Sous-Classe UILabel. (File-New-File-CocoaTouchClass-make Subclas of UILabel).
//  sampleLabel.swift

import UIKit

class sampleLabel: UILabel {

 let topInset = CGFloat(5.0), bottomInset = CGFloat(5.0), leftInset = CGFloat(8.0), rightInset = CGFloat(8.0)

 override func drawTextInRect(rect: CGRect) {

  let insets: UIEdgeInsets = UIEdgeInsets(top: topInset, left: leftInset, bottom: bottomInset, right: rightInset)
  super.drawTextInRect(UIEdgeInsetsInsetRect(rect, insets))

 }
 override func intrinsicContentSize() -> CGSize {
  var intrinsicSuperViewContentSize = super.intrinsicContentSize()
  intrinsicSuperViewContentSize.height += topInset + bottomInset
  intrinsicSuperViewContentSize.width += leftInset + rightInset
  return intrinsicSuperViewContentSize
 }
}
Sur ViewController:
override func viewDidLoad() {
  super.viewDidLoad()

  let labelName = sampleLabel(frame: CGRectMake(0, 100, 300, 25))
  labelName.text = "Sample Label"
  labelName.backgroundColor =  UIColor.grayColor()

  labelName.textColor = UIColor.redColor()
  labelName.shadowColor = UIColor.blackColor()
  labelName.font = UIFont(name: "HelveticaNeue", size: CGFloat(22))
  self.view.addSubview(labelName)
 }
OU d'Associer personnalisé UILabel classe sur la table de montage séquentiel comme l'Étiquette de la classe.
Swift 3, solution iOS10:
open class UIInsetLabel: UILabel {

    open var insets : UIEdgeInsets = UIEdgeInsets() {
        didSet {
            super.invalidateIntrinsicContentSize()
        }
    }

    open override var intrinsicContentSize: CGSize {
        var size = super.intrinsicContentSize
        size.width += insets.left + insets.right
        size.height += insets.top + insets.bottom
        return size
    }

    override open func drawText(in rect: CGRect) {
        return super.drawText(in: UIEdgeInsetsInsetRect(rect, insets))
    }
}
j'ai édité un peu dans la réponse acceptée. Il ya un problème lorsque leftInset et rightInset Augmentation, une partie du texte sera disparu, b / c la largeur de l'étiquette sera rétrécie, mais la hauteur n'augmente pas comme la figure:
pour résoudre ce problème, vous devez recalculer la hauteur du texte comme suit:
@IBDesignable class PaddingLabel: UILabel {

  @IBInspectable var topInset: CGFloat = 20.0
  @IBInspectable var bottomInset: CGFloat = 20.0
  @IBInspectable var leftInset: CGFloat = 20.0
  @IBInspectable var rightInset: CGFloat = 20.0

  override func drawTextInRect(rect: CGRect) {
    let insets = UIEdgeInsets(top: topInset, left: leftInset, bottom: bottomInset, right: rightInset)
    super.drawTextInRect(UIEdgeInsetsInsetRect(rect, insets))
  }

  override func intrinsicContentSize() -> CGSize {
    var intrinsicSuperViewContentSize = super.intrinsicContentSize()

    let textWidth = frame.size.width - (self.leftInset + self.rightInset)
    let newSize = self.text!.boundingRectWithSize(CGSizeMake(textWidth, CGFloat.max), options: NSStringDrawingOptions.UsesLineFragmentOrigin, attributes: [NSFontAttributeName: self.font], context: nil)
    intrinsicSuperViewContentSize.height = ceil(newSize.size.height) + self.topInset + self.bottomInset

    return intrinsicSuperViewContentSize
  }
}
et résultat:

j'espère aider certaines personnes dans la même situation que moi.
Dans Swift 3
la meilleure manière simple et
class UILabelPadded: UILabel {
     override func drawText(in rect: CGRect) {
     let insets = UIEdgeInsets.init(top: 0, left: 5, bottom: 0, right: 5)
     super.drawText(in: UIEdgeInsetsInsetRect(rect, insets))
    }

}
selon Swift 4.2 (Xcode 10 beta 6)" UIEdgeInsetsInsetRect " étant déprécié. J'ai aussi déclaré la classe publique pour la rendre plus utile.
public class UIPaddedLabel: UILabel {

    @IBInspectable var topInset: CGFloat = 5.0
    @IBInspectable var bottomInset: CGFloat = 5.0
    @IBInspectable var leftInset: CGFloat = 7.0
    @IBInspectable var rightInset: CGFloat = 7.0

    public override func drawText(in rect: CGRect) {
        let insets = UIEdgeInsets.init(top: topInset, left: leftInset, bottom: bottomInset, right: rightInset)
        super.drawText(in: rect.inset(by: insets))
    }

    public override var intrinsicContentSize: CGSize {
        let size = super.intrinsicContentSize
        return CGSize(width: size.width + leftInset + rightInset,
                      height: size.height + topInset + bottomInset)
    }

    override func sizeToFit() {
        super.sizeThatFits(intrinsicContentSize)
    }
}
easy padding (Swift 3.0, réponse D'Alvin George):
  class NewLabel: UILabel {

        override func textRect(forBounds bounds: CGRect, limitedToNumberOfLines numberOfLines: Int) -> CGRect {
                return self.bounds.insetBy(dx: CGFloat(15.0), dy: CGFloat(15.0))
        }

        override func draw(_ rect: CGRect) {
                super.drawText(in: self.bounds.insetBy(dx: CGFloat(5.0), dy: CGFloat(5.0)))
        }

  }
une autre option sans sous-classe serait:
- Définir l'étiquette
text -
sizeToFit() -
puis augmenter légèrement la hauteur de l'étiquette pour simuler le rembourrage
label.text = "someText"
label.textAlignment = .center
label.sizeToFit()
label.frame = CGRect( x: label.frame.x, y: label.frame.y,width:  label.frame.width + 20,height: label.frame.height + 8)
voie Facile
import UIKit

class ViewController: UIViewController {

    override func viewDidLoad() {
        super.viewDidLoad()
        // Do any additional setup after loading the view, typically from a nib.

        self.view.addSubview(makeLabel("my title",x: 0, y: 100, w: 320, h: 30))
    }

    func makeLabel(title:String, x:CGFloat, y:CGFloat, w:CGFloat, h:CGFloat)->UILabel{
        var myLabel : UILabel = UILabel(frame: CGRectMake(x,y,w,h))
        myLabel.textAlignment = NSTextAlignment.Right

        // inser last char to right
        var titlePlus1char = "\(title)1"
        myLabel.text = titlePlus1char
        var titleSize:Int = count(titlePlus1char)-1

        myLabel.textColor = UIColor(red:1.0, green:1.0,blue:1.0,alpha:1.0)
        myLabel.backgroundColor = UIColor(red: 214/255, green: 167/255, blue: 0/255,alpha:1.0)


        // create myMutable String
        var myMutableString = NSMutableAttributedString()

        // create myMutable font
        myMutableString = NSMutableAttributedString(string: titlePlus1char, attributes: [NSFontAttributeName:UIFont(name: "HelveticaNeue", size: 20)!])

        // set margin size
        myMutableString.addAttribute(NSFontAttributeName, value: UIFont(name: "HelveticaNeue", size: 10)!, range: NSRange(location: titleSize,length: 1))

        // set last char to alpha 0
        myMutableString.addAttribute(NSForegroundColorAttributeName, value: UIColor(red:1.0, green:1.0,blue:1.0,alpha:0), range: NSRange(location: titleSize,length: 1))

        myLabel.attributedText = myMutableString

        return myLabel
    }


    override func didReceiveMemoryWarning() {
        super.didReceiveMemoryWarning()
        // Dispose of any resources that can be recreated.
    }

}
si vous voulez ajouter 2px padding autour du textdirect, faites simplement ceci:
let insets = UIEdgeInsets(top: -2, left: -2, bottom: -2, right: -2)
label.frame = UIEdgeInsetsInsetRect(textRect, insets)
utilisez ce code si vous rencontrez des problèmes d'élagage de texte lors de l'application de rembourrage.
@IBDesignable class PaddingLabel: UILabel {

 @IBInspectable var topInset: CGFloat = 5.0
 @IBInspectable var bottomInset: CGFloat = 5.0
 @IBInspectable var leftInset: CGFloat = 5.0
 @IBInspectable var rightInset: CGFloat = 5.0

 override func drawText(in rect: CGRect) {
      let insets = UIEdgeInsets.init(top: topInset, left: leftInset, bottom: bottomInset, right: rightInset)
      super.drawText(in: UIEdgeInsetsInsetRect(rect, insets))
 }

 override var intrinsicContentSize: CGSize {
      var intrinsicSuperViewContentSize = super.intrinsicContentSize
      let textWidth = frame.size.width - (self.leftInset + self.rightInset)
      let newSize = self.text!.boundingRect(with: CGSize(textWidth,    CGFloat.greatestFiniteMagnitude), options: NSStringDrawingOptions.usesLineFragmentOrigin, attributes: [NSFontAttributeName: self.font], context: nil)
      intrinsicSuperViewContentSize.height = ceil(newSize.size.height) + self.topInset + self.bottomInset
      return intrinsicSuperViewContentSize
 }
}
extension CGSize{
 init(_ width:CGFloat,_ height:CGFloat) {
      self.init(width:width,height:height)
 }
}
si vous ne voulez pas ou avez besoin d'utiliser un UILabel @IBInspectable / @IBDesignable dans Storyboat (je pense qu'ils sont rendus trop lents de toute façon), alors il est plus propre d'utiliser UIEdgeInsets au lieu de 4 CGFloats différents.
exemple de Code Swift 4.2:
class UIPaddedLabel: UILabel {
    var padding = UIEdgeInsets(top: 0, left: 0, bottom: 0, right: 0)

    public override func drawText(in rect: CGRect) {
        super.drawText(in: rect.inset(by: padding))
    }

    public override var intrinsicContentSize: CGSize {
        let size = super.intrinsicContentSize
        return CGSize(width: size.width + padding.left + padding.right,
                      height: size.height + padding.top + padding.bottom)
    }
}
Facile padding:
import UIKit

    class NewLabel: UILabel {

        override func textRectForBounds(bounds: CGRect, limitedToNumberOfLines numberOfLines: Int) -> CGRect {

            return CGRectInset(self.bounds, CGFloat(15.0), CGFloat(15.0))
        }

        override func drawRect(rect: CGRect) {

            super.drawTextInRect(CGRectInset(self.bounds,CGFloat(5.0), CGFloat(5.0)))
        }

    }
Juste utiliser la mise en page automatique:
let paddedWidth = myLabel.intrinsicContentSize.width + 2 * padding
myLabel.widthAnchor.constraint(equalToConstant: paddedWidth).isActive = true
fait.
semblable à d'autres réponses, mais avec une classe func pour configurer le rembourrage dinamically:
class UILabelExtendedView: UILabel
{
    var topInset: CGFloat = 4.0
    var bottomInset: CGFloat = 4.0
    var leftInset: CGFloat = 8.0
    var rightInset: CGFloat = 8.0

    override func drawText(in rect: CGRect)
    {
        let insets: UIEdgeInsets = UIEdgeInsets(top: topInset, left: leftInset, bottom: bottomInset, right: rightInset)
        super.drawText(in: UIEdgeInsetsInsetRect(rect, insets))
    }

    override public var intrinsicContentSize: CGSize
    {
        var contentSize = super.intrinsicContentSize
        contentSize.height += topInset + bottomInset
        contentSize.width += leftInset + rightInset
        return contentSize
    }

    func setPadding(top: CGFloat, left: CGFloat, bottom: CGFloat, right: CGFloat){
        self.topInset = top
        self.bottomInset = bottom
        self.leftInset = left
        self.rightInset = right
        let insets: UIEdgeInsets = UIEdgeInsets(top: top, left: left, bottom: bottom, right: right)
        super.drawText(in: UIEdgeInsetsInsetRect(self.frame, insets))
    }
}
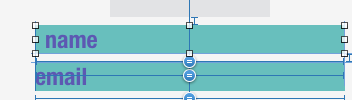
Une solution pragmatique consiste à ajouter des étiquettes vierges de la même taille et la couleur que l'étiquette principale. Réglez l'espace de tête/de queue à l'étiquette principale à zéro, alignez les centres verticaux, et faites de la largeur votre marge désirée.
Une élaboration sur Mundi de réponse.
, c'est-à-dire l'intégration d'une étiquette dans un UIView et l'application du rembourrage par la mise en page automatique. Exemple:
vue d'ensemble:
1) Créer un UIView ("panneau"), et régler son apparence.
2) Créer un UILabel et l'ajouter au panneau.
3) Ajouter des contraintes pour faire respecter le rembourrage.
4) ajoutez le panneau à votre hiérarchie de vue, puis positionnez le panneau.
détails:
1) Créer la vue de panneau.
let panel = UIView()
panel.backgroundColor = .green
panel.layer.cornerRadius = 12
2) Créer l'étiquette, l'ajouter au panneau comme un subview.
let label = UILabel()
panel.addSubview(label)
3) Ajouter des contraintes entre les bords de l'étiquette et le panneau. Cela force le panneau de garder un distance à partir de l'étiquette. c. à d." capitonnage "
Éditorial: faire tout cela en main est super fastidieux, verbeux et sujette à erreur. Je vous suggère de choisir un emballage de mise en page automatique à partir de github ou d'en écrire un vous-même
label.panel.translatesAutoresizingMaskIntoConstraints = false
label.topAnchor.constraint(equalTo: panel.topAnchor,
    constant: vPadding).isActive = true
label.bottomAnchor.constraint(equalTo: panel.bottomAnchor,
    constant: -vPadding).isActive = true
label.leadingAnchor.constraint(equalTo: panel.leadingAnchor,
    constant: hPadding).isActive = true
label.trailingAnchor.constraint(equalTo: panel.trailingAnchor,
    constant: -hPadding).isActive = true

label.textAlignment = .center
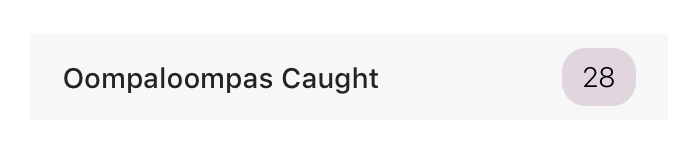
4) Ajouter le panneau à votre hiérarchie de vue et ensuite ajouter des contraintes de positionnement. par exemple, serrez le côté droit d'un tableViewCell, comme dans l'image d'exemple.
Note: VOUS seulement besoin d'ajouter des contraintes de position, pas des contraintes dimensionnelles: la mise en page automatique résoudra la mise en page basée à la fois sur le intrinsicContentSize de l'étiquette et les contraintes ajoutées plus tôt.
hostView.addSubview(panel)
panel.translatesAutoresizingMaskIntoConstraints = false
panel.trailingAnchor.constraint(equalTo: hostView.trailingAnchor,
    constant: -16).isActive = true
panel.centerYAnchor.constraint(equalTo: hostView.centerYAnchor).isActive = true