Ajouter et supprimer des vues dans Android dynamiquement?
Comment puis-je ajouter et supprimer des vues telles que TextView s de L'application Android comme sur le stock D'origine Android contacts écran où vous appuyez sur une petite icône sur le côté droit d'un champ et il ajoute ou supprime un champ qui se compose d'un TextView et un editTextView (de ce que je peux voir).
y a-t-il des exemples pour y parvenir?
9 réponses
de ce fil sur android-Développeurs, il coutures que ViewParent et ViewGroup en général ne peut pas supprimer les vues. Vous devez lancer votre parent dans un layout (si c'est un layout) pour accomplir ce que vous voulez.
par exemple:
//syntax error in View
View namebar = View.findViewById(R.id.namebar);
((ViewGroup) namebar.getParent()).removeView(namebar);
j'ai besoin de la même caractéristique décrite dans cette question. Voici ma solution et le code source: https://github.com/laoyang/android-dynamic-views . Et vous pouvez voir la démo vidéo en action ici: http://www.youtube.com/watch?v=4HeqyG6FDhQ
Mise en page
en gros, vous aurez deux fichiers de mise en page xml:
- horizontale LinearLayout ligne de vue avec un
TextEdit, unSpinneret unImageButtonà supprimer. - verticale LinearLayout conteneur affichage avec juste un Ajouter un nouveau bouton.
Contrôle
dans le code Java, vous ajoutez et supprimez les vues en ligne dans le conteneur dynamiquement, en utilisant inflate, addView, removeView, etc. Il y a un certain contrôle de la visibilité pour de meilleurs UX dans le application Android stock. Vous devez ajouter un TextWatcher pour la vue EditText dans chaque ligne: lorsque le texte est vide, vous devez cacher le bouton Ajouter nouveau et le bouton Supprimer. Dans mon code, j'ai écrit une fonction d'aide void inflateEditRow(String) pour toute la logique.
autres astuces
- Set
android:animateLayoutChanges="true"en xml pour activer l'animation - utiliser un fond transparent personnalisé avec pressé sélecteur pour rendre les boutons visuellement les mêmes que ceux de l'application Android stock.
code Source
le code Java de l'activité principale (cela explique toute la logique, mais un bon nombre de propriétés sont définies dans les fichiers de mise en page xml, veuillez vous référer à la source Github pour la solution complète):
public class MainActivity extends Activity {
// Parent view for all rows and the add button.
private LinearLayout mContainerView;
// The "Add new" button
private Button mAddButton;
// There always should be only one empty row, other empty rows will
// be removed.
private View mExclusiveEmptyView;

@Override
public void onCreate(Bundle savedInstanceState) {
    super.onCreate(savedInstanceState);
    setContentView(R.layout.row_container);
    mContainerView = (LinearLayout) findViewById(R.id.parentView);
    mAddButton = (Button) findViewById(R.id.btnAddNewItem);

    // Add some examples
    inflateEditRow("Xiaochao");
    inflateEditRow("Yang");
}

// onClick handler for the "Add new" button;
public void onAddNewClicked(View v) {
    // Inflate a new row and hide the button self.
    inflateEditRow(null);
    v.setVisibility(View.GONE);
}

// onClick handler for the "X" button of each row
public void onDeleteClicked(View v) {
    // remove the row by calling the getParent on button
    mContainerView.removeView((View) v.getParent());
}

// Helper for inflating a row
private void inflateEditRow(String name) {
    LayoutInflater inflater = (LayoutInflater) getSystemService(Context.LAYOUT_INFLATER_SERVICE);
    final View rowView = inflater.inflate(R.layout.row, null);
    final ImageButton deleteButton = (ImageButton) rowView
            .findViewById(R.id.buttonDelete);
    final EditText editText = (EditText) rowView
            .findViewById(R.id.editText);
    if (name != null && !name.isEmpty()) {
        editText.setText(name);
    } else {
        mExclusiveEmptyView = rowView;
        deleteButton.setVisibility(View.INVISIBLE);
    }

    // A TextWatcher to control the visibility of the "Add new" button and
    // handle the exclusive empty view.
    editText.addTextChangedListener(new TextWatcher() {

        @Override
        public void afterTextChanged(Editable s) {

            // Some visibility logic control here:
            if (s.toString().isEmpty()) {
                mAddButton.setVisibility(View.GONE);
                deleteButton.setVisibility(View.INVISIBLE);
                if (mExclusiveEmptyView != null
                        && mExclusiveEmptyView != rowView) {
                    mContainerView.removeView(mExclusiveEmptyView);
                }
                mExclusiveEmptyView = rowView;
            } else {
                if (mExclusiveEmptyView == rowView) {
                    mExclusiveEmptyView = null;
                }
                mAddButton.setVisibility(View.VISIBLE);
                deleteButton.setVisibility(View.VISIBLE);
            }
        }

        @Override
        public void beforeTextChanged(CharSequence s, int start, int count,
                int after) {
        }

        @Override
        public void onTextChanged(CharSequence s, int start, int before,
                int count) {
        }
    });

    // Inflate at the end of all rows but before the "Add new" button
    mContainerView.addView(rowView, mContainerView.getChildCount() - 1);
}
C'est ma voie générale:
View namebar = view.findViewById(R.id.namebar);
ViewGroup parent = (ViewGroup) namebar.getParent();
if (parent != null) {
    parent.removeView(namebar);
}
Salut Vous pouvez essayer de cette façon en ajoutant la disposition relative et que d'ajouter textview dans cela.
LinearLayout.LayoutParams lp = new LinearLayout.LayoutParams(
            (LayoutParams.WRAP_CONTENT), (LayoutParams.WRAP_CONTENT));

RelativeLayout relative = new RelativeLayout(getApplicationContext());
relative.setLayoutParams(lp);

TextView tv = new TextView(getApplicationContext());
tv.setLayoutParams(lp);

EditText edittv = new EditText(getApplicationContext());
edittv.setLayoutParams(lp);

relative.addView(tv);
relative.addView(edittv);
ViewGroup fournit L'API pour la gestion des vues des enfants pendant l'exécution, permettant d'ajouter ou de supprimer des vues.
quelques autres liens sur le sujet:
Android, ajouter une nouvelle vue sans Layout XML
http://developer.android.com/reference/android/view/View.html
http://developer.android.com/reference/android/widget/LinearLayout.html
pour ajouter le bouton
LinearLayout dynamicview = (LinearLayout)findViewById(R.id.buttonlayout);
LinearLayout.LayoutParams  lprams = new LinearLayout.LayoutParams(  LinearLayout.LayoutParams.WRAP_CONTENT,
LinearLayout.LayoutParams.WRAP_CONTENT);

Button btn = new Button(this);
btn.setId(count);
final int id_ = btn.getId();
btn.setText("Capture Image" + id_);
btn.setTextColor(Color.WHITE);
btn.setBackgroundColor(Color.rgb(70, 80, 90));
dynamicview.addView(btn, lprams);
btn = ((Button) findViewById(id_));
btn.setOnClickListener(this);
pour enlever le bouton
ViewGroup layout = (ViewGroup) findViewById(R.id.buttonlayout);
View command = layout.findViewById(count);
layout.removeView(command);
il suffit D'utiliser myView.setVisibility(View.GONE); pour l'enlever complètement.
Mais si vous voulez réserver l'espace occupé à l'intérieur de son parent utiliser myView.setVisibility(View.INVISIBLE);
écrivez D'abord la classe D'activité. La classe suivante a un nom de catégorie et un petit bouton add. Lorsque vous appuyez sur le bouton ajouter (+) il ajoute une nouvelle ligne qui contient un EditText et un ImageButton qui effectue la suppression de la ligne.
package com.blmsr.manager;

import android.app.Activity;
import android.app.ListActivity;
import android.content.Intent;
import android.graphics.Color;
import android.graphics.drawable.Drawable;
import android.os.Bundle;
import android.util.Log;
import android.view.Menu;
import android.view.MenuItem;
import android.view.View;
import android.widget.Button;
import android.widget.EditText;
import android.widget.ImageButton;
import android.widget.LinearLayout;
import android.widget.ScrollView;
import android.widget.TableLayout;
import android.widget.TableRow;
import android.widget.TextView;

import com.blmsr.manager.R;
import com.blmsr.manager.dao.CategoryService;
import com.blmsr.manager.models.CategoryModel;
import com.blmsr.manager.service.DatabaseService;

public class CategoryEditorActivity extends Activity {
    private final String CLASSNAME = "CategoryEditorActivity";
    LinearLayout itsLinearLayout;
    @Override
    protected void onCreate(Bundle savedInstanceState) {
        super.onCreate(savedInstanceState);
        setContentView(R.layout.activity_category_editor);

        itsLinearLayout = (LinearLayout)findViewById(R.id.linearLayout2);
    }
@Override
public boolean onCreateOptionsMenu(Menu menu) {
    // Inflate the menu; this adds items to the action bar if it is present.
    getMenuInflater().inflate(R.menu.menu_category_editor, menu);
    return true;
}

@Override
public boolean onOptionsItemSelected(MenuItem item) {
    // Handle action bar item clicks here. The action bar will
    // automatically handle clicks on the Home/Up button, so long
    // as you specify a parent activity in AndroidManifest.xml.
    switch (item.getItemId()) {
        case R.id.action_delete:
            deleteCategory();
            return true;
        case R.id.action_save:
            saveCategory();
            return true;
        case R.id.action_settings:
            return true;
        default:
            return super.onOptionsItemSelected(item);
    }
}

/**
 * Adds a new row which contains the EditText and a delete button.
 * @param theView
 */
public void addField(View theView)
{
    itsLinearLayout.addView(tableLayout(), itsLinearLayout.getChildCount()-1);
}

// Using a TableLayout as it provides you with a neat ordering structure

private TableLayout tableLayout() {
    TableLayout tableLayout = new TableLayout(this);
    tableLayout.addView(createRowView());
    return tableLayout;
}

private TableRow createRowView() {
    TableRow tableRow = new TableRow(this);
    tableRow.setPadding(0, 10, 0, 0);

    EditText editText = new EditText(this);
    editText.setWidth(600);
    editText.requestFocus();

    tableRow.addView(editText);
    ImageButton btnGreen = new ImageButton(this);
    btnGreen.setImageResource(R.drawable.ic_delete);
    btnGreen.setBackgroundColor(Color.TRANSPARENT);
    btnGreen.setOnClickListener(anImageButtonListener);
    tableRow.addView(btnGreen);

    return tableRow;
}

/**
 * Delete the row when clicked on the remove button.
 */
private View.OnClickListener anImageButtonListener = new View.OnClickListener() {
    @Override
    public void onClick(View v) {
        TableRow anTableRow = (TableRow)v.getParent();
        TableLayout anTable = (TableLayout) anTableRow.getParent();
        itsLinearLayout.removeView(anTable);

    }
};

/**
 * Save the values to db.
 */
private void saveCategory()
{
    CategoryService aCategoryService = DatabaseService.getInstance(this).getCategoryService();
    aCategoryService.save(getModel());
    Log.d(CLASSNAME, "successfully saved model");

    Intent anIntent = new Intent(this, CategoriesListActivity.class);
    startActivity(anIntent);

}

/**
 * performs the delete.
 */
private void deleteCategory()
{

}

/**
 * Returns the model object. It gets the values from the EditText views and sets to the model.
 * @return
 */
private CategoryModel getModel()
{
    CategoryModel aCategoryModel = new CategoryModel();
    try
    {
        EditText anCategoryNameEditText = (EditText) findViewById(R.id.categoryNameEditText);
        aCategoryModel.setCategoryName(anCategoryNameEditText.getText().toString());
        for(int i= 0; i< itsLinearLayout.getChildCount(); i++)
        {
            View aTableLayOutView = itsLinearLayout.getChildAt(i);
            if(aTableLayOutView instanceof  TableLayout)
            {
                for(int j= 0; j< ((TableLayout) aTableLayOutView).getChildCount() ; j++ );
                {
                    TableRow anTableRow = (TableRow) ((TableLayout) aTableLayOutView).getChildAt(i);
                    EditText anEditText =  (EditText) anTableRow.getChildAt(0);
                    if(StringUtils.isNullOrEmpty(anEditText.getText().toString()))
                    {
                        // show a validation message.
                        //return aCategoryModel;
                    }

                    setValuesToModel(aCategoryModel, i + 1, anEditText.getText().toString());
                }
            }
        }
    }
    catch (Exception anException)
    {
        Log.d(CLASSNAME, "Exception occured"+anException);
    }

    return aCategoryModel;
}

/**
 * Sets the value to model.
 * @param theModel
 * @param theFieldIndexNumber
 * @param theFieldValue
 */
private void setValuesToModel(CategoryModel theModel, int theFieldIndexNumber, String theFieldValue)
{
    switch (theFieldIndexNumber)
    {
        case 1 :
            theModel.setField1(theFieldValue);
            break;
        case 2 :
            theModel.setField2(theFieldValue);
            break;
        case 3 :
            theModel.setField3(theFieldValue);
            break;
        case 4 :
            theModel.setField4(theFieldValue);
            break;
        case 5 :
            theModel.setField5(theFieldValue);
            break;
        case 6 :
            theModel.setField6(theFieldValue);
            break;
        case 7 :
            theModel.setField7(theFieldValue);
            break;
        case 8 :
            theModel.setField8(theFieldValue);
            break;
        case 9 :
            theModel.setField9(theFieldValue);
            break;
        case 10 :
            theModel.setField10(theFieldValue);
            break;
        case 11 :
            theModel.setField11(theFieldValue);
            break;
        case 12 :
            theModel.setField12(theFieldValue);
            break;
        case 13 :
            theModel.setField13(theFieldValue);
            break;
        case 14 :
            theModel.setField14(theFieldValue);
            break;
        case 15 :
            theModel.setField15(theFieldValue);
            break;
    }
}
}
2. Écrivez le format xml comme indiqué ci-dessous.
<LinearLayout xmlns:android="http://schemas.android.com/apk/res/android"
xmlns:tools="http://schemas.android.com/tools"
android:layout_width="fill_parent"
android:layout_height="fill_parent"
android:orientation="vertical"
android:background="#006699"
android:paddingBottom="@dimen/activity_vertical_margin"
android:paddingLeft="@dimen/activity_horizontal_margin"
android:paddingRight="@dimen/activity_horizontal_margin"
android:paddingTop="@dimen/activity_vertical_margin"
tools:context="com.blmsr.manager.CategoryEditorActivity">

<LinearLayout
    android:id="@+id/addCategiryNameItem"
    android:layout_width="wrap_content"
    android:layout_height="wrap_content"
    android:orientation="horizontal">

    <TextView
        android:id="@+id/categoryNameTextView"
        android:layout_width="200dp"
        android:layout_height="wrap_content"
        android:text="@string/lbl_category_name"
        android:textStyle="bold"
        />

    <TextView
        android:id="@+id/categoryIconName"
        android:layout_width="100dp"
        android:layout_height="wrap_content"
        android:text="@string/lbl_category_icon_name"
        android:textStyle="bold"
        />

</LinearLayout>

<LinearLayout
    android:id="@+id/linearLayout1"
    android:layout_width="match_parent"
    android:layout_height="wrap_content"
    android:orientation="vertical">

    <EditText
        android:id="@+id/categoryNameEditText"
        android:layout_width="200dp"
        android:layout_height="wrap_content"
        android:hint="@string/lbl_category_name"
        android:inputType="textAutoComplete" />


    <ScrollView
        android:id="@+id/scrollView1"
        android:layout_width="match_parent"
        android:layout_height="wrap_content">

        <LinearLayout
            android:id="@+id/linearLayout2"
            android:layout_width="match_parent"
            android:layout_height="wrap_content"
            android:orientation="vertical">

        <LinearLayout
            android:id="@+id/linearLayout3"
            android:layout_width="match_parent"
            android:layout_height="wrap_content"
            android:orientation="horizontal">


            </LinearLayout>

            <ImageButton
                android:id="@+id/addField"
                android:layout_width="50dp"
                android:layout_height="50dp"
                android:layout_below="@+id/addCategoryLayout"
                android:src="@drawable/ic_input_add"
                android:onClick="addField"
                />
        </LinearLayout>
    </ScrollView>
</LinearLayout>
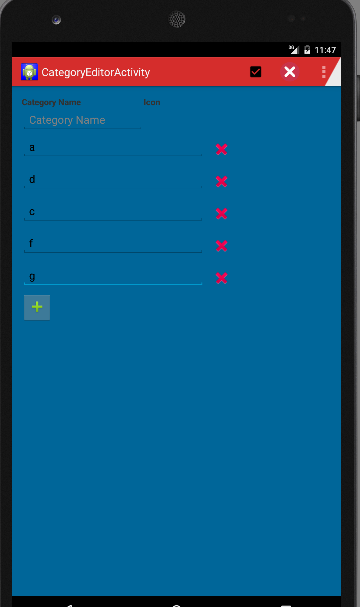
- une fois que vous avez terminé votre vue sera comme indiqué ci-dessous
//MainActivity :


 package com.edittext.demo;
    import android.app.Activity;
    import android.os.Bundle;
    import android.text.TextUtils;
    import android.view.Menu;
    import android.view.View;
    import android.view.View.OnClickListener;
    import android.widget.Button;
    import android.widget.EditText;
    import android.widget.LinearLayout;
    import android.widget.Toast;

    public class MainActivity extends Activity {

        private EditText edtText;
        private LinearLayout LinearMain;
        private Button btnAdd, btnClear;
        private int no;

        @Override
        protected void onCreate(Bundle savedInstanceState) {
            super.onCreate(savedInstanceState);
            setContentView(R.layout.activity_main);

            edtText = (EditText)findViewById(R.id.edtMain);
            btnAdd = (Button)findViewById(R.id.btnAdd);
            btnClear = (Button)findViewById(R.id.btnClear);
            LinearMain = (LinearLayout)findViewById(R.id.LinearMain);

            btnAdd.setOnClickListener(new OnClickListener() {
                @Override
                public void onClick(View v) {
                    if (!TextUtils.isEmpty(edtText.getText().toString().trim())) {
                        no = Integer.parseInt(edtText.getText().toString());
                        CreateEdittext();
                    }else {
                        Toast.makeText(MainActivity.this, "Please entere value", Toast.LENGTH_SHORT).show();
                    }
                }
            });

            btnClear.setOnClickListener(new OnClickListener() {
                @Override
                public void onClick(View v) {
                    LinearMain.removeAllViews();
                    edtText.setText("");
                }
            });

            /*edtText.addTextChangedListener(new TextWatcher() {
                @Override
                public void onTextChanged(CharSequence s, int start, int before, int count) {

                }
                @Override
                public void beforeTextChanged(CharSequence s, int start, int count,int after) {
                }
                @Override
                public void afterTextChanged(Editable s) {
                }
            });*/

        }

        protected void CreateEdittext() {
            final EditText[] text = new EditText[no];
            final Button[] add = new Button[no];
            final LinearLayout[] LinearChild = new LinearLayout[no];
            LinearMain.removeAllViews();

            for (int i = 0; i < no; i++){

                View view = getLayoutInflater().inflate(R.layout.edit_text, LinearMain,false);
                text[i] = (EditText)view.findViewById(R.id.edtText);
                text[i].setId(i);
                text[i].setTag(""+i);

                add[i] = (Button)view.findViewById(R.id.btnAdd);
                add[i].setId(i);
                add[i].setTag(""+i);

                LinearChild[i] = (LinearLayout)view.findViewById(R.id.child_linear);
                LinearChild[i].setId(i);
                LinearChild[i].setTag(""+i);

                LinearMain.addView(view);

                add[i].setOnClickListener(new View.OnClickListener() {
                    public void onClick(View v) {
                        //Toast.makeText(MainActivity.this, "add text "+v.getTag(), Toast.LENGTH_SHORT).show();
                        int a = Integer.parseInt(text[v.getId()].getText().toString());
                        LinearChild[v.getId()].removeAllViews();
                        for (int k = 0; k < a; k++){

                            EditText text = (EditText) new EditText(MainActivity.this);
                            text.setId(k);
                            text.setTag(""+k);

                            LinearChild[v.getId()].addView(text);
                        }
                    }
                });
            }
        }

        @Override
        public boolean onCreateOptionsMenu(Menu menu) {
            // Inflate the menu; this adds items to the action bar if it is present.
            getMenuInflater().inflate(R.menu.main, menu);
            return true;
        }

    }
/ / Ajouter maintenant xml main
<LinearLayout xmlns:android="http://schemas.android.com/apk/res/android"
xmlns:tools="http://schemas.android.com/tools"
android:layout_width="match_parent"
android:layout_height="match_parent"
android:orientation="vertical"
tools:context=".MainActivity" >

<LinearLayout
    android:layout_width="match_parent"
    android:layout_height="wrap_content"
    android:layout_marginTop="10dp"
    android:orientation="horizontal" >

    <EditText
        android:id="@+id/edtMain"
        android:layout_width="0dp"
        android:layout_height="wrap_content"
        android:layout_marginLeft="20dp"
        android:layout_weight="1"
        android:ems="10"
        android:hint="Enter value" >

        <requestFocus />
    </EditText>

    <Button
        android:id="@+id/btnAdd"
        android:layout_width="wrap_content"
        android:layout_height="wrap_content"
        android:layout_marginLeft="10dp"
        android:text="Add" />

    <Button
        android:id="@+id/btnClear"
        android:layout_width="wrap_content"
        android:layout_height="wrap_content"
        android:layout_marginLeft="5dp"
        android:layout_marginRight="5dp"
        android:text="Clear" />
</LinearLayout>

<ScrollView
    android:layout_width="match_parent"
    android:layout_height="match_parent"
    android:layout_margin="10dp" >

    <LinearLayout
        android:id="@+id/LinearMain"
        android:layout_width="match_parent"
        android:layout_height="match_parent"
        android:orientation="vertical" >
    </LinearLayout>
</ScrollView>
/ / ajouter maintenant le fichier de vue xml..
<LinearLayout xmlns:android="http://schemas.android.com/apk/res/android"
android:layout_width="match_parent"
android:layout_height="wrap_content"
android:orientation="vertical" >

<LinearLayout
    android:layout_width="match_parent"
    android:layout_height="wrap_content"
    android:layout_marginTop="10dp"
    android:orientation="horizontal" >

    <EditText
        android:id="@+id/edtText"
        android:layout_width="wrap_content"
        android:layout_height="wrap_content"
        android:layout_marginLeft="20dp"
        android:ems="10" />

    <Button
        android:id="@+id/btnAdd"
        android:layout_width="wrap_content"
        android:layout_height="wrap_content"
        android:layout_marginLeft="10dp"
        android:text="Add" />
</LinearLayout>

<LinearLayout
    android:id="@+id/child_linear"
    android:layout_width="match_parent"
    android:layout_height="wrap_content"
    android:layout_marginLeft="30dp"
    android:layout_marginRight="10dp"
    android:layout_marginTop="5dp"
    android:orientation="vertical" >
</LinearLayout>